
Crashes aren’t a question of if with your DJI FPV drone, but when. The good news is DJI designed this high-speed machine with modular components so nearly every part can be replaced after impact. Whether you’re staring at a snapped arm after your first close call or planning preventative measures before your next flight session, understanding your dji fpv drone repair options saves both time and money. This guide cuts through the confusion by comparing actual DIY repair costs against surprisingly affordable official service options—revealing when professional help actually costs less than your own time and tools.
Most pilots assume DIY repair is always cheaper, but real-world data shows DJI’s service center often beats self-repair on value. After analyzing dozens of user reports and disassembly procedures, we’ve discovered that single broken arms cost only $72 through DJI service versus $25 in parts plus 2-4 hours of your time. The DJI FPV drone repair process requires precision work with over 60 tiny screws, micro-connectors that break if mishandled, and soldering skills for motor replacements—making professional service the smarter choice for time-pressed pilots. Keep reading to discover exactly when to grab your screwdriver and when to simply ship your drone to DJI.
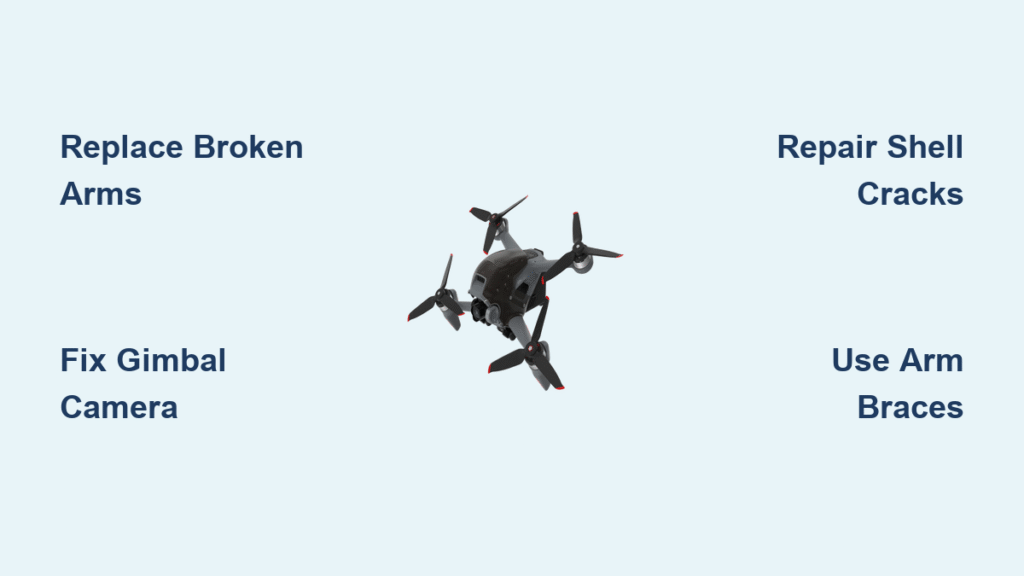
DJI FPV Drone’s Most Common Crash Damage Patterns
Your DJI FPV drone resembles a “flying wine glass”—aerodynamically efficient but structurally vulnerable. Understanding these typical failure points helps you prepare parts and decide whether to attempt repairs yourself or send it to DJI’s surprisingly affordable service center.
Why Front Arms Break First in Every DJI FPV Crash
Front arms absorb most impact energy during forward crashes, making them the #1 failure point. Unlike quadcopters with symmetrical designs, the DJI FPV’s forward-leaning structure concentrates force on the front arms during collisions. Single arm fractures cost $45-$72 through DJI service but require desoldering three motor leads for DIY replacement—adding significant complexity for beginners. If you notice hairline cracks near the motor base, replace the arm immediately before the next flight to prevent catastrophic mid-air failure.
Gimbal Camera Vulnerability During High-Speed Forward Impacts
The exposed gimbal assembly suffers damage in crashes involving forward momentum. Unlike traditional drones with recessed cameras, the DJI FPV’s gimbal protrudes significantly, making it susceptible to impacts during aggressive flying. Camera module replacement runs $150-$200 through service centers but requires removing the top shell and carefully disconnecting fragile micro-coax cables during DIY repair. Critical warning: Never pull the micro-coax cable itself—always lift the connector body straight up to avoid permanent damage to the tiny coaxial connection.
Shell Cracks That Still Allow Flight Operations
Top shell cracks rarely affect flight performance but compromise weather resistance and structural integrity. Many pilots continue flying with cracked shells until moisture or subsequent impacts cause secondary damage. Unlike arm or gimbal issues, shell damage won’t prevent takeoff but creates long-term reliability problems. DIY shell replacement takes 45 minutes with moderate skill, while DJI service averages $100. Since shell damage doesn’t ground your drone immediately, this repair perfectly demonstrates when waiting for professional service makes sense—especially if you’re not equipped with precision tools.
Essential $40 Tool Kit for DJI FPV Repairs
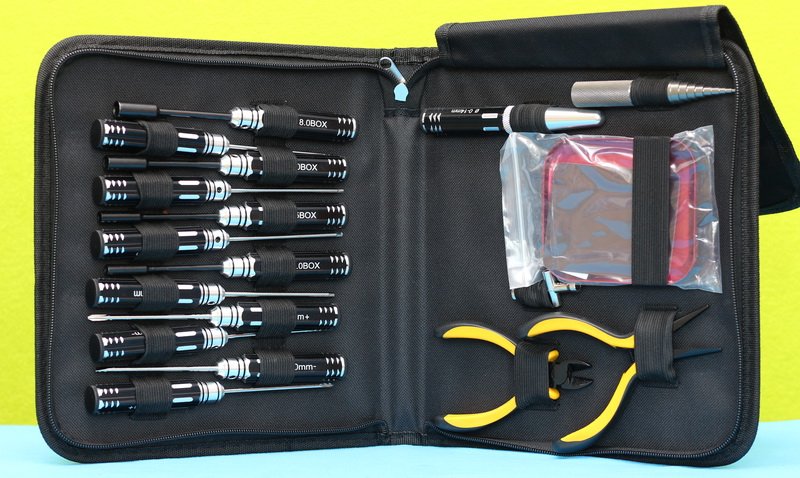
Before attempting any dji fpv drone repair, verify you have these critical tools. The drone contains over 60 screws of varying sizes and requires soldering skills for motor replacements—standard hobby tools often fail on DJI’s precision components.
Why Standard Screwdrivers Fail on DJI FPV Screws
DJI uses proprietary hex head screws (primarily 1.5mm with some 2.5mm) that easily strip with improper tools. Your standard screwdriver set lacks the precision needed for these microscopic fasteners. Invest in a dedicated hex driver set with magnetic tips—specifically 1.5mm and 2.5mm bits—to prevent the “stripped screw nightmare” that turns simple repairs into expensive service center visits. For battery bay arm screws, you’ll need a long Allen key with 6-inch reach to access the recessed mounting points.
The Critical Importance of a 60W Soldering Station
Each motor connects via hard-soldered leads to the ESC board, making a quality soldering station non-negotiable for arm or motor replacements. Standard 30W irons lack sufficient heat to cleanly desolder connections without damaging the delicate circuit board. A 60W minimum station with temperature control ensures quick, clean solder joints that won’t fail during flight. Pro tip: Take photos of wire colors and positions before desoldering—motor phase order determines rotation direction, and reversing connections causes dangerous instability.
Creating Your DJI FPV Screw Map with Blu-tac
Never underestimate screw organization during dji fpv drone repair. Create a foolproof system using Blu-tac on an A4 sheet: press each screw into the putty as you remove it, labeling the location with a fine-tip marker. This prevents the “where does this screw go?” panic during reassembly that leads to stripped threads or structural weaknesses. The DJI FPV uses over 60 screws of varying lengths—using the wrong screw in a critical location can compromise flight safety.
Step-by-Step DJI FPV Top Shell Replacement Guide
Replacing the top shell ranks among the most common dji fpv drone repair tasks after minor crashes. This moderate-difficulty procedure takes 45 minutes for first-timers but becomes routine with practice.
Removing the 8 Critical Screws Without Stripping
Start by extracting four long perimeter screws around the gimbal mount, followed by four shorter screws from each side panel. Use a 1.5mm hex driver with moderate downward pressure—DJI applies factory sealant “gum” that resists initial turning. If you encounter resistance, clear dried gum from screw heads using a dental pick before applying force. Critical mistake to avoid: Using excessive torque strips these soft aluminum threads, requiring costly thread repair kits or complete component replacement.
Disconnecting the Gimbal Cable Without Damage
After removing all screws, lift the front of the top shell first, then slide it backward to clear rear clips. Before fully removing the shell, disconnect the gimbal cable—a delicate micro-coax connector that breaks if mishandled. Grip the connector body firmly with ESD-safe tweezers and lift straight up—never pull the cable itself. This single connection carries both power and video signals, so damaging it turns a simple shell replacement into a $200 camera module repair.
Reassembly Mistakes That Cause Future Crashes
During reassembly, ensure the shell clicks completely into all snap-fit locations before tightening screws. Many pilots rush this step, leaving gaps that compromise structural integrity. Tighten screws in a star pattern rather than sequentially to distribute pressure evenly. After reassembly, verify the gimbal moves freely through its full range—restricted movement indicates pinched cables that cause erratic flight behavior. Always calibrate the gimbal through the DJI Fly app after any top shell work to prevent drifting during flight.
Fixing Broken DJI FPV Arms: DIY vs Service Cost Analysis

Arm fractures represent the most frequent dji fpv drone repair scenario. Understanding the real costs helps you decide between DIY replacement and professional service.
Desoldering Motor Leads Without Damaging the ESC
Each arm contains three motor leads soldered directly to the ESC board—a high-current design that prevents signal interference but complicates repairs. To replace a broken arm, you must desolder these connections using proper technique: heat each joint just long enough to remove the wire (3-5 seconds), then clean the pad with solder wick before installing the new arm. Rushing this process overheats the ESC board, while lingering too long damages the delicate circuitry. If you lack soldering experience, this single step makes professional service the wiser choice.
DJI’s $72 Arm Repair That Beats DIY for Most Pilots
Real-world pricing data reveals why professional service often wins: DJI charges just $72 for single arm replacement versus $25 in parts plus 2-4 hours of your time. When you factor in tool costs (minimum $40 for proper equipment), the DIY approach only becomes cost-effective if you already own precision tools and plan multiple repairs. For single-drones owners facing time constraints, shipping your DJI FPV drone for professional repair typically delivers better value—especially considering DJI includes warranty coverage on replaced parts.
How to Identify Left vs Right Arms for Proper Installation
DJI arms are side-specific (marked L/R), and installing them backward causes catastrophic flight instability. Before removing your broken arm, note its orientation relative to the drone body. Aftermarket arm braces also feature left/right differentiation—installing them backward compromises structural reinforcement. During reassembly, verify the motor wire routing matches the original configuration, as reversed wiring creates counter-rotating propellers that make controlled flight impossible.
Must-Have DJI FPV Crash Prevention Upgrades
Smart pilots invest in protection before their first crash. These affordable upgrades significantly reduce dji fpv drone repair frequency without compromising performance.
$15 Arm Braces That Prevent 80% of Major Repairs
The single most effective crash prevention upgrade, aluminum arm braces distribute impact forces across the arm structure. These $15 accessories prevent the fractures that plague stock arms during minor collisions. Install them by inserting from the underside of each arm, aligning the buckle with the motor-base screw hole, then securing with existing motor screws. While adding just 15 grams of weight, they withstand impacts that would otherwise require $72 in professional repairs.
Propeller Guards for Indoor Flying Without Speed Loss
Quick-snap propeller guards protect both props and arms during indoor flying or proximity work. Unlike bulky traditional guards, DJI’s design adds minimal weight and installs in under two minutes. Left-side guards snap over LF and LB motor bases, with right-side guards covering RF and RB—locking securely with integrated buckles. These guards prevent the most common beginner crashes during takeoff and landing while maintaining 95% of your drone’s performance.
Landing Gear Extensions for Uneven Terrain Operations
Taller landing gear prevents prop strikes on uneven terrain and provides crucial clearance for grass takeoffs. Standard landing gear causes frequent tip-overs on rough surfaces, leading to gimbal and shell damage. Extended landing gear kits install with just two screws per side and include reinforced LED panels. Pilots flying in parks or fields report 70% fewer landing-related repairs after this simple $20 upgrade.
When to Abandon DIY and Ship to DJI Service
Knowing when to call professionals saves you from turning minor damage into catastrophic failure during dji fpv drone repair attempts.
3 Signs Your DJI FPV Needs Professional Repair
Stop immediately if you notice: 1) Water exposure (even minor moisture requires complete disassembly and drying), 2) Cracked circuit boards visible beneath components, or 3) Multiple damage points requiring full disassembly. These conditions demand specialized tools and expertise that exceed typical DIY capabilities. Shipping your drone to DJI ensures proper diagnostics and repair by technicians with factory training and equipment.
How Water Damage Changes the Repair Equation
Water exposure—even from light rain—requires complete disassembly, component drying, and corrosion prevention that most pilots can’t properly execute. DJI service centers use specialized cleaning solutions and vacuum chambers to remove moisture from microscopic components. Attempting DIY water damage repair often leads to “zombie drones” that appear functional but fail days later due to hidden corrosion. For any moisture exposure, professional service represents the only reliable dji fpv drone repair option.
The Cost Threshold Where Service Beats DIY Parts
When repair costs exceed 40% of your drone’s value, professional service typically provides better value than DIY. For the DJI FPV, this threshold sits around $150—meaning multiple component failures (arm + motor + shell) become more economical to ship to DJI. Their service centers purchase parts at wholesale rates and include labor in flat fees, while DIY repairs require full retail parts costs plus your valuable time. Most pilots discover that beyond basic landing gear or shell replacements, professional service delivers superior cost efficiency.
Final Recommendations for DJI FPV Drone Owners
For first-time FPV pilots, budget $200 annually for repairs and preventative upgrades. This covers typical crash damage plus essential modifications like arm braces. The DJI FPV’s modular design rewards both DIY enthusiasts and service-center users—start with official repairs to understand damage patterns, then gradually tackle DIY projects as you build skills. Whether you choose to wrench yourself or ship to DJI, proper planning turns inevitable crashes into minor setbacks rather than drone-killing disasters. Always prioritize arm braces and prop guards as your first upgrades—they’ll pay for themselves after just one prevented crash.


