
Nothing ruins the thrill of RC driving faster than a vehicle that bounces uncontrollably over bumps or loses traction mid-corner. When you learn how to make RC car suspension properly, you transform your vehicle from a frustrating toy into a precision machine that handles exactly how you want. The right suspension setup gives you confidence when hitting jumps, maintains tire contact on rough terrain, and extracts maximum speed from your RC car. Whether you’re building from scratch or tuning an existing setup, mastering suspension principles will dramatically improve your driving experience and extend your vehicle’s lifespan by preventing hard impacts from damaging your chassis.
Most beginners underestimate how much suspension affects overall performance—it’s not just about making your RC car look cool with extra travel. A properly tuned suspension system directly translates to faster lap times, better control during jumps, and tires that wear evenly instead of shredding after one session. This guide gives you the exact steps to build and tune suspension that responds precisely to your inputs, with specific adjustments for different driving conditions. By the end, you’ll understand exactly how to make RC car suspension work for your specific vehicle and driving style.
Select the Right Suspension Design for Your RC Vehicle
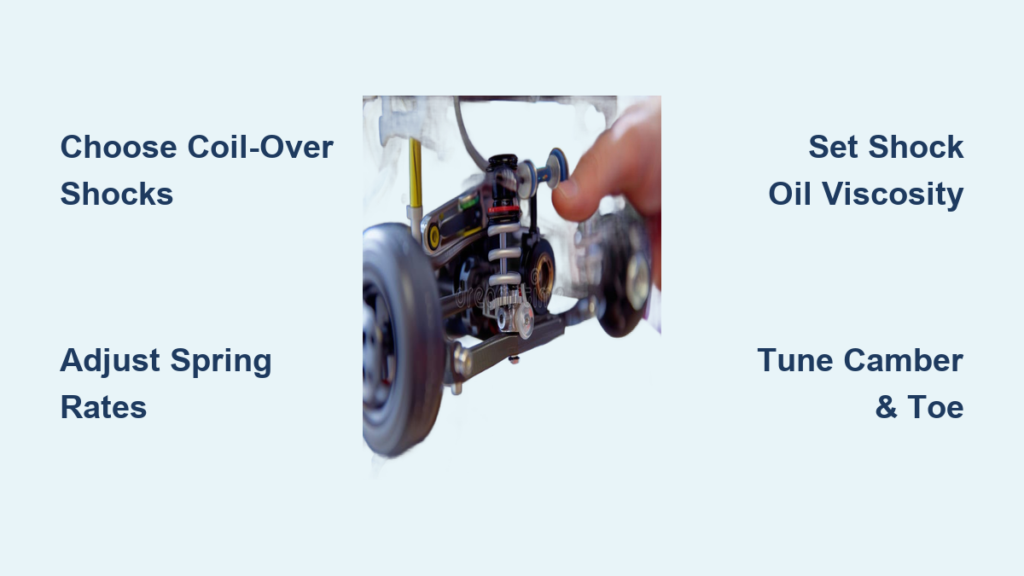
Your RC car’s suspension type determines everything from handling characteristics to maintenance requirements. Coil-over shocks dominate the RC world for good reason—they combine spring and damper in one unit, allowing precise tuning of both elements. For 1/10 scale buggies and monster trucks, this design gives you complete control through adjustable oil viscosity, spring rates, and shock mounting positions. When you’re learning how to make RC car suspension effective, start with coil-overs since they offer the most straightforward tuning options for beginners.
Independent suspension systems separate each wheel’s movement, maintaining better ground contact on uneven surfaces. If you race on technical tracks with jumps and bumps, this design prevents one wheel’s movement from affecting others, keeping more tire surface in contact with the track. Look for vehicles with dual A-arms (upper and lower control arms) when selecting a platform for serious tuning. These setups allow you to adjust camber, caster, and toe independently—critical parameters when you’re trying to make RC car suspension respond exactly to your driving inputs.
Suspension arm length dramatically affects how your vehicle handles different terrain. Longer arms provide smoother transitions over bumps but reduce responsiveness, while shorter arms make the car feel more reactive but transmit more shock to the chassis. For backyard bashing on rough terrain, choose longer arms that absorb impacts without transferring excessive force to your transmission. On smooth tracks where quick direction changes matter most, shorter arms give you that razor-sharp handling feel. Your choice here forms the foundation of how to make RC car suspension work for your specific driving environment.
Assemble Critical Suspension Components Correctly
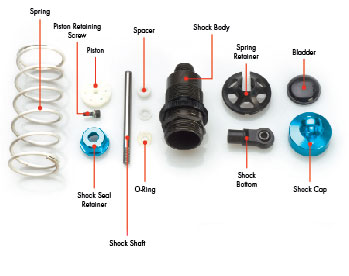
Shock absorbers require careful assembly to perform consistently across multiple runs. Start by selecting the right shock oil viscosity—30W works well for most 1/10 scale buggies on medium-traction surfaces. Fill the shock body to just below the top when fully extended, then slowly cycle the shaft 10-15 times to eliminate air bubbles. Never skip the bleeding process—trapped air causes inconsistent damping that makes your vehicle unpredictable mid-corner.
Springs come in various rates measured by how much force compresses them 1mm. For most bashers, medium-rate springs (around 1.8-2.2 kg/mm) provide the best balance of bump absorption and stability. When you’re learning how to make RC car suspension handle jumps properly, test different spring rates by running identical sections of track and noting:
– Bottoming out on hard landings (springs too soft)
– Excessive bouncing after impacts (springs too stiff)
– Uneven tire wear patterns (spring imbalance front/rear)
Pivot points need proper lubrication to maintain smooth operation. Replace plastic bushings with precision bearings for noticeable improvement in suspension response. Apply a thin layer of silicone grease to shock shafts and pivot points—too much attracts dirt, while too little causes binding. Your suspension can only work as well as its weakest component, so invest in quality parts that won’t bind or wear prematurely.
Configure Shock Absorbers for Optimal Damping
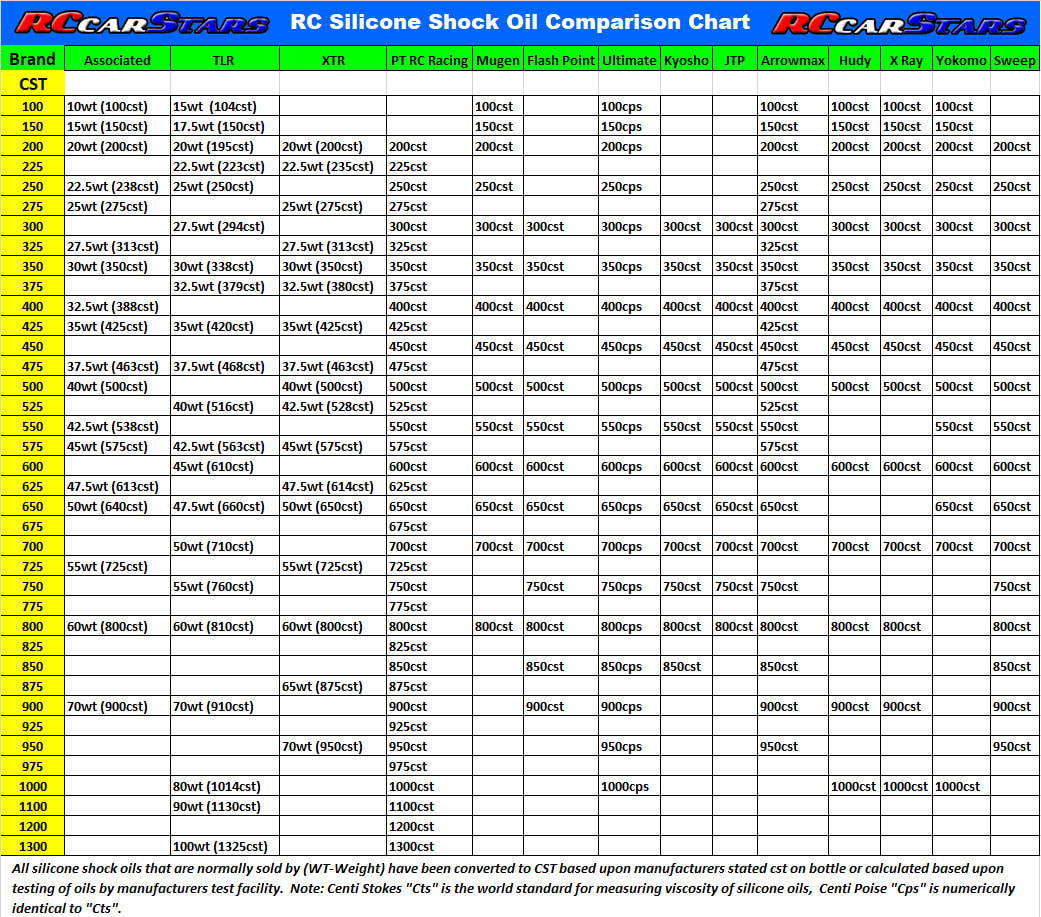
Oil viscosity selection makes or breaks your suspension performance. Use this quick reference when learning how to make RC car suspension adapt to different conditions:
| Track Condition | Recommended Oil Weight | Spring Rate |
|---|---|---|
| Smooth asphalt | 40-50W | Stiff |
| Carpet racing | 30-40W | Medium-stiff |
| Outdoor dirt | 25-35W | Medium |
| Rough backyard | 20-25W | Soft |
Mounting position changes how shocks interact with the chassis geometry. Moving shocks outward on the shock tower effectively softens the spring rate without changing springs—ideal when you need more traction but don’t want to buy new springs. Conversely, moving mounts inward makes the suspension feel stiffer for high-speed stability. Most quality RC kits include multiple shock mounting holes specifically for this tuning purpose.
Shock preload adjustment sets your vehicle’s ride height without changing spring rate. Turn the preload collar to raise or lower the chassis—typically 1-2mm of preload works well for most applications. Too much preload causes the suspension to sit high but bottom out easily, while too little lets the chassis drag on the ground. When you’re learning how to make RC car suspension balanced, check ride height after each adjustment by measuring from the chassis to the ground at all four corners.
Fine-Tune Geometry Settings for Maximum Traction
Camber adjustments directly impact cornering grip. Set negative camber between 1-3 degrees for most racing applications—this keeps more tire surface in contact when the chassis rolls in turns. Check camber using a digital gauge with the vehicle at race weight and suspension settled. Critical mistake to avoid: setting camber with the vehicle on a stand rather than under its own weight—this gives false readings that ruin handling.
Toe settings control straight-line stability versus cornering agility:
– Front toe-out (0.5-2mm): Sharper turn-in for technical tracks
– Front toe-in (1-3mm): Better high-speed stability for bashing
– Rear toe-in (1-2mm): Prevents “loose” feeling on corner exit
Caster angle affects steering feel and high-speed stability. Most 1/10 scale buggies perform best between 15-25 degrees. Increase caster for more stability at high speeds, but be aware it makes steering feel heavier. When experimenting with how to make RC car suspension handle predictably, change caster in 5-degree increments and test thoroughly—small changes here create noticeable differences in steering response.
Optimize Suspension for Specific Driving Conditions

Dirt tracks demand setups that handle both low traction and large bumps. Run softer springs (1.4-1.8 kg/mm) with thinner oil (20-25W) to maintain tire contact through ruts. Increase shock travel by lowering ride height slightly, but ensure you have at least 2mm of clearance to prevent bottoming. When you’re learning how to make RC car suspension work on loose surfaces, focus on keeping tires planted rather than maximum speed.
Carpet racing requires the opposite approach—stiffer springs (2.2-2.6 kg/mm) with thicker oil (40-50W) prevent excessive chassis movement on high-grip surfaces. Reduce shock travel to keep the chassis stable during rapid direction changes. Set front camber between 1-2 degrees negative and rear camber at 0.5-1.5 degrees for optimal carpet performance. The key to making RC car suspension effective on carpet is minimizing unnecessary movement while maintaining enough compliance for small bumps.
Backyard bashing needs durability-focused tuning. Use progressive rate springs that start soft but stiffen as they compress—perfect for handling unexpected obstacles. Install shock boots to protect shafts from dirt and debris. When learning how to make RC car suspension survive rough treatment, increase oil viscosity by 5-10W over racing specifications to prevent bottoming on hard landings.
Balance Front and Rear Suspension for Neutral Handling
Diagnose handling issues with this quick reference:
| Symptom | Likely Cause | Adjustment |
|---|---|---|
| Pushes in corners | Front too stiff/rear too soft | Soften front springs or stiffen rear |
| Loose on exit | Front too soft/rear too stiff | Stiffen front springs or soften rear |
| Bounces after jumps | Rebound too slow | Decrease rebound damping |
| Bottoms on landings | Compression too soft | Increase compression damping |
Front-to-rear balance makes the difference between a car that handles predictably and one that feels nervous. Start with slightly stiffer rear springs (about 10% stiffer than front) for most applications, then adjust based on handling characteristics. When you’re learning how to make RC car suspension balanced, make only one change at a time and test thoroughly before making another adjustment.
Shock damping rates control how quickly suspension compresses and rebounds. Set rebound damping slightly slower than compression—typically a 60/40 ratio works well for most applications. Too fast rebound causes the chassis to bounce after impacts, while too slow makes the vehicle feel sluggish through consecutive bumps. The goal when you’re trying to make RC car suspension responsive is finding the sweet spot where the suspension recovers quickly without oscillating.
Implement Essential Maintenance for Long-Lasting Performance
Check shock shafts weekly for scratches that could damage seals—even minor nicks cause oil leaks that ruin damping consistency. Clean shafts with isopropyl alcohol after each run, then apply a thin coat of silicone grease. Replace shock oil completely every 4-6 weeks of regular use, as dirt contamination and heat breakdown degrade performance over time.
Inspect suspension arms monthly for cracks, especially near mounting points. Plastic arms develop stress fractures that aren’t always visible—run your fingernail along potential problem areas to feel for cracks. Aluminum arms need checking for bent mounting tabs that alter geometry. When maintaining how to make RC car suspension reliable, remember that a single cracked arm can completely change your vehicle’s handling characteristics.
Rotate tires every 2-3 runs to ensure even wear. Check wheel hexes after each run—they work loose surprisingly often and cause handling inconsistencies. Keep a maintenance log noting oil changes, spring replacements, and geometry settings that worked well on specific tracks. This record becomes invaluable when you’re trying to make RC car suspension perform consistently across different conditions.
Mastering how to make RC car suspension involves continuous refinement—there’s no single “perfect” setup that works for all conditions. Start with these baseline adjustments, then systematically test changes while paying attention to how each modification affects your vehicle’s behavior. Within a few sessions, you’ll develop the intuition to diagnose handling issues and make precise adjustments that transform your RC driving experience. The most successful RC drivers treat suspension tuning as an ongoing process, not a one-time setup task.


