
Your nitro RC car sits ready on the track, engine cold and fuel tank empty. That distinctive smell of nitromethane hangs in the air as you prepare for your first run – but if you skip critical steps, you’ll face sputtering engines, overheating components, or worse, a seized piston. Mastering how to use a nitro RC car requires precise fuel handling, engine tuning, and break-in procedures that separate casual hobbyists from serious racers. Unlike electric models, nitro vehicles demand hands-on mechanical understanding to unlock their raw power and satisfying roar. This guide delivers field-tested protocols for safe ignition, optimal tuning, and longevity-preserving maintenance – covering everything from your initial fuel mix to post-run care. You’ll learn exactly how to avoid the most common beginner mistakes that destroy engines within minutes of first use.
Essential Safety Gear and Workspace Setup Before Ignition
Never skip safety prep when working with flammable nitro fuel and high-RPM engines. Position your car on a stable, non-flammable surface away from dry grass or fuel containers. Wear ANSI-approved safety goggles to shield eyes from fuel splashes and debris during startup. Keep a dry chemical fire extinguisher within arm’s reach – nitro fuel ignites at 302°F (150°C) and burns with intense heat. Lay down an absorbent mat under the car to catch fuel spills, and ensure your workspace has excellent ventilation to prevent fume buildup. Most critical: remove all jewelry and secure loose clothing before starting the engine. That spinning pull-start cord can yank rings or sleeves into dangerous positions in milliseconds.
Why Your Glow Plug Igniter Must Be Fully Charged
A weak igniter causes frustrating failed starts that flood your engine. Test your igniter by pressing the button – it should glow bright orange within 2 seconds. If it takes longer or appears dim, replace the 1.5V button cell battery immediately. During startup attempts, hold the igniter firmly against the glow plug for 10 full seconds before pulling the cord. Rushing this step starves the combustion chamber of needed heat, especially in cool weather below 60°F (15°C). Pro racers always carry two charged igniters as backup – one depleted battery means wasted track time.
Correct Nitro Fuel Mixing and Handling Procedures
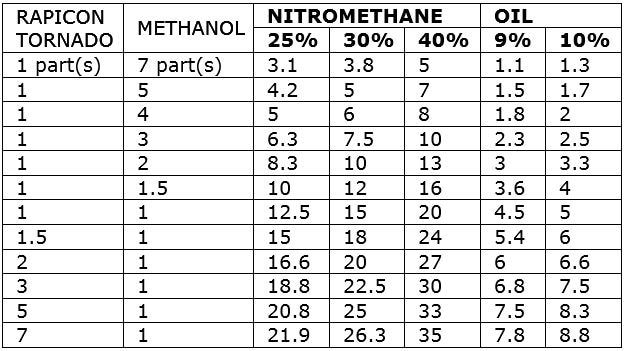
Nitro fuel isn’t “pour and go” – improper mixing causes lean conditions that melt pistons. Most beginner cars require 16-20% nitro content blended with 14-18% oil (synthetic/castor mix). Never use automotive fuels or pure nitromethane. Before filling, shake the fuel bottle vigorously for 60 seconds – settled oil separates from nitro, creating dangerous lean mixtures. Pour through a fine-mesh filter into your car’s tank to catch debris. Fill only to 80% capacity; trapped air prevents proper fuel flow during aggressive driving. Store fuel in original opaque containers away from sunlight – UV exposure degrades oil components within weeks.
How to Diagnose Fuel Contamination Issues
Cloudy or separated fuel indicates water intrusion or oil breakdown. Hold your tank at eye level against light: clean fuel appears crystal clear. If you spot haze or layers, drain the entire system immediately. Contaminated fuel causes erratic idling and piston scoring. To prevent this, always cap fuel containers tightly after use and replace O-rings on tank lids every 10 runs. A single drop of water in the combustion chamber creates steam explosions that crack cylinder heads.
Pre-Start Checklist: 5 Critical Components to Verify
Skipping pre-flight checks guarantees mid-run failures. First, spin the tires by hand – they should rotate freely without binding. Next, inspect the air filter: a clogged filter chokes airflow, causing rich conditions that wash oil from cylinder walls. Squeeze the fuel lines along their entire path; kinks or cracks cause air leaks that lean out your engine. Verify the glow plug is securely tightened (but not over-torqued) using a plug wrench. Finally, test the throttle response: with the engine off, move the trigger from neutral to full – you should hear crisp clicks at each adjustment point without hesitation.
Why Your Clutch Must Be Properly Adjusted
A loose clutch bell slips during acceleration, overheating clutch shoes. Too tight, and the car creeps forward when off the trigger. Adjust while the engine’s cold: loosen the clutch nut, then tighten finger-tight plus 1/8 turn with a wrench. Spin the spur gear – you should feel slight resistance but no binding. Test by holding the rear tires while gently pulling the starter cord; the engine should turn without moving wheels. Misadjusted clutches cause premature wear on bell housings and drive shafts.
Step-by-Step: Starting Your Nitro RC Engine on the First Pull
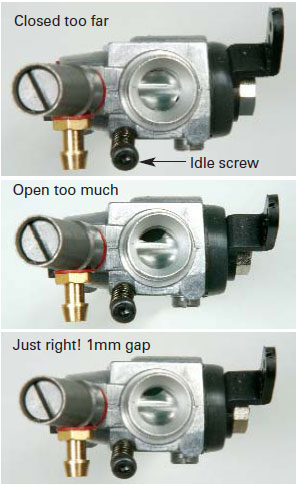
Cold starts require specific technique. Begin with the choke fully closed (if equipped) and high-speed needle 1.5 turns open from seated. Prime the engine by squeezing the fuel line until fuel reaches the carburetor – stop when you see liquid at the fuel filter. Hold the igniter on the glow plug, then pull the starter cord in one smooth, fast motion. After ignition, crack the choke open 25% and let the engine idle for 30 seconds to warm up. Gradually open the choke fully while adjusting the idle screw until the car rolls slowly in neutral. If it stalls, repeat with 10% more choke. Never “full throttle” a cold engine – thermal shock cracks pistons.
Fixing Flooded Engines in Under 60 Seconds
A flooded engine won’t catch and emits strong fuel odor. Remove the glow plug and pull the starter cord 5 times to clear excess fuel. Blot the cylinder with a paper towel, reinstall the plug, and start with the throttle fully open. Once running, slowly close the throttle to idle position. Pro tip: tilt the car on its side during clearing pulls – gravity helps drain fuel from the combustion chamber. If flooding persists, your low-speed needle is too rich; turn it clockwise 1/8 turn.
Tuning 101: Adjusting High and Low Speed Needles for Peak Performance
Tuning isn’t guesswork – follow this sequence. First, set low-speed needle for smooth transitions: at operating temperature, drive in circles while adjusting until you get instant throttle response without hesitation. The ideal setting gives slight acceleration when you nudge the trigger from neutral. Next, adjust high-speed needle for top speed: run at full throttle for 30 seconds, then immediately kill the engine. Remove the glow plug – a light tan coating means perfect tune. Black soot indicates rich; shiny piston means dangerously lean. Adjust in 1/16-turn increments.
How to Recognize Dangerous Lean Conditions
Lean engines develop a high-pitched whine and lose power during extended runs. Within 2 minutes, the aluminum piston expands and seizes against the cylinder sleeve – you’ll hear a metallic “clunk” followed by sudden stoppage. If your engine reaches 280°F (138°C) on a temperature gun, shut down immediately. Always run rich during break-in; lean conditions during first 5 tanks cause irreversible damage. Keep a spare piston on hand – seized engines require complete rebuilds.
The Crucial First 5 Runs: Nitro Engine Break-In Protocol
Rushing break-in destroys 70% of new nitro engines. For your first tank, run at 1/4 throttle only, pausing every 2 minutes to check engine temperature (max 220°F/104°C). During tank two, gradually increase to 1/2 throttle in short bursts. By tank three, you may run at 3/4 throttle but avoid full acceleration. Only after five complete fuel tanks should you attempt wide-open throttle runs. Throughout break-in, keep the high-speed needle rich – the engine should burble slightly during acceleration. This allows microscopic metal particles to polish cylinder walls without welding components together.
Why Synthetic Oil Extends Break-In Life
Castor oil-based fuels create protective glaze but leave gummy residues. Synthetic blends run cleaner during critical break-in phases. Look for fuels labeled “break-in specific” with 22-25% synthetic oil content. These form smoother cylinder wall finishes that prevent scuffing during initial heat cycles. Never use standard racing fuel for break-in – its lower oil content accelerates wear when metal surfaces aren’t yet mated. Change the air filter after every break-in run; metal particles contaminate filters rapidly.
Driving Techniques for Beginners: Avoiding Common Rookie Mistakes
Nitro cars demand different handling than electric models. Always approach corners at partial throttle – sudden deceleration cools the engine too fast, causing thermal shock. When jumping, maintain steady throttle through the air; chopping the trigger mid-air makes landing control impossible. Avoid continuous full-throttle runs exceeding 45 seconds – nitro engines need cooling intervals. Most importantly: never drive on concrete. The abrasive surface shreds tires 3x faster than asphalt and sends stone chips into suspension bearings. Stick to smooth parking lots or dedicated tracks.
How to Recover From a Roll-Over
If your car flips, kill the engine immediately by covering the exhaust with your hand. Restarting while upside-down floods the engine. Right the car, check for debris in the air filter, and spin the wheels to ensure no drivetrain binding. Before relaunching, inspect shock shafts for bending – a single impact can misalign suspension geometry. Carry zip ties in your pit box to temporarily secure loose body clips during races.
Immediate Post-Run Shutdown and Cooling Procedures
Never shut down by fuel starvation – this leaves unburned oil in the cylinder. Instead, let the engine idle for 60 seconds to cool internal components gradually. After shutdown, remove the glow plug and squirt 3-5 drops of after-run oil into the cylinder while rotating the flywheel. This prevents rust during storage. Wipe excess fuel from the engine with a lint-free cloth – residual nitro attracts moisture that corrodes aluminum parts overnight. Check the glow plug element; replace if warped or darkened.
Why You Must Drain Fuel After Every Session
Leaving fuel in the tank causes phase separation overnight. The nitro sinks while oil rises, creating explosive lean mixtures for your next start. Drain fuel through the carburetor by removing the fuel line and running the engine until dry. Store drained fuel in a dedicated container for future use – but never reuse fuel that’s been in the car for over 48 hours. Fresh fuel maintains consistent burn characteristics critical for tuning.
Long-Term Storage: Preserving Your Nitro RC Car Between Runs
For storage beyond 72 hours, remove the body and clean all chassis surfaces with denatured alcohol to remove fuel residue. Spray suspension pivots with synthetic grease to prevent corrosion. Store the car elevated with tires off the ground to avoid flat spots. Most critical: replace the air filter – old filters trap acidic fuel vapors that eat through rubber seals. Keep the vehicle in a climate-controlled space between 60-75°F (15-24°C); humidity above 60% causes internal rust within weeks.
Final Note: Mastering how to use a nitro RC car transforms frustrating failures into rewarding performance. By following these precise fueling, tuning, and maintenance protocols, you’ll achieve smoother runs, extended engine life, and track-ready reliability. Remember that proper break-in procedures prevent 90% of early failures, while consistent post-run care keeps your investment running strong season after season. When in doubt during tuning, always err on the rich side – a slightly rich engine runs cooler and lasts longer than a dangerously lean one. Now that you’ve learned these field-proven techniques, your next step is practicing throttle modulation on smooth asphalt surfaces to build instinctive control before tackling competitive tracks.


