
You fire up your RC car, the wheels spin freely when you touch the throttle, and the steering responds perfectly—but the vehicle stubbornly refuses to move forward or backward. This frustrating scenario affects RC enthusiasts at every skill level, from beginners with toy-grade models to serious hobbyists running high-performance racing machines. When your RC car turns but doesn’t move, the problem almost always lies in the critical link between your throttle input and the mechanical force that propels the vehicle. The good news? Most cases can be diagnosed and fixed in under 30 minutes with basic tools and a systematic approach.
Understanding why your RC car turns but doesn’t move requires following the power path from transmitter to wheels. Your radio signal travels to the receiver, which communicates with the Electronic Speed Controller (ESC) to deliver power to the motor. That rotational force then transfers through the transmission—via gears, drive shafts, and universal joints—to finally turn the wheels. A break anywhere along this chain creates the classic symptom of responsive steering with zero propulsion. This guide cuts through the confusion with specific, actionable steps to identify and resolve the exact cause of your immobilized RC car.
Immediate Checks That Solve 60% of Cases
Don’t reach for your screwdriver yet—these five-minute inspections often reveal the culprit before you disassemble anything. These zero-cost diagnostics should always be your first troubleshooting step.
Test motor responsiveness with direct power connection. Disconnect the motor from the ESC and connect it directly to a 9V battery (for brushed motors) or appropriate power source. If the motor spins freely when powered directly but not through the ESC, you’ve isolated the problem to the ESC or signal chain. If the motor doesn’t spin at all under direct power, focus your attention on motor replacement or repair.
Examine every electrical connection point thoroughly. With the car powered on, gently wiggle all connectors between battery, ESC, receiver, and motor while watching for motor response changes. Pay special attention to the three motor wires—look for burnt insulation, melted plastic at connection points, or loose terminals. A single compromised connector can disrupt power flow while still allowing steering servo operation.
Verify battery health under actual load conditions. A multimeter reading showing full voltage at rest can be misleading. Test your battery while applying throttle—many failing batteries maintain voltage when idle but collapse under motor load. For LiPo batteries, check individual cell voltages using a balance charger; any cell significantly lower than others indicates an imbalanced pack that needs replacement.
Motor Failure Diagnosis and Solutions
When your RC car turns but doesn’t move, the motor itself often bears responsibility. Understanding the specific failure modes for both brushless and brushed systems helps pinpoint the exact issue.
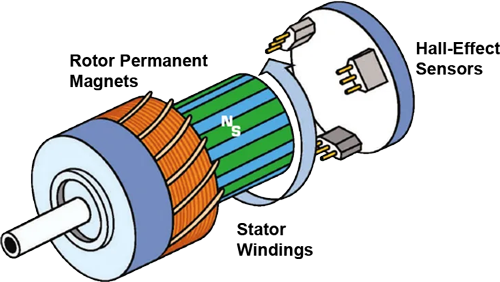
Brushless Motor Bearing and Winding Failures
Modern RC cars predominantly use brushless motors, which fail in distinctive ways. A seized bearing creates noticeable resistance when spinning the rotor by hand, often accompanied by a grinding sensation. Overheating from aggressive gearing or prolonged high-throttle operation can damage windings, causing internal shorts that prevent proper function.
To properly diagnose brushless motor issues, disconnect all three motor wires from the ESC and spin the rotor shaft. It should rotate smoothly with minimal resistance and no clicking sounds. Next, use a multimeter to check resistance between each pair of motor wires—readings should be nearly identical and very low (typically 0.1-1.0 ohms). Significant variation between measurements or extremely low resistance (near zero) confirms winding damage requiring motor replacement.
Brushed Motor Commutator Problems
Budget-friendly and older RC models commonly use brushed motors, which develop distinctive wear patterns. As carbon brushes wear down, they leave deposits on the copper commutator segments, creating intermittent contact points that cause the motor to cut out under load. You might notice the car working perfectly at low throttle but failing completely when you press harder.
Inspect the commutator (the copper cylinder at the motor’s end) for smooth, clean segments with sharp edges between them. Pitting, scoring, dark carbon buildup, or melted sections where brushes contact the commutator all indicate the need for cleaning or replacement. Severe brush wear typically requires complete motor replacement, as individual brush replacement is rarely cost-effective for modern RC applications.
Electronic Speed Controller Troubleshooting
The ESC serves as the critical intermediary between your radio signal and motor power—when it fails, you get the classic symptom of working steering with no propulsion.
Identify ESC failure through systematic testing. Disconnect the motor and connect a known-good motor or simple resistor load across the motor wires. Apply throttle while observing any LED indicators on the ESC. Most modern ESCs flash specific error codes when problems occur—consult your manual for interpretation. Common failure signs include complete silence from the ESC despite receiver operation, unexpected shutdowns under load, or visible damage to capacitors on the circuit board.
Address common ESC failure causes immediately. Water exposure from driving in wet conditions is a leading cause of premature ESC failure—always dry your electronics thoroughly after wet runs. Excessive current draw from mismatched components or damaged motors also kills ESCs quickly. If your ESC shows signs of melting, burning smells, or bulging capacitors, replace it immediately to prevent fire hazards.
Transmission and Drivetrain Failure Points

When your motor spins freely but the car remains stationary, focus your attention on mechanical power transfer components that frequently fail after crashes or impacts.
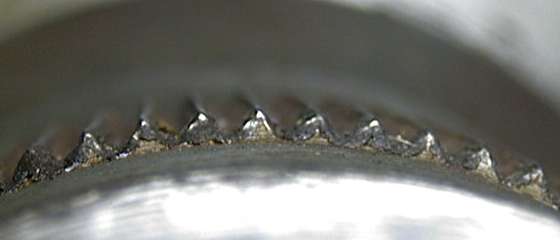
Gear System Inspection and Repair
The spur and pinion gear interface is particularly vulnerable to damage. Remove the spur gear cover and inspect both gears under bright light—look for missing teeth chunks, rounded edges where sharp profiles should exist, or debris jammed between meshing teeth. A simple test: rotate the wheels by hand while listening for grinding or clicking sounds that indicate gear damage.
Check pinion gear tightness on the motor shaft—any side-to-side movement or independent rotation means the set screw has loosened. This creates the unnerving symptom of a revving motor with zero propulsion, often accompanied by a high-pitched whine as the pinion spins without resistance. Tighten the set screw securely using the correct hex key size, taking care not to strip the soft metal.
Drive Shaft and Universal Joint Assessment
Broken drive shafts or failed universal joints cause immediate power loss to specific wheels. Rotate each wheel by hand while observing connected drive components—any wheel that spins freely without moving the corresponding drive shaft indicates a break in that section. Universal joints should rotate smoothly through their full range without binding or resistance.
Inspect dogbone driveshafts for collapsed center pins or deteriorated rubber/silicone inserts that allow slippage under load. Some models use splined shafts that wear smooth over time—check for rounded splines on both the drive shaft and wheel hub interface where power transfer occurs.
Wheel and Axle Component Failures
Don’t overlook the final power transfer points where rotational force becomes actual movement—wheel hubs and axles frequently develop issues that mimic more complex problems.
Examine wheel hub splines for wear. Remove wheels and inspect the internal splines where drive components connect. Worn splines show rounded edges instead of sharp teeth, allowing the drive shaft to spin freely inside the hub without moving the wheel. This produces the perplexing symptom of working transmission components with zero wheel movement—replace severely worn hubs immediately.
Check axle straightness with a simple roll test. Remove axles and roll them along a perfectly flat surface like glass or a smooth countertop. Any visible wobble or hopping indicates bending from crash impacts. Bent axles cause binding that prevents movement and creates dangerous vibration during operation—replace rather than attempting straightening.
Preventative Maintenance That Avoids Future Failures
Once you’ve restored mobility to your RC car, implement these simple maintenance habits to prevent recurrence of the “turns but doesn’t move” problem.
Perform weekly drivetrain inspections. After each significant driving session, check gear mesh tension using the paper test method—insert a standard sheet of paper between pinion and spur gears; it should slide through with slight resistance. Too much resistance indicates overly tight mesh causing accelerated wear; too little clearance allows gear skipping under load.
Lubricate critical components properly. Use only RC-specific lubricants—household oils attract dirt and cause premature wear. Apply light oil to wheel bearings and transmission output shafts, while drive shaft U-joints benefit from thicker grease designed for high-load applications. Clean excess lubricant from gear surfaces to prevent dirt accumulation.
Address minor issues immediately. A slightly loose screw, minor gear wear, or early brush degradation often progresses rapidly to complete failure. Developing the habit of thorough post-run inspections catches 80% of potential problems before they leave you with an immobilized RC car.
When your RC car turns but doesn’t move, the solution typically lies in one of seven key areas: motor failure, ESC malfunction, gear damage, drive shaft breakage, universal joint failure, wheel hub wear, or power delivery issues. By systematically working through these diagnostic steps—starting with the quickest electrical checks before moving to mechanical inspections—you’ll identify and resolve the problem efficiently. Remember that regular preventative maintenance, particularly gear mesh checks and drivetrain inspections, prevents most immobilization issues before they occur. With these troubleshooting techniques in your toolkit, you’ll spend less time diagnosing problems and more time enjoying what RC cars do best—providing thrilling, high-speed fun on any terrain.


