
Your RC drift car’s ability to maintain smooth, controlled slides depends heavily on one critical suspension parameter: camber angle. When your rear tires suddenly lose grip mid-drift or your car fights against your steering inputs, improper camber settings are often the culprit. This precise adjustment determines how much of your tire’s contact patch actually engages the surface during those high-angle maneuvers that define competitive drifting. Getting camber right transforms an unpredictable, frustrating build into a car that responds intuitively to your throttle and steering inputs, making those long, sustained drifts feel effortless rather than forced.
The challenge lies in finding that sweet spot between aggressive camber for maximum drift angle and conservative settings for stability. Unlike racing applications where maximum grip is the goal, RC drift requires a carefully calculated compromise that allows controlled tire breakaway while maintaining enough contact patch to steer the slide. This guide cuts through the confusion with actionable steps to dial in your camber settings for any surface or driving style, whether you’re a beginner setting up your first drift chassis or a seasoned driver fine-tuning for competition.
Why Negative Camber Makes or Breaks Your Drift Performance
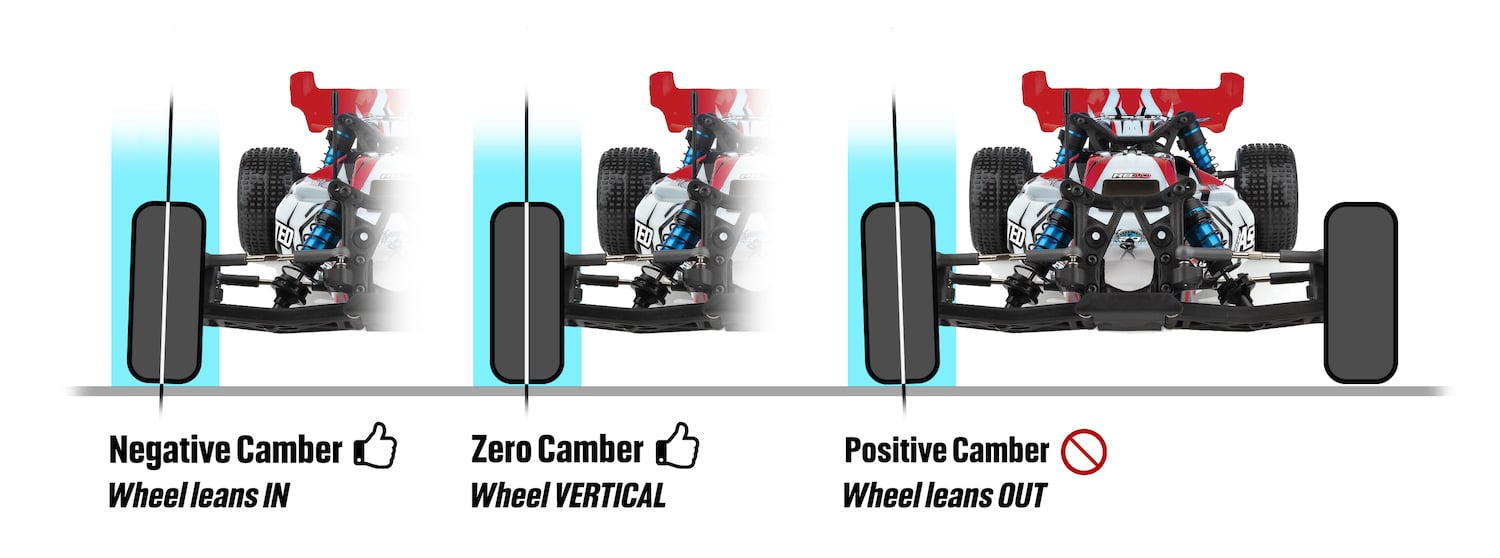
Negative camber—the inward tilt of your wheels at the top—directly impacts your RC drift car’s ability to maintain grip during extreme angles. When your car enters a 45-degree drift, chassis roll shifts weight to the outside rear wheel, compressing that suspension while the inside wheel extends. Without proper negative camber, the outside tire’s contact patch dramatically reduces as it rolls onto its outer edge, causing sudden loss of traction that snaps your car out of the drift.
Most competitive RC drifters use between 1.5 and 3 degrees of negative camber on rear wheels for optimal performance. At 2 degrees, the tire maintains maximum contact patch as the suspension compresses during cornering—exactly when you need grip to control the slide. Less than 1.5 degrees causes premature breakaway that makes initiating drifts difficult, while exceeding 3.5 degrees creates excessive outer shoulder wear and makes the car feel “sticky” during sustained slides. Front wheels typically require milder settings between 0.5 and 2 degrees because they steer rather than drive the drift, with too much front camber causing unpredictable initiation behavior.
Pro Tip: Always set rear camber more aggressively than front—typically 1-2 degrees difference—to prevent understeer during drift entry. When your car resists turning into the drift despite proper throttle input, this camber imbalance is usually to blame.
Exact Camber Adjustment Procedure for RC Drift Cars
Skip the guesswork with this precise 5-step adjustment process that guarantees accurate, repeatable results:
-
Prepare your workspace: Park your RC drift car on a completely level surface with the suspension at normal ride height. Cycle the suspension 5-10 times by gently pressing down on the chassis to normalize shock pressure.
-
Measure current settings: Position your digital camber gauge against the wheel rim (not the tire) while ensuring the gauge base is perpendicular to the surface. Record readings for all four wheels—most drifters discover significant discrepancies between left and right sides.
-
Identify adjustment points: Locate camber links on your suspension arms—usually threaded rods connecting upper or lower arms to the hub assembly. On most Kyosho, Yokomo, or MST chassis, rear camber adjusts via eccentric bushings or threaded turnbuckles near the hub.
-
Make incremental changes: Loosen lock nuts, then rotate adjustment points in quarter-turn increments. To increase negative camber, shorten the upper link or lengthen the lower link depending on your chassis geometry. Remmeasure after each adjustment—don’t rely on visual estimation.
-
Verify and secure: After reaching target settings, drive the car for 2-3 minutes to allow suspension settlement, then remeasure. Tighten all lock nuts securely and mark final positions with a paint pen for quick reference during future sessions.
Critical Warning: Never adjust camber with the car on a stand—suspension geometry changes dramatically at ride height versus droop position, leading to inaccurate settings that feel completely different during actual drifting.
Troubleshoot These 4 Common Camber-Related Drift Failures

Why Your Car Won’t Initiate Drifts Despite Proper Throttle Input
If your RC drift car resists breaking loose even with aggressive throttle application, insufficient rear camber is almost certainly the issue. The tires lack enough negative angle to generate the necessary grip during initial cornering load, preventing that controlled breakaway. Immediately increase rear camber by 0.25-0.5 degrees and test again—most indoor carpet tracks require at least 2.5 degrees for reliable initiation. Check for uneven wear across both rear tires; consistent center wear confirms inadequate camber while outer shoulder wear indicates proper settings.
Fixing Unstable Drifts That Suddenly Snap Out
Excessive negative camber (over 3 degrees for most setups) creates too much grip at high angles, making your car resist the drift arc and requiring constant throttle correction. This manifests as sudden snap-back to straight driving mid-drift, especially on high-traction surfaces. Reduce rear camber in 0.25-degree increments until the drift feels progressive rather than binary. Verify by checking tire wear—severe outer shoulder wear confirms excessive camber that’s killing your drift consistency.
Solving Asymmetrical Drifting Behavior Between Left and Right
When your car drifts perfectly in one direction but feels completely different in the opposite direction, check for camber asymmetry between left and right wheels. Measure both rear wheels independently—differences as small as 0.3 degrees create noticeable handling imbalances. Also verify ride height; a 1mm difference between sides dramatically affects camber effectiveness during drifts. Correct by adjusting the problematic side until both wheels match within 0.1 degrees.
Preventing Premature Tire Wear That Kills Your Budget
Aggressive camber settings accelerate outer shoulder wear, but completely eliminating negative camber sacrifices drift performance. The solution lies in matching camber to your tire compound and driving style. Softer compounds tolerate 2.5-3 degrees with acceptable wear, while harder compounds perform better at 1.5-2 degrees. If tires wear through in under 10 minutes of drifting, reduce camber by 0.5 degrees immediately—this small adjustment often doubles tire life without sacrificing significant performance.
Surface-Specific Camber Tuning Cheat Sheet

Carpet Tracks: Use 2.5-3.5 degrees rear camber for standard carpet, reducing to 2-2.5 degrees for high-pile surfaces. The fibers provide less traction, requiring more negative angle to maintain grip during slides.
Outdoor Asphalt: Opt for milder 1.5-2.5 degrees rear camber—higher natural grip means less angle needed to prevent the tires from “biting” too hard and killing drifts prematurely.
Tarmac/Concrete: Start at 2-3 degrees rear camber for predictable, consistent feedback. These surfaces respond linearly to camber changes, making them ideal for dialing in baseline settings.
Vinyl/Smooth Surfaces: Go conservative with 1-2 degrees rear camber—excessive angle creates too much grip on low-traction surfaces, making controlled drifting nearly impossible.
Pro Tip: When switching surfaces, adjust camber before changing tire compounds—this single parameter often solves 80% of surface-related handling issues without requiring expensive tire changes.
Critical Camber Mistakes That Ruin Drift Performance
Setting identical camber on all four wheels ignores the different roles each axle plays during drifting. Rear wheels need significantly more negative camber than fronts to handle lateral loads—always adjust them independently. Front camber exceeding rear settings causes unpredictable steering behavior that makes drift initiation inconsistent.
Neglecting to check camber before each session leads to gradual performance degradation as adjustment links loosen from vibration and impacts. A quick 2-minute verification prevents frustration during practice or competition—successful drivers check settings religiously.
Overlooking camber’s interaction with toe settings creates handling conflicts that mask true performance potential. Increasing rear camber effectively increases toe-out, so reduce rear toe by 0.5-1mm when adding negative camber to maintain balance. Front camber increases require reducing front toe-in to preserve steering responsiveness.
Using inaccurate measurement tools wastes tuning time—you can’t improve what you can’t measure. Invest in a quality digital camber gauge that provides 0.1-degree accuracy rather than relying on visual estimation or cheap analog gauges that vary by ±1 degree between measurements.
Maintaining Camber Performance Through Seasons and Tire Life
Cold weather hardens tire rubber, reducing effective contact patch and requiring 0.2-0.5 degrees more negative camber for equivalent summer performance. Conversely, summer heat softens tires, often allowing you to reduce camber by similar amounts while maintaining drift consistency. Track ambient temperature when noting successful setups—this data becomes invaluable for seasonal adjustments.
As tires wear down, their grip characteristics change significantly. Fresh tires with full compound depth tolerate more aggressive camber (up to 3.5 degrees), while worn tires perform better with milder settings (1.5-2 degrees) to preserve their diminished contact patch. Monitor wear patterns closely—transitioning from outer shoulder wear to more even wear indicates it’s time to reduce camber.
Regularly clean and lubricate camber adjustment threads to prevent binding that causes inaccurate settings. Dirt and debris accumulation in adjustment links creates “stiction” that makes fine-tuning impossible. Apply lightweight grease to all threaded components during maintenance sessions to ensure smooth, precise adjustments when you need them most.
Final Tuning Philosophy for Championship-Winning Drift Performance
Mastering RC drift camber isn’t about finding the most aggressive setting possible—it’s about discovering the precise angle that makes your specific chassis respond predictably to your driving style. Start with 2 degrees rear and 1 degree front as a baseline, then make 0.25-degree adjustments while testing specific handling characteristics. Keep a detailed log of settings and performance notes—this data becomes your most valuable tuning resource as you develop expertise.
Remember that camber functions within a complete suspension system—its effectiveness depends on proper toe, caster, and ride height configuration. The most successful drift setups achieve harmony between all parameters, allowing the car to respond intuitively throughout every phase of the drift. When you finally dial in that perfect camber setting, you’ll feel it immediately: the car initiates smoothly, maintains consistent slides with minimal correction, and responds predictably to your inputs, transforming frustrating practice sessions into flowing, controlled drifts that look as good as they feel.


