
You’ve just unboxed your new RC car or noticed your vehicle isn’t tracking straight through corners. The frustrating push under braking or inconsistent corner entry has you wondering—could improper toe alignment be the culprit? Toe settings dramatically impact your RC car’s handling characteristics, yet many hobbyists overlook this critical adjustment. Understanding how to properly set toe on your RC car transforms unpredictable handling into precise control, whether you’re racing on clay tracks or bashing through backyard terrain. This guide reveals the exact procedures for measuring and adjusting toe angle to match your driving style and surface conditions.
Why Proper Toe Adjustment Matters for RC Performance
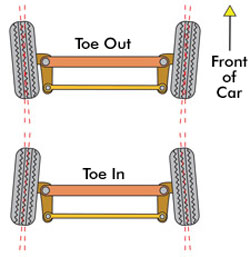
Incorrect toe settings create handling inconsistencies that frustrate even experienced drivers. Too much toe-in makes your RC car feel sluggish entering corners, while excessive toe-out causes nervous behavior and unpredictable rotation. The right toe setup improves corner speed, reduces tire wear, and creates more consistent lap times. Most factory RC cars ship with conservative toe settings that work adequately but leave significant performance on the table for tuned setups.
How Toe Affects Different Driving Conditions
On high-traction clay tracks: Competitive racers typically run 1-2 degrees of toe-in for the rear to stabilize the car under power. Front toe-out between 0.5-1 degree helps initiate rotation without making the car twitchy. The exact setting depends on your driving style—aggressive drivers often prefer more front toe-out for quicker turn-in.
For off-road bashing: Dirt and gravel surfaces require more neutral toe settings (0-1 degree toe-in) to handle uneven terrain without fighting the steering. Too much toe adjustment on loose surfaces causes excessive tire scrub and rapid wear without meaningful handling benefits.
Essential Tools for Accurate Toe Measurement

Professional-Grade Alignment Equipment
Invest in a dedicated RC toe gauge or digital alignment system for precise adjustments. Magnetic digital gauges that attach directly to your RC car’s wheels provide readings accurate to 0.1 degrees. Budget-friendly alternatives include aluminum toe plates with printed degree markings that slide under your vehicle’s wheels. Never attempt toe adjustment by eye—RC cars require precision measured in fractions of degrees.
Basic Tools for Adjustment Process
- Hex wrenches matching your RC car’s suspension hardware
- Small container for removed shims (if applicable)
- Digital calipers for measuring shim thickness
- Marker pen for marking control arms before disassembly
- Clean microfiber cloth for wiping wheels before measurement
Step-by-Step Toe Adjustment Procedure
Preparing Your RC Car for Measurement
Begin with your RC car on a perfectly level surface with tires properly inflated to your standard running pressure. Clean all four wheels thoroughly to ensure accurate measurement—dirt buildup creates false readings. Install fresh tires if yours show uneven wear, as worn tires compromise alignment accuracy. Verify your suspension is at proper ride height before measuring toe, as incorrect ride height distorts alignment geometry.
Measuring Current Toe Settings Accurately
Place your RC car on the alignment surface and rotate each wheel forward to settle the suspension. Position your toe gauge against both front (or rear) wheels at axle height. For digital gauges, follow the manufacturer’s zeroing procedure. With mechanical plates, align the indicator to the zero mark before taking measurements. Record readings from multiple points around the wheel circumference to identify bent components—the difference should be minimal (less than 0.5 degrees).
Making Precise Toe Adjustments
Most RC cars adjust toe through turnbuckle links connecting the steering knuckles. Loosen the jam nuts on both ends of the tie rod while holding the link itself stationary with another wrench to prevent unwanted rotation. Turn the link equally in small increments—typically 1/8 turn equals approximately 0.5 degrees of change. After each adjustment, retighten jam nuts and re-measure before proceeding. For shimmable suspension systems, add or remove shims behind the hub to achieve desired toe angle.
Common Toe Adjustment Mistakes to Avoid
Ignoring Sequence During Multi-Point Adjustments
Adjusting front and rear toe independently creates handling imbalances. Always set rear toe first, then front toe—the rear setup establishes your car’s fundamental stability that the front must complement. Changing rear toe after setting front toe requires complete re-measurement of both ends. Professional tuners follow strict sequence: ride height → camber → toe → anti-squat/dive.
Failing to Verify After Bumps and Jumps
Your static toe measurement doesn’t reflect dynamic behavior. After setting static toe, take your RC car for a short test run over small bumps and observe handling changes. Excessive bump steer indicates your suspension geometry needs additional tuning beyond simple toe adjustment. Record how the car behaves through different corner types before making further changes.
Troubleshooting Toe-Related Handling Issues

Diagnosing Excessive Tire Wear Patterns
Uneven tire wear provides critical feedback about your toe settings. Feathered edges with raised lips indicate excessive toe-in, while cupping or scalloped wear suggests toe-out beyond optimal range. Measure wear at multiple points around the tire circumference—if the pattern repeats every 2-3 inches, your toe setting is causing harmonic vibration during rotation.
Fixing Loose Steering Response Without Changing Toe
If your RC car feels vague in steering but you don’t want to alter toe settings, check for worn suspension bushings or loose hex screws first. Many perceived toe issues actually stem from excessive play in suspension components. Tighten all relevant hardware to manufacturer specifications before concluding you need alignment changes.
Performance Toe Settings for Different RC Platforms
Touring Cars and On-Road Racers
Competitive touring cars typically run 1-2 degrees of rear toe-in for stability under acceleration. Front toe settings range from 0.5 degrees toe-out for quick rotation to 1 degree toe-in for high-speed stability. Asphalt specialists often run more neutral settings (0-0.5 degrees) to minimize tire temperature buildup during long runs.
1/10 Scale Buggies and Stadium Trucks
Dirt buggies perform best with 0-1 degrees of rear toe-in to balance rotation and stability. Front toe settings vary dramatically based on track conditions—loose dirt requires more toe-out (1-2 degrees) for initial bite, while packed clay benefits from neutral to slight toe-in (0-0.5 degrees). Always match front and rear settings to create balanced handling.
Maintenance Schedule for Toe Settings
Check and verify your RC car’s toe settings after every 3-5 hours of running time. Impact from jumps and hard landings gradually shifts alignment, especially in off-road applications. Before each race day, perform a complete alignment check including toe, camber, and ride height. Record your optimal settings in a tuning notebook—small changes in temperature or track conditions may require minor toe adjustments from your baseline.
Fine-Tuning Toe for Competitive Advantage
Professional RC drivers make micro-adjustments based on qualifying performance. If your car pushes exiting corners, try reducing rear toe-in by 0.25 degrees. When the car feels nervous under braking, add 0.25 degrees of front toe-in for stability. These subtle changes create meaningful improvements at competitive levels where hundredths of seconds matter.
Final Note: Proper toe adjustment transforms your RC car from unpredictable to precision handling. Start with manufacturer recommendations, then fine-tune based on track conditions and your driving style. Always make incremental changes and document results—small toe adjustments create significant performance differences. For optimal results, combine proper toe settings with appropriate camber and caster adjustments to create balanced suspension geometry that works harmoniously. Regular alignment checks ensure consistent performance session after session, maximizing your RC car’s potential on any surface.


