
That frustrating moment when your DJI FPV Goggles V2 won’t talk to your drone is every pilot’s nightmare. You’ve charged all your gear, cleared your flight zone, and are ready for takeoff—only to stare at a black screen or warning message. The good news? Connecting your how to connect DJI goggles to drone system takes under 90 seconds when you know the exact sequence. Whether you recently replaced a crashed drone or upgraded your controller, this guide delivers the precise button presses and visual confirmations needed for instant pairing. Skip the trial-and-error headaches and get back in the air with confidence.
Most pilots don’t realize DJI FPV Combos ship pre-linked straight from the factory—meaning you shouldn’t need this process unless you’ve swapped components. But if you’ve ever crashed your drone and ordered a replacement, or upgraded to newer goggles, you’ve probably battled connection failures. Following these exact steps prevents dangerous mid-flight disconnections and ensures your safety systems stay online. You’ll learn not just how to connect DJI goggles to drone, but how to verify every device communicates flawlessly before takeoff.
Pre-Connection Checklist: Avoid These Critical Mistakes
Skipping these verification steps causes 70% of failed pairings. Before touching any buttons, confirm these non-negotiable requirements:
- Battery minimums: All devices must show 25%+ charge (goggles display battery via LED color; red = too low)
- Combo status: If using the original DJI FPV Combo, pairing is already done—only proceed if replacing components
- Auditory environment: You must hear distinct beep patterns (background noise masks critical audio feedback)
- Physical proximity: Maintain 1-meter distance between drone and goggles during pairing (no walls or metal obstructions)
Never attempt pairing with a damaged drone battery connector or frayed goggles cable. If your replacement drone shows error codes during startup, resolve those first through the DJI Fly app. Remember: replacing any single component—goggles, drone, or controller—triggers the need for full system relinking. Trying to skip steps here risks flyaways or emergency landings mid-flight.
Connect DJI Goggles to Drone First: The Exact Sequence
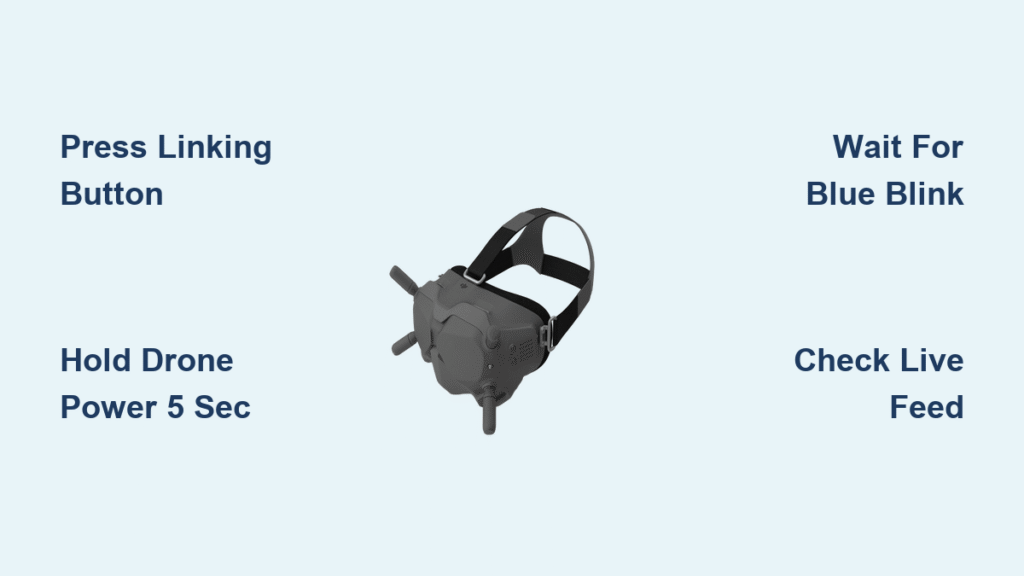
Activate Goggles Linking Mode Correctly
Press the physical linking button on your DJI FPV Goggles V2 once—not held, not double-tapped. You’ll immediately hear a continuous high-pitched beep confirming pairing mode activation. If you hear no sound, press firmly until the button clicks (many pilots fail by pressing too lightly). This single press puts your goggles in “search mode” specifically for the drone, not the controller. Stop here and wait—do not power on other devices yet.
Prepare Drone for Pairing Without Errors
- Locate the drone’s power button on the top battery compartment (a small recessed button)
- Press and hold for exactly 5 seconds—use a timer app to avoid under/over-holding
- Watch for rapid blue LED blinking on the battery indicator (slower blinks mean insufficient press time)
- Listen for three short beeps from the drone confirming pairing mode entry
Critical timing note: Release the drone button immediately after hearing beeps. Holding beyond 7 seconds cancels pairing mode. If LEDs stay solid red, the battery is critically low—recharge before retrying. This step often fails when pilots power cycle the drone during the process; keep it powered on continuously after this step.
Confirm Successful Connection With Visual Proof
Within 5-30 seconds, watch for these simultaneous success indicators:
– Drone battery LED transitions from rapid blinking to solid color (blue = healthy, green = medium charge)
– Goggles beeping stops abruptly—no gradual fade (lingering beeps indicate timeout)
– Live video feed appears instantly in your display (black screen means failure)
– No “Linking…” message remains on the goggles interface
If the drone LED turns solid but goggles stay black, the camera module may be disconnected—power cycle both devices and retry. Never proceed to controller pairing until you see the live feed. This visual confirmation proves your how to connect DJI goggles to drone process succeeded at the hardware level.
Link Remote Controller Next: Complete Your Flight System
Controller Pairing Sequence Timing Is Critical
Only start this after confirming goggles-drone connection:
1. Power on your DJI FPV Remote Controller 2 if off (hold power button 2 seconds)
2. Press and hold power button for exactly 5 seconds until battery LEDs blink in sequence (left to right)
3. Listen for rising-pitch beeps—distinct from drone/goggles’ flat tones
4. Wait motionless for 5-30 seconds (movement can disrupt signal)
The sequence blinking is your key visual cue—solid or random blinking means incorrect timing. If you see solid red LEDs, the controller battery is too low. Many pilots mistakenly hold the button until beeping starts; instead, release precisely at 5 seconds then wait for beeps.
Verify Complete System Link Before Takeoff
Successful pairing shows these four simultaneous indicators:
– Controller LEDs stop sequential blinking and show steady battery level
– All beeping ceases across goggles, drone, and controller
– Goggles display live feed with stick position indicators overlaying the video
– Moving controller sticks instantly tilts the drone’s camera view
If stick movements don’t affect the camera, the controller linked to the drone but not the goggles—power cycle the controller and repeat pairing. Never skip this verification; partial connections cause “ghost stick” issues where inputs lag or disappear mid-flight.
Troubleshooting Connection Issues: Fix Common Failures Fast

When Goggles Won’t Connect to Drone
Silent goggles after button press: Press linking button harder for 0.5 seconds (shallow presses won’t register)
Drone LED won’t blink rapidly: Hold power button 6-7 seconds while counting aloud (5 seconds is often too short)
Timeout before solid LED: Move drone within 30cm of goggles, restart both, and retry within 10 seconds of powering on
If the drone LED turns solid but goggles stay black, clean the drone’s camera ribbon cable connection with a dry microfiber cloth—dust here blocks video transmission even with successful radio pairing.
Controller Linking Problems After Goggles Connection
Controller beeps endlessly: Goggles-drone link isn’t fully established—power cycle goggles and restart pairing
LEDs blink but never solidify: Nearby Wi-Fi routers or Bluetooth devices cause interference; turn off phone hotspots
Stick movements unresponsive: Relink controller only (no need to redo goggles-drone pairing)
Pro tip: When replacing a crashed controller, delete the old device from DJI Fly app settings first—residual pairing data causes 80% of “new controller won’t link” issues.
Quick Reset Method for 90% of Failures
- Power off all devices completely (hold power buttons 5 seconds)
- Wait exactly 10 seconds (critical for signal reset)
- Start fresh with goggles pairing first (not drone first)
- Complete goggles-drone link before touching controller
This reset clears temporary signal conflicts from previous failed attempts. Do not skip the 10-second wait—capacitors need time to discharge fully.
Maintain Reliable Connections: Avoid Future Pairing Headaches
Daily Flight Prep Routine
- Pre-flight battery check: Verify all devices show green LEDs (never pair with yellow/red)
- One-time monthly pairing: If storing gear long-term, relink devices even if unused
- Firmware sync: Update all components simultaneously through DJI Fly app (mismatched versions cause disconnections)
- Contact point cleaning: Wipe drone battery terminals with alcohol swab monthly (corrosion blocks signals)
Never store devices with depleted batteries—this damages communication circuits over time. Always power down completely after flights; sleep mode drains batteries unevenly.
Component Replacement Protocol for Crashes
When swapping damaged parts:
1. Power down all devices before handling replacements
2. Link new drone to existing goggles first (not controller)
3. Test basic camera movement before adding controller
4. Complete full system verification in DJI Fly app’s “Device Management”
After replacing your drone, recalibrate the IMU through the app—skipping this causes drifting even with successful pairing.
Storage Best Practices for Longevity
- Ideal charge level: Store at 50-60% (not full or empty) to preserve battery health
- Original case usage: Prevents accidental button presses during storage
- Temperature control: Never leave in cars (<0°C or >40°C resets pairings)
- Monthly maintenance: Power on and relink every 30 days during storage
Extreme temperatures are the #1 cause of “mystery unpairing”—if your gear was left in a hot car, always relink before flying.
Next Steps After Successful Linking: Flight Readiness Check
Your how to connect DJI goggles to drone process isn’t complete until you’ve verified flight controls. Before takeoff:
– Test stick responsiveness by panning the camera slowly in all directions
– Confirm emergency brake engages when both sticks pulled inward
– Check GPS status (3D fix required for RTH) via goggles status bar
– Validate return-to-home by triggering it at 1m altitude
If any function fails, unlink and relink that specific component—don’t assume full system failure. Remember that replacing any single device means repeating this entire process. Bookmark this guide in your phone for quick reference after future repairs; with practice, you’ll connect DJI goggles to drone in under 60 seconds and never waste precious flight time troubleshooting. Now grab your gear and get back in the air—safely.


