
Your heart sinks as you watch your DJI Mavic crash into a tree branch—now you’re staring at bent props, a cracked gimbal, or worse. Don’t panic. Most Mavic owners face their first DJI Mavic drone repair within 18 months of ownership, and the good news is that 90% of these repairs cost less than $100. Whether you’ve clipped a tree during auto-landing or snapped a rear leg on landing, this guide shows you exactly how to navigate the repair process and get your drone back in the air without overpaying.
Most Mavic repairs fall into predictable categories, and understanding your options before sending your drone for service saves you time, money, and frustration. You’ll learn whether to choose official DJI service, trusted third-party shops, or if a DIY fix makes sense for your specific damage. With documented repair times, real cost examples, and insider tips to avoid common pitfalls, you’ll make an informed decision that keeps your drone flying.
DJI’s Official Repair Service: What Really Happens
Your Drone’s Journey Through DJI’s Service Center
When you initiate a DJI Mavic drone repair through their official channel, your drone enters a streamlined process. Start by creating a repair case on DJI’s website where you’ll receive a prepaid UPS label—no upfront payment required. Drop your package at any UPS location and wait for automated email updates confirming receipt, diagnostic results, and repair approval.
DJI’s technicians run comprehensive diagnostics that often reveal hidden damage beyond your initial assessment. After email notification of the exact cost, you approve or decline through their portal. Here’s what happens next: DJI either repairs your original unit or swaps it for a certified refurbished replacement—often without explicitly stating this until you receive your “repaired” drone.
Real Repair Costs and Timelines You Can Expect
.png?width=1170&name=Maintenance%20Cyle%20Infographic%20(1).png)
Based on verified user reports, DJI’s Mavic drone repair pricing remains remarkably consistent regardless of model:
- Air 2S rear leg repair: $90 (includes still-wired components)
- Mini 2 with cracked body + severed gimbal: $77
- Air 2S tree collision damage: $86 (props included)
Most users receive their drone back within 8-14 calendar days, including shipping time both ways. DJI covers all shipping costs and provides a full 12-month warranty on refurbished units, making this option ideal if you prioritize warranty coverage over keeping your original serial number.
Third-Party Repair Centers That Actually Deliver
Trusted Shops for Mavic Series Repairs
When keeping your original drone serial matters, specialized third-party repair centers become your best option. These shops maintain your drone’s identity while often providing faster turnaround:
The Drone Repair (Irvine, CA) handles the entire Mavic series with 1-10 business day turnaround. Their process includes free diagnostics—you only pay if they successfully repair your drone. While DJI covers shipping both ways, third-party shops typically charge $15-$25 for return shipping.
DDS Drone Repair (New Jersey) stands out with DJI-certified technicians and free nationwide UPS shipping both ways. Their “no payment unless repaired” policy eliminates financial risk, making them ideal for uncertain damage scenarios.
Ohio Drone Repair (Akron) offers comprehensive service plus training if you want to understand your drone better before trusting it to technicians.
Spot the Difference: Refurbished vs Your Original Mavic
Identifying DJI’s Silent Replacement Policy
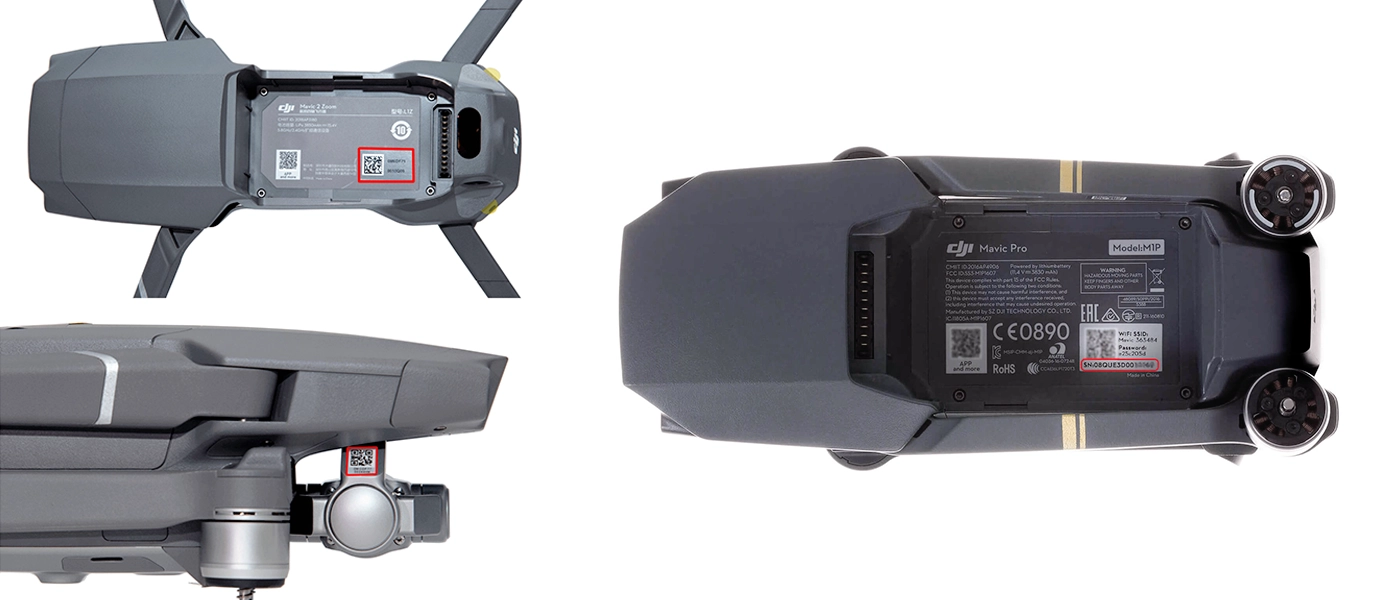
DJI’s official policy states they may substitute a refurbished unit during the repair case creation process, but many users report receiving a different drone without clear notification. Here’s how to verify if you’ve received a refurbished unit:
Check your drone’s serial number—specifically the tenth character or fifth-from-last letter. If it’s “S” or “R,” you have a refurbished unit. Also look for a black rectangular “Refurbished” sticker inside the battery compartment or on the box.
This swap means you’ll lose all custom decals, must re-register with the FAA under the new serial number, and need to re-pair your controller and reload firmware. While the drone flies identically, sentimental value disappears when your specific unit doesn’t return.
Fix These Common Mavic Problems Yourself (Safely)
Simple Repairs Worth Attempting at Home
Before shipping your drone, assess whether you can handle these DJI Mavic drone repair tasks yourself:
- Propeller replacement: Swap damaged props using the included tool—takes 2 minutes
- Gimbal calibration: Run through DJI Fly app’s calibration sequence (Settings > Advanced Settings > Gimbal)
- Firmware updates: Critical after any repair to ensure optimal performance
- Basic cleaning: Remove debris from motor housings with compressed air
These simple fixes cost nothing but your time and often resolve issues mistaken for major damage. However, never attempt ribbon cable replacements or motor swaps without proper tools and experience—these require precision soldering and calibration equipment.
Prepare Your Mavic Properly Before Shipping
Critical Pre-Shipping Checklist
Avoid delays and complications by following this essential preparation sequence before your Mavic drone repair:
- Back up flight data: Sync logs and media files through the DJI Fly app
- Remove all accessories: Props, gimbal guard, ND filters, and SD cards
- Deactivate FAA registration: If concerned about serial number changes
- Pack securely: Use original foam insert or equivalent protective material
- Include documentation: Print your repair case number and contact sheet inside the box
Crucially, never ship batteries—they’re fire hazards during transport. Exclude chargers, cables, and carrying cases unless specifically damaged. Proper preparation prevents additional damage during shipping and speeds up the repair process.
Understand Repair Costs Before Committing
DJI vs Third-Party Price Comparison
| Service Type | Diagnostic Fee | Typical Repair Range | Shipping Cost | Total Cost |
|---|---|---|---|---|
| DJI Official | $0 | $75-$100 | $0 | $75-$100 |
| The Drone Repair | $0 | Market rate | $15-$25 | $90-$150 |
| DDS Drone Repair | $0 | Market rate | $0 | Pay only if fixed |
Pro Tip: DJI Care Refresh reduces costs significantly but must be purchased before damage occurs. Without it, most non-structural repairs stay under $100, making insurance less cost-effective for minor crashes.
Post-Repair Setup Checklist for Immediate Flight
Reactivating Your Repaired Mavic in 5 Steps
After receiving your drone back, follow this sequence to ensure safe operation:
- Firmware update: Connect to DJI Fly app immediately—refurbished units often run outdated software
- Device pairing: Re-link controller and aircraft through the app
- FAA registration: Register new serial if you received a refurbished unit
- Critical calibrations: Run IMU, compass, and gimbal calibration before flight
- Test flight protocol: Conduct 5-minute hover test in safe area before full flight
Skipping these steps risks flight instability or connection issues that mimic unresolved damage. Proper reactivation ensures your DJI Mavic drone repair investment pays off with reliable performance.
Prevent Future Repairs With These Smart Habits
Pre-Flight Checks That Avoid Costly Crashes
Save yourself future Mavic drone repair headaches with these essential pre-flight habits:
- Prop tightness verification: Spin each propeller manually—no wobble should exist
- Gimbal obstruction check: Ensure no debris or tape blocks movement
- GPS signal verification: Wait for at least 10 satellites before flight
- Return-to-home altitude test: Confirm safe clearance above obstacles
Store your drone properly between flights by removing batteries for long-term storage, keeping it in temperature-controlled environments, and installing the gimbal lock when not flying. These simple practices extend your drone’s life and prevent many common repair scenarios.
Your DJI Mavic took a hit, but it doesn’t have to stay grounded. Whether you choose DJI’s official service for warranty peace of mind or a third-party shop to keep your original serial number, most repairs cost less than $100 and take under two weeks. The key is understanding exactly what you’re paying for—whether it’s your specific drone back or a certified replacement that flies just as well. Follow these preparation steps, know what to expect, and you’ll be back capturing aerial footage before the next weekend. Don’t let one crash ground your flying future—smart DJI Mavic drone repair decisions keep you in the air where you belong.


