
Your Phantom 4 just took a hard landing, and now you’re staring at bent props, a tilted camera, or worse—complete silence when you power it on. Before you panic about a $1,500 paperweight, know this: most crash damage is fixable, often for less than half the cost of replacement. Whether you’re weighing professional repair against DIY fixes or just need to understand what broke, this DJI Phantom drone repair guide walks you through every option to get your bird flying again.
From mail-in services that handle everything to sourcing parts for your own rebuild, we’ll cover exactly what to expect, what it costs, and how to avoid common rookie mistakes that turn minor repairs into expensive headaches. Most Phantom 4 owners can get back in the air within a week with the right approach—let’s get your drone flying again.
DJI Phantom 4 Repair Cost Breakdown: $700 Fix vs $1500 Replacement
The Drone Repair Service Timeline (Irvine, CA)
When your Phantom 4 arrives at The Drone Repair in Irvine, California, their specialized DJI technicians begin with a free diagnostic report within 1-3 business days. Complex cases might take up to 10 days, but most Phantom repairs wrap within a week once you approve the quote. You’ll receive email updates throughout the process, with clear photos of damaged components before any work begins.
What to Ship for Professional Repair:
– Drone body only (no batteries!)
– Remote controller only
– Never include: Propellers, cables, chargers, SD cards, or accessories
Return Shipping Costs:
– Phantom series: $25-45 (medium size category)
– Payment required after repair completion
– Shipping insurance available for high-value repairs
East Coast Alternative: Camrise’s $700 Phantom 4 Resurrection
For pilots on the East Coast, Camrise (formerly STC Electronics) in NYC offers comparable service with a proven track record. One documented case shows a Phantom 4 Pro fully rebuilt after a catastrophic crash onto marble flooring, with camera, gimbal, and shell replacement for around $700—still $800 cheaper than buying new. Their specialty is major crash damage where multiple components need replacement, and they’ve maintained positive reviews from experienced pilots for years.
Phantom 4 Motor Replacement: Avoid These 3 Costly Soldering Mistakes

Critical Pre-Repair Diagnostic Steps
Before ordering any parts for your DJI Phantom drone repair, complete these essential checks:
- Manual motor test: Spin each prop by hand—any resistance indicates motor damage
- Error documentation: Record every startup message verbatim (photos help)
- Cable inspection: Check ribbon cables for tears, especially around gimbal
- Parts list creation: Photograph all visible damage for accurate ordering
Critical Warning: Never cut and splice motor leads. These require precision desoldering from ESC boards—cheap soldering guns won’t cut it. Attempting improper soldering often creates additional damage that requires professional correction.
Phantom 4 Pro Motor Compatibility Guide
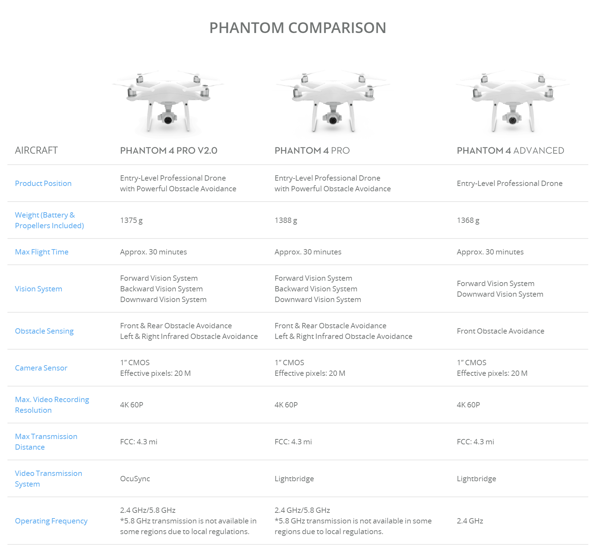
Phantom 4 Pro motors come in three variants, making part sourcing confusing. The most expensive version shares components with the Pro V2, but requires careful visual matching with supplier photos. When ordering replacement motors:
- Verify exact model number from damaged unit
- Compare photos with supplier listings
- Note that Phantom 4 Pro and Pro V2 have different landing gear designs
- Remember controller compatibility differs between Pro and Pro V2 models
DJI Phantom Drone Repair: When to DIY vs Call Professionals
Shell Replacement: The One DIY-Friendly Phantom Repair
Replacing your Phantom’s shell is the most accessible DIY repair with minimal risk. Most shell replacements take 45-90 minutes with just a Phillips #0 screwdriver. You can source body shells from Amazon for $30-60 with fast shipping, making this an ideal first repair project.
Successful Shell Replacement Checklist:
– Order exact model-specific shell (Pro vs Pro V2 differ)
– Remove all electronics carefully from damaged shell
– Transfer components one at a time to new shell
– Double-check all cable connections before final assembly
– Test flight in controlled environment after completion
Professional Repair Triggers: 3 Situations You Shouldn’t DIY
Certain damage scenarios require professional DJI Phantom drone repair expertise:
- Complete camera assembly detachment: Requires precision ribbon cable replacement
- Multiple motor failures: Indicates possible flight controller issues
- Water damage beyond drying: Needs professional component cleaning
One photographer documented a Phantom 4 Pro fully operational 2+ years after a 12-foot drop onto marble flooring, but only because they entrusted the complex camera/gimbal replacement to professionals while handling shell replacement themselves.
Phantom 4 Error Message Decoder: Fix ESC Failures in 20 Minutes
“Takeoff Error – Check Motors and Propellers” Solution
When your Phantom 4 displays “Takeoff error. Check the motors and propellers,” the problem is usually ESC (Electronic Speed Controller) related. Here’s your troubleshooting sequence:
- Swap propellers between motors—if error follows the propeller, it’s unbalanced
- Manually test each motor for free rotation
- Inspect ribbon cables between ESC and motors for damage
- Check gimbal connections as these often share circuitry
80% of ESC startup failures stem from damaged ribbon cables. Replacement takes 15-20 minutes with proper tools and correct OEM cables—never use aftermarket cables for gimbal connections as they cause calibration issues.
Motor Seizure Quick Fix Protocol
If motors won’t spin freely after a crash:
- Remove propellers completely
- Power on without props to test motor function
- If humming but not spinning, check for physical obstructions
- If completely silent, test with multimeter for electrical continuity
- Pro Tip: Apply light lubricant to motor shafts before reassembly (use only drone-specific lubricant)
Phantom 4 Repair Economics: The 50% Replacement Rule
Cost Breakdown for Major Crash Repairs
| Repair Type | Professional Cost | DIY Parts Cost | New Drone Cost |
|---|---|---|---|
| Camera/Gimbal | $400-700 | $200-350 | $1,500 |
| Shell Replacement | $150 | $30-60 | N/A |
| Single Motor | $200 | $45-75 | N/A |
| Complete Rebuild | $700+ | $200-400 | $1,500 |
The 50% rule determines your best path: if repair costs exceed half your drone’s value, consider replacement—unless sentimental value or specific features justify the premium. For most Phantom 4 owners, professional service makes sense for camera/gimbal damage, while shell replacement is perfect for DIY.
Hidden Costs to Consider:
– Quality soldering station ($80-150) for DIY repairs
– Time investment (4-6 hours for first rebuild)
– Learning curve with one “practice” assembly expected
Crash Prevention: Avoid Future DJI Phantom Drone Repair Needs
Sport Mode Danger Zone: What Beginners Must Know
Experienced pilots treat Sport Mode like a sports car—fun but unforgiving on uneven terrain. Beginners should master normal flight mode before attempting high-speed maneuvers. The most common crash pattern involves Sport Mode flights over uneven ground where altitude sensors struggle to adjust quickly.
Pre-Flight Checklist That Prevents 80% of Crashes:
– Verify GPS lock (minimum 10 satellites)
– Check battery levels (never below 20% for critical flights)
– Confirm propeller integrity (no cracks or bends)
– Clear surroundings of obstacles
– Calibrate compass before first flight of the day
Professional photographers sum it up perfectly: “If you fly, eventually you will crash.” Budget for repairs accordingly and treat your Phantom as the $1,500 flying camera it is—because it is.
Your Phantom Repair Decision Framework
Choose Professional Repair When:
– Camera/gimbal assembly completely destroyed
– Multiple system failures (motors + flight controller)
– Limited technical experience with electronics
– Quick turnaround needed for business use
DIY Repair Makes Sense When:
– Shell damage only (no electronics)
– Single motor replacement needed
– Previous electronics repair experience
– Cost is primary concern and time is available
Replacement Triggers:
– Flight controller damage
– Water damage beyond surface drying
– Repair quote exceeds 60% of new drone cost
Your Phantom’s crash isn’t the end—it’s often the beginning of understanding your drone better than ever. Most damage is repairable with the right approach, whether you ship it to specialists or tackle the rebuild yourself. With professional services completing most Phantom 4 repairs within a week and DIY options costing half as much as replacement, getting back in the air is easier than you think. The key is making an informed decision based on your specific damage pattern and technical confidence.


