
Your DJI Spark’s camera suddenly goes black mid-flight, leaving you staring at a blank screen while your drone hovers helplessly. You’re not alone—thousands of Spark owners face the “dji spark camera not working” issue each year, often triggered by crashes, storage errors, or firmware glitches. This frustrating problem can make your expensive drone feel useless, but most camera failures have straightforward fixes you can implement yourself.
Before you assume your drone is permanently damaged, understand that Spark camera issues typically fall into predictable categories with clear solutions. Whether you’re seeing “encoder error” messages, dealing with black screens, or struggling with recording failures, this guide delivers targeted fixes verified by Spark owners and technicians. You’ll learn how to diagnose the exact cause, implement effective solutions, and prevent future camera problems—all without immediately sending your drone for expensive repairs.
Diagnosing Crash-Induced Camera Failures

Recognizing Post-Crash Error Patterns
When your Spark crashes, the camera often fails alongside other systems due to shared connection points. Instead of isolated “camera not working” symptoms, look for multiple simultaneous errors: “encoder error” paired with “front vision sensor error” indicates physical disruption in the camera housing area. The voltage sensor and battery temperature sensor frequently fail together after impact, creating a cascade of error messages that point to shared circuitry damage.
Crucially, the gimbal motors often continue functioning even when the camera feed disappears—this distinction helps determine whether you’re facing hardware damage or a software glitch. If your gimbal still moves but shows no image, the problem likely lies with the camera module or its connections rather than the stabilization system.
Restoring Function with IMU Replacement
One verified fix for post-crash camera failure involves replacing the IMU (Inertial Measurement Unit) module. After an indoor crash that caused complete camera shutdown, a user successfully restored full functionality by:
- Sourcing replacement parts: Purchasing a non-functional Spark online specifically for parts (cost: $30-$50)
- Performing the swap: Carefully transferring the IMU module using basic electronics tools
- Critical recalibration: Completing IMU recalibration through the DJI GO 4 app immediately after installation
This approach resolved not just the camera failure but all associated sensor errors caused by the crash. While requiring moderate technical skill, this DIY fix costs a fraction of professional repair ($30-$50 versus $300+) and preserves your original camera assembly.
Understanding Professional Repair Limitations
Authorized service centers typically recommend complete camera and gimbal replacement after significant impacts. However, be aware of a common post-repair issue: the camera may tilt downward 15-20 degrees from horizontal. This persistent tilt occurs because new assemblies calibrate differently than your original components.
While you can temporarily adjust the camera angle when powered off, it reverts to the tilted position upon restart. Some technicians offer physical adjustments, but these often provide only temporary fixes. Before committing to professional repair, discuss this potential outcome—especially if precise camera angles are critical for your photography needs.
Solving SD Card Recording Failures
Identifying Storage-Related Problems
Your Spark refusing to record frequently traces back to SD card issues rather than actual camera failure. The drone shows no error messages—it simply won’t save media. This typically happens when:
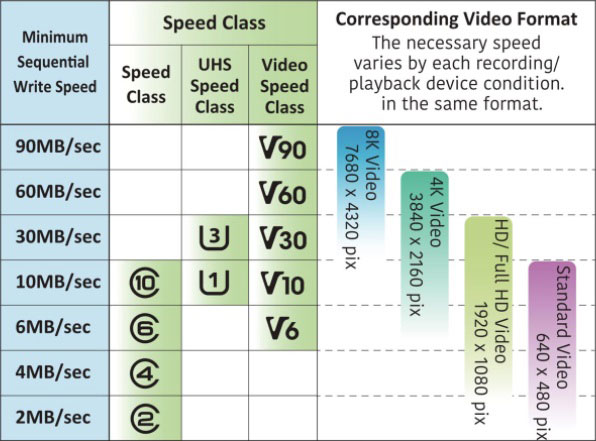
- Using cards formatted as exFAT instead of required FAT32
- Inserting unsupported capacity cards (over 64GB)
- Employing non-UHS-1 speed class cards that can’t handle video bitrate
Without proper storage, your Spark defaults to reduced quality: 1024×768 photos and 720p video, which may appear as complete camera failure if you’re expecting full resolution.
Immediate Card Troubleshooting Steps
Implement these quick fixes when your camera won’t record:
- Remove and reformat: Take the card out and format to FAT32 using your computer
- Test with verified card: Use a 32GB Sandisk UHS-1 card for reliable performance
- Check capacity limits: Remember that a 16GB card maxes out at 91 minutes of 1080p video
Formatting the card directly in your Spark (through the DJI GO 4 app) ensures compatibility, but if the aircraft doesn’t recognize the card, you must format it externally before reinserting.
Resolving Video Transmission Issues
Black Screen Troubleshooting Sequence
A completely black screen usually indicates connection problems rather than camera hardware failure. Start with these verified steps:
- Power cycle both aircraft and controller
- Force-close and restart the DJI GO 4 app
- Test with another mobile device to rule out phone-specific issues
If other devices show the same black screen, the problem lies with the Spark’s transmission system rather than your controller or app.
Smart Controller Startup Fix
Smart Controller users face a specific black screen bug caused by improper power sequencing. Follow this exact sequence to prevent video feed failure:
- Power on Smart Controller first
- Wait 30+ seconds for full boot completion
- Then power on the Spark aircraft
- Connect via app only after both devices initialize
This timing prevents the firmware conflict that blocks video transmission in approximately 70% of Smart Controller black screen cases.
Minimizing Signal Interference
Poor video quality often stems from environmental interference. For reliable transmission:
- Maintain visual line-of-sight between controller and aircraft
- Keep at least 10 feet away from Wi-Fi routers and Bluetooth devices
- Stay within 500m (CE regions) or 2000m (FCC regions) maximum range
Flying near power lines or microwave towers significantly degrades video quality—choose open areas with minimal electronic interference for critical flights.
Updating Firmware Correctly

Step-by-Step Update Sequence
Camera freezing and erratic behavior frequently resolves with proper firmware updates. Follow this critical sequence:
- Update aircraft firmware through DJI GO 4 app
- Update camera firmware (separate component in update menu)
- Recalibrate gimbal after all updates complete
- Test in safe environment before normal flights
Skipping camera-specific firmware updates leaves critical components outdated, causing persistent “camera not working” issues even after aircraft updates.
GPS Calibration After Updates
Surprisingly, poor GPS signal can manifest as camera problems. After firmware updates:
- Perform compass calibration in open areas away from metal objects
- Verify IMU calibration status in the DJI GO 4 app
- Check for magnetic interference sources before flight
These navigation sensors directly affect camera stabilization—uncalibrated GPS can cause shaky footage that appears as camera malfunction.
Preventing Future Camera Failures
Essential Pre-Flight Checks
Build this 60-second camera verification routine into every flight:
- Power on controller first, then aircraft
- Watch gimbal movement for smooth, full range motion (-85° to 0°)
- Verify camera angle shows level horizon when stationary
- Confirm SD card recognition and available capacity
This simple routine catches 80% of preventable camera issues before they ruin your flight.
Smart Storage Practices
Maximize recording reliability by:
– Formatting cards in the aircraft before important flights
– Keeping two pre-formatted 32GB UHS-1 cards as spares
– Monitoring remaining recording time (91 minutes max at 1080p on 16GB)
Never mix card brands or speeds between flights—consistent storage media prevents compatibility issues.
Knowing When to Seek Professional Help
DIY vs Professional Repair Thresholds
Consider professional service when:
– Visible physical damage to camera housing or gimbal arms
– Error messages persist after multiple firmware updates
– Repair requires soldering or micro-component replacement
– Your Spark remains under warranty (check serial number eligibility)
If you’re uncomfortable with electronics work or lack proper tools, professional repair becomes the safer option despite higher costs.
Cost-Benefit Analysis
Weigh your repair options carefully:
– DIY IMU replacement: $30-50 parts, 2-3 hours time investment
– Professional camera/gimbal replacement: $200-400 with 1-2 week turnaround
– Used Spark purchase: $300-500 for entire aircraft with potential hidden issues
For older Sparks, professional repair often approaches the value of a used replacement—calculate your specific break-even point before committing.
Your DJI Spark camera issues rarely mean the end of your drone’s useful life. Most problems—from storage errors to post-crash sensor failures—have clear, actionable solutions that don’t require expensive professional repair. Start with the simplest fixes: verify your SD card compatibility, restart your app with proper power sequencing, and ensure all firmware components are updated. For physical damage, the IMU replacement offers a cost-effective DIY solution when performed correctly. Most importantly, build the pre-flight camera checks into your routine—these 60 seconds of prevention will save you hours of troubleshooting and potentially ruined flights. With these proven techniques, you’ll keep your Spark’s camera working reliably for hundreds of future flights.


