
Your nitro RC car’s idle setting is the foundation of smooth operation, yet it’s one of the most overlooked tuning aspects for beginners. When properly adjusted, your engine will start reliably, maintain consistent speed during stops, and respond instantly to throttle input. A poorly tuned idle causes frustrating stalls, sluggish acceleration, and unnecessary wear on your expensive engine. Whether you’re dealing with a new build or troubleshooting an existing setup, mastering idle adjustment transforms your driving experience from frustrating to fluid. This guide provides the exact steps to achieve perfect idle settings on your nitro-powered machine, eliminating guesswork and getting you back to enjoying your RC car.
Locate the Idle Adjustment Screw on Your Specific Engine

Finding the idle screw requires careful examination of your carburetor assembly since placement varies across manufacturers and engine models. On most standard nitro engines like the popular OS Maxx or Novarossi units found in 1/10 scale buggies, the idle screw sits on the side of the carburetor opposite the high-speed needle valve. It typically appears as a small brass screw with either a flathead or Phillips slot, though some premium engines feature hex socket heads for more precise adjustment.
Examine your carburetor closely—you should see a throttle linkage connected to a rotating barrel inside the carburetor body. The idle screw physically contacts this linkage to prevent it from closing completely. On engines like the Losi .21 or Team Associated S15, this screw often protrudes from the carburetor base near the engine mounting point. If you’re working with a newer brushless conversion carburetor, check for a small adjustment knob rather than a traditional screw. Always refer to your specific engine’s manual before proceeding, as misidentifying the idle screw as another adjustment can lead to serious tuning issues.
How to Identify the Idle Screw vs. Other Carburetor Components
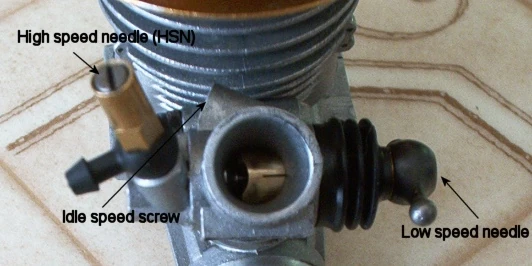
Distinguishing the idle adjustment from other carburetor screws prevents costly mistakes during tuning. The high-speed needle (usually on top of the carburetor) controls the fuel mixture at wide-open throttle, while the low-speed or idle mixture needle (typically at the carburetor base) regulates fuel flow at idle and low RPM. The idle screw is unique because it’s the only adjustment that physically limits how far the throttle can close—you can verify this by watching the throttle linkage move as you turn the screw.
When examining your carburetor, look for these visual cues:
– The idle screw often has a spring-loaded tip to maintain constant contact with the throttle linkage
– Unlike mixture needles, the idle screw doesn’t have a spring underneath it
– Turning the idle screw produces immediate, noticeable changes in engine RPM even when not running
– On many engines, the idle screw sits in a vertical orientation while mixture needles are horizontal
Adjust the Idle Screw for Correct RPM Without Stalling
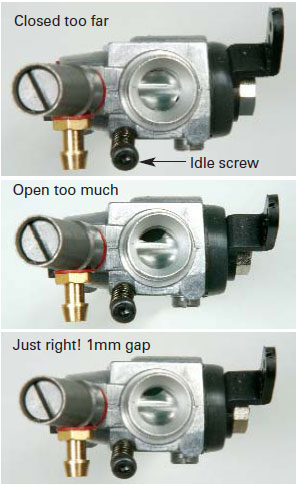
With your engine warmed up for 2-3 minutes, begin making precise adjustments to the idle screw using a properly sized screwdriver that fits snugly in the slot. Start with quarter-turn increments—turn clockwise to raise the idle RPM or counterclockwise to lower it. After each adjustment, wait 5-10 seconds for the engine to stabilize before making additional changes. Rushing this process leads to over-adjustment and frustration.
Your target idle RPM depends on engine size and vehicle type. For most 1/10 scale buggies with .12-.18 cubic inch engines, aim for 4,000-6,000 RPM at idle—this produces a steady, confident hum without sounding strained. Larger .25 cubic inch engines in monster trucks perform best at 3,500-5,000 RPM. The sweet spot is the lowest stable RPM where the engine doesn’t stall when you tap the chassis or apply slight load. Test stability by gently pressing down on the tire while idling—if the engine maintains speed without hesitation, you’ve found the ideal setting.
Recognizing Proper vs. Improper Idle Settings by Sound
Your ears provide the most immediate feedback about idle quality since visual RPM measurement requires additional tools. A perfectly tuned idle produces a smooth, consistent tone without irregular sputtering or surging. Listen carefully as you make adjustments—your ideal idle should sound like a steady purr rather than a choppy, uneven rhythm.
When the idle is too low, you’ll hear the engine “cough” or sputter before potentially stalling. If the idle is too high, the engine produces a sharp, racing sound even when stationary, and you might notice the car creeping forward slightly on its own. The transition from too low to perfect idle is unmistakable—you’ll hear the engine settle into a stable, even rhythm that maintains itself consistently. Practice identifying these sounds with your specific engine to develop your tuning intuition over time.
Fine-Tune with Idle Mixture Needle for Smooth Transitions
After establishing proper idle speed, adjust the idle mixture needle to optimize how the engine responds when transitioning from idle to acceleration. Locate the idle mixture needle (often labeled “L” or “IDL”) at the base of your carburetor, typically near the intake manifold. With the engine running at operating temperature, turn the needle counterclockwise to enrich (add fuel) or clockwise to lean (reduce fuel) the mixture at idle.
Perform this critical test: with the engine idling smoothly, quickly apply full throttle and immediately release it. A properly tuned idle mixture allows the engine to accelerate instantly without hesitation and return to a stable idle within 1-2 seconds. If the engine stumbles or nearly stalls during this transition, the mixture is too lean—turn the needle counterclockwise 1/8 turn at a time until smoothness improves. If the engine produces excessive smoke or “bogs down” when accelerating from idle, the mixture is too rich—turn the needle clockwise in small increments.
Troubleshooting Common Idle Mixture Problems
Even with correct idle speed, mixture issues cause frustrating performance problems that require systematic troubleshooting. If your engine starts well but stalls when you apply the brakes or come to a stop, you likely have a lean idle mixture—common after running a fresh engine that hasn’t fully broken in. Gradually enrich the mixture until the engine maintains idle through braking maneuvers.
Conversely, if your engine idles smoothly but produces thick blue smoke and struggles to reach full RPM, you’re running too rich at idle. This wastes fuel and creates unnecessary heat buildup. Methodically lean the mixture while monitoring performance until the smoke reduces to a light haze and acceleration becomes crisp. Remember that mixture adjustments interact with idle speed settings—you may need to revisit both adjustments iteratively to achieve perfect harmony between them.
Adapt Idle Settings for Changing Environmental Conditions
Temperature and altitude changes significantly impact how your nitro engine performs at idle, requiring regular adjustments to maintain optimal performance. On hot days above 85°F (29°C), the air density decreases, causing your engine to run leaner than normal. Compensate by slightly enriching the idle mixture and potentially raising the idle speed 200-300 RPM to maintain stability. Cold mornings below 60°F (15°C) have the opposite effect—denser air creates richer conditions that often require leaning the mixture and lowering idle speed to prevent excessive smoke and rough running.
Altitude changes present another tuning challenge, especially if you race at locations significantly above sea level. For every 1,000 feet of elevation gain, reduce your idle mixture by approximately 1/8 turn and lower idle speed by 200-300 RPM. Serious racers maintain a tuning log noting their optimal settings for different tracks and conditions, allowing them to quickly return to proven configurations rather than starting from scratch each time. When in doubt, start slightly rich and adjust leaner as needed—running too lean risks engine damage while running rich only affects performance temporarily.
Prevent Idle Drift with Proper Maintenance
Vibration from operation gradually loosens carburetor adjustments, causing your carefully tuned idle to “drift” over time. Many quality nitro engines feature lock nuts on adjustment screws that prevent this movement—always tighten these after final tuning. If your carburetor lacks lock nuts, apply a tiny drop of medium-strength thread locker to the idle screw threads after achieving perfect settings, being careful not to get any on the screw head where it would interfere with future adjustments.
Regular maintenance preserves your idle settings between tuning sessions. Clean or replace your air filter before every run session to ensure consistent air flow—clogged filters create artificially rich conditions that destabilize idle. Inspect the carburetor linkage for wear or binding, as sticky linkages cause inconsistent idle behavior regardless of your settings. Finally, use fresh nitro fuel with proper oil content—old fuel that has absorbed moisture creates erratic running conditions that mimic tuning problems but actually stem from fuel quality issues.
Know When to Seek Professional Engine Service
Some idle problems indicate serious mechanical issues that no amount of carburetor adjustment can resolve. If your engine consistently stalls despite perfect carburetor settings, check for these warning signs of internal damage: excessive blue smoke at idle (worn piston ring), metal flakes in your fuel filter (bearing failure), or progressive loss of power throughout a tank run (head shim compression or seal failure). These conditions require professional service or complete engine rebuild rather than simple tuning.
Carburetor wear also eventually prevents stable idle regardless of adjustment skill. Inspect for these signs that your carburetor needs replacement: visible scoring in the throttle bore, cracked or hardened O-rings, or persistent idle instability despite thorough cleaning. If you’ve methodically checked all other possibilities and still can’t achieve stable idle, consult an experienced nitro mechanic—continuing to run with unresolved mechanical issues risks catastrophic engine failure and more expensive repairs down the line.
Mastering idle adjustment on your nitro RC car transforms frustrating sessions into smooth, reliable performance. Start with small, deliberate changes to the idle screw and mixture needle, always allowing time for the engine to stabilize between adjustments. Keep a tuning log noting what works in different conditions—this record becomes invaluable as you gain experience. With practice, you’ll develop an intuitive sense for your engine’s ideal settings, allowing you to achieve perfect idle quickly and consistently. Remember that proper idle tuning isn’t a one-time task but an ongoing process that adapts to your engine’s condition and the environment. By following these steps, you’ll enjoy more track time, less frustration, and the satisfaction of knowing your nitro RC car is performing at its absolute best.


