

Remote control cars demand precise steering adjustments to deliver the responsive handling that separates average drivers from top competitors. When your RC car’s steering feels sluggish through corners or pulls to one side unexpectedly, it’s more than just frustrating—it directly impacts your lap times and driving enjoyment. The good news is that most steering issues can be resolved with systematic adjustments using basic tools you likely already own. Whether you’re preparing for your first race or fine-tuning your daily driver, knowing how to adjust RC car steering properly transforms unpredictable handling into confidence-inspiring control.
Poor steering alignment creates domino-effect problems: inconsistent cornering, premature tire wear, and servo strain that drains battery life faster. Many beginners waste hours replacing parts when simple calibration would solve the issue. This guide provides the exact steps to diagnose and fix steering problems, with specific techniques that work across most RC car models—from entry-level bashers to competition-grade machines.
Calibrate Your Radio System Before Mechanical Tweaks
Start with your transmitter settings before touching any physical components—misconfigured radio parameters often mimic mechanical steering problems. Power on both your transmitter and receiver, then center the steering wheel on your controller. Watch the servo horn attached to your steering servo; it should sit perfectly perpendicular to the servo body. If it’s angled even slightly, this misalignment causes inconsistent steering response.
Navigate to your transmitter’s sub-trim or steering center menu and adjust until the servo horn aligns perpendicular with the steering wheel centered. This calibration establishes your true neutral position without altering maximum throw. Next, test endpoint symmetry by turning the steering wheel fully left and right while observing wheel travel. Both sides should turn equally—if not, access your endpoint adjustment (EPA) settings and modify left/right values until wheel rotation matches precisely. Unequal endpoints make your RC car pull to one side during turns, destroying your racing lines and consistency.
Position Your Servo Horn for Optimal Steering Response
The angle of your servo horn relative to the steering linkage critically affects steering feel and precision. With steering centered, examine where the linkage connects to the servo horn—it should form a near 90-degree angle with the servo shaft when wheels point straight ahead. This geometry delivers the most linear response throughout the entire steering range.
Most servo horns feature multiple mounting holes allowing different throw characteristics:
– Outermost hole: Maximum steering authority (best for tight tracks)
– Middle hole: Balanced response (ideal for general bashing)
– Innermost hole: Reduced throw for precise control (technical courses)
Loosen the servo horn screw, rotate to your preferred position, then retighten while maintaining perfect centering. Test drive with each position to determine what works best for your driving style—small changes here dramatically alter handling feel. Remember to recheck endpoint symmetry after any servo horn adjustment.
Perfect Your Toe Alignment with Tie Rod Adjustments
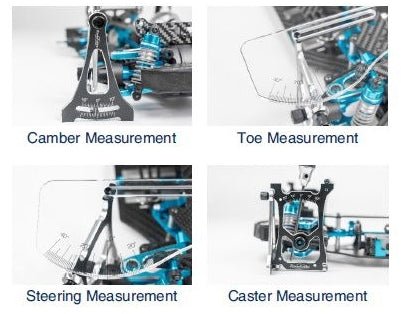
Toe angle—whether wheels point slightly inward (toe-in) or outward (toe-out) when viewed from above—directly impacts straight-line stability and corner entry behavior. Most RC cars ship with slight toe-out (1-3 degrees) for beginner-friendly stability, but competitive setups often require zero toe or slight toe-in on high-traction surfaces.
To measure current toe:
1. Place your RC car on a flat surface
2. Use a ruler to measure distance between front tire edges
3. Measure again between rear tire edges at same height
4. Compare front vs. rear measurements
Adjust by loosening tie rod collars and rotating the rods:
– Lengthen tie rods (turn counter-clockwise) for more toe-out
– Shorten tie rods (turn clockwise) for toe-in
Make quarter-turn adjustments, then retest—small changes create noticeable handling differences. For carpet racing, try 1-2 degrees toe-in; for loose dirt, increase to 2-4 degrees toe-out. Always adjust both sides equally unless intentionally creating an asymmetric setup for specific handling characteristics.
Optimize Steering Rate and Exponential Settings
Your transmitter’s steering rate (dual rate) and exponential settings fine-tune how steering inputs translate to wheel movement. Access these through your transmitter menu:
Steering Rate (D/R):
– 50-60%: Beginner-friendly, reduced sensitivity
– 70-80%: Competitive balance for most tracks
– 90-100%: Maximum responsiveness for technical courses
Exponential (EXPO):
– +10 to +30: Reduced center sensitivity (smoother steering)
– 0: Linear response (direct but potentially twitchy)
– -10 to -20: Increased center sensitivity (aggressive steering)
Higher rate with positive exponential creates progressive steering—smooth at center but responsive at full lock—ideal for most racing conditions. Lower rate with zero exponential suits beginners still developing steering control. Test different combinations on your local track to find your sweet spot; most serious racers settle around 80% rate with +20 exponential.
Maintain Steering Components to Prevent Performance Drift
Even perfect initial adjustments mean nothing if components wear or loosen over time. Before each driving session:
- Check tie rod ends: Grasp each rod near the ball joint and wiggle side-to-side—any movement indicates worn bearings needing replacement
- Inspect servo output spline: Look for stripped teeth or plastic fragments inside the chassis
- Test servo holding power: A buzzing or drifting servo suggests internal gear wear
- Clean linkage regularly: Wipe down components after dusty or muddy runs
- Lubricate appropriately: Apply manufacturer-recommended grease to ball joints
Replace bent tie rods immediately—attempting to straighten them weakens the metal and invites catastrophic failure mid-drive. Pay special attention to ball cups and steering blocks; these inexpensive parts dramatically affect steering precision when worn.
Diagnose and Fix Common Steering Issues

When your RC car exhibits unpredictable steering behavior, use this troubleshooting flow:
Problem: Sluggish response or binding during turns
Solution: Disconnect steering linkage from servo horn and manually move wheels through full travel. If resistance occurs, check for:
– Misaligned steering blocks
– Debris in linkage joints
– Suspension arms rubbing against chassis
Problem: Car pulls to one side despite proper calibration
Solution: Re-check endpoints with car both elevated and on ground—suspension compression affects geometry. If still pulling, compare left/right suspension arms for bends using a ruler.
Problem: Steering feels “nervous” or over-responsive
Solution: Reduce steering rate and increase exponential settings. Consider adding slight toe-in for high-traction surfaces.
Customize Steering for Different Driving Conditions
Adjust your setup based on track surface:
– High-traction surfaces (carpet/concrete): Reduce rate to 70-80%, add +20-30 exponential, try slight toe-in
– Loose surfaces (dirt/sand): Increase rate to 90-100%, reduce exponential, add 2-4 degrees toe-out
– Technical tracks: Prioritize precision with reduced throw and higher exponential
– High-speed tracks: Maximize responsiveness with higher rate settings
Remember to adjust slipper clutch tension along with steering—too loose causes wheelspin that overwhelms steering, while too tight reduces corner exit speed.
Complete Final Verification Before Driving
Before hitting the track, run through this checklist:
– Confirm transmitter/receiver binding is solid
– Verify sub-trim centers servo horn perfectly
– Check equal left/right wheel travel
– Ensure tie rods are equally adjusted
– Test full steering range for binding
– Perform short test drive with figure-eight patterns
Record final settings in a notebook including sub-trim values, endpoints, rate, exponential, and toe measurements. This reference becomes invaluable when you find a winning setup or need to return to baseline after experimenting.
Mastering how to adjust RC car steering transforms frustrating handling into predictable, confidence-inspiring control. Start with radio calibration, methodically work through mechanical adjustments, and always test changes individually. With practice, you’ll develop the intuition to diagnose steering issues instantly and make precise tweaks that maximize performance in any condition. The difference between good and great RC driving often comes down to these critical steering adjustments—take the time to get them right, and you’ll leave the competition in your dust.


