
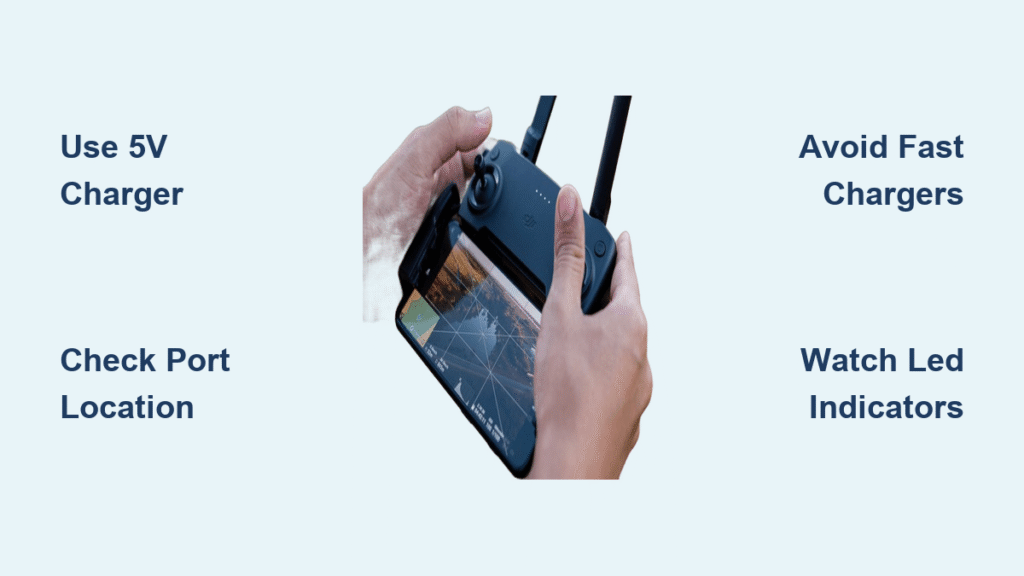
Your drone controller dies mid-flight session, and you’re left grounded with a $1,000 paperweight. Sound familiar? Charging DJI controllers isn’t complicated, but getting it wrong can leave you scrambling for power when you should be soaring through the skies. This guide breaks down the exact steps for every major DJI controller model, plus the critical mistakes that drain batteries faster than you can say “takeoff.”
Whether you’re flying a Mavic Mini or Mavic Air, you’ll learn the precise charging methods, optimal power sources, and pro tips that separate successful pilots from grounded beginners. Understanding how to charge DJI drone controller properly ensures you’re always ready for flight without risking damage to your expensive equipment.
Micro-USB vs USB-C Port Locations

Every DJI controller hides its charging port in plain sight—you just need to know where to look. The side panel contains the single port that powers your entire flight session, but the connector type varies dramatically between models.
Mavic Mini Controller:
– Port Type: Micro-USB (small rectangular connector)
– Location: Left side panel, clearly labeled
– Cable Needed: Standard micro-USB to USB-A (same as most Android phones pre-2018)
Mavic Air Controller:
– Port Type: Micro-USB for charging only
– Location: Right side panel, separate from phone connection port
– Cable Needed: Requires USB-C to micro-USB adapter (included in box)
Find Your Controller’s Hidden Port
- Hold controller horizontally with screen facing you
- Check both side panels for small rectangular or oval ports
- Look for charging symbols (⚡) near the port
- Identify connector shape: Micro-USB = flat rectangle, USB-C = rounded oval
Many pilots mistakenly try to charge through the drone’s USB-C port on the Mavic Air controller. This won’t work—charging happens exclusively through the separate micro-USB port. Take 10 seconds to locate your specific port before attempting to charge.
Mavic Mini Controller Charging Steps
The Mavic Mini controller follows the simplest charging protocol in DJI’s lineup. No adapters, no confusion—just plug and power up.
Required Equipment
- Micro-USB cable (included with controller)
- USB power source (5V/1A minimum)
- 2-3 hours available charging time
Quick Charging Process
- Power down controller completely (hold power button 2 seconds)
- Connect micro-USB cable to side port until it clicks
- Plug USB end into wall adapter, computer, or power bank
- Watch LED indicators blink during charging
- Unplug when solid (all LEDs stop blinking)
Pro Tip: Controller works while charging, but response lag increases 15-20%. For precision flying, wait for full charge.
Charging Without Wall Outlet
- Laptop USB: 3-4 hours (slower but reliable)
- Power bank: 2-3 hours (ensure 10,000mAh+ capacity)
- Car charger: 2.5 hours (verify 5V/2A output)
Unlike some controllers, the Mavic Mini doesn’t require any special adapters—just plug your standard micro-USB cable directly into the side port. This simplicity makes it the most travel-friendly option in DJI’s lineup.
Mavic Air Controller Power-Up Method

Don’t let the USB-C drone port fool you—the Mavic Air controller stubbornly sticks with micro-USB for charging. This design quirk trips up 90% of new pilots.
Adapter Connection Sequence
- Disconnect phone cable from controller bottom
- Locate micro-USB port on controller’s right side
- Attach USB-C adapter (small black piece from original box)
- Connect USB-C cable to adapter’s female end
- Plug into power (wall adapter recommended)
Travel Cable Kit Essentials
- Primary: USB-C to micro-USB adapter (tiny, easily lost)
- Backup: Dedicated micro-USB cable (foolproof option)
- Power bank: 20,000mAh for all-day sessions
Warning: Using the drone’s USB-C cable directly won’t work—it needs the adapter bridge. The Mavic Air controller’s charging process is less intuitive than the Mavic Mini’s, but following this specific sequence ensures proper connection every time.
Power Source Requirements and Safety

Your controller’s lithium battery demands specific power characteristics. Get this wrong and you’ll face slow charging, overheating, or permanent battery damage.
Minimum Power Specifications
- Voltage: Exactly 5V (no fast-charge protocols)
- Current: 1A minimum, 2A optimal
- Total Wattage: 5-10 watts maximum
Safe Power Sources Ranked
- DJI official charger: Zero risk, perfect voltage
- Quality phone charger: Samsung, Apple, Anker brands
- Computer USB: Safe but slow (500mA-1A typical)
- Power bank: Check 5V output rating carefully
- Avoid: Cheap gas station chargers, unknown brands
Cable Quality Check
- Inspect weekly: Frayed cables cause 40% of charging failures
- Test fit: Loose connections = slow charging
- Length matters: 3-6 feet optimal (longer = voltage drop)
Using incompatible chargers with higher voltage outputs (like 9V or 12V fast chargers) can permanently damage your controller’s charging circuitry. Always verify your power source delivers exactly 5V before connecting.
LED Indicator Meanings Explained
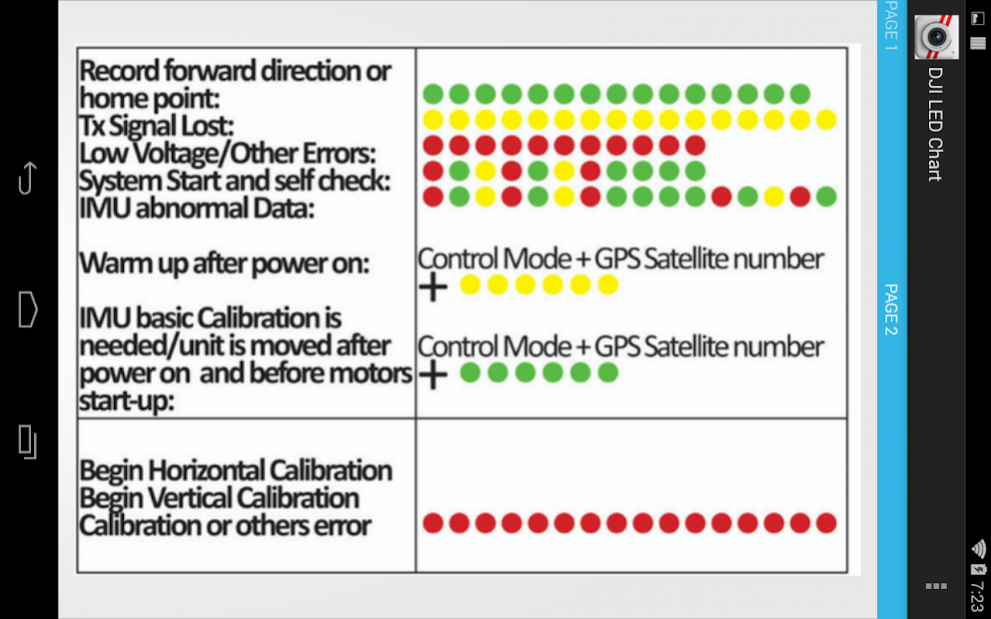
Those four tiny lights tell the complete charging story—if you know the language. Each blink pattern reveals battery status, problems, and completion time.
Light Pattern Decoder
- Rapid blinking (all 4): 0-25% charged, 2+ hours remaining
- 3 blinking, 1 solid: 25-50% charged, 1-1.5 hours remaining
- 2 blinking, 2 solid: 50-75% charged, 30-60 minutes remaining
- 1 blinking, 3 solid: 75-99% charged, 10-20 minutes remaining
- All solid: 100% charged, ready to fly
No Lights Troubleshooting
- Check cable connection (unplug/replug firmly)
- Test power source (try different wall adapter)
- Inspect port debris (use toothpick gently)
- Reset controller (hold power 10 seconds)
These LED indicators provide immediate feedback on your charging status. Learn this language to avoid unnecessary panic when your controller appears unresponsive.
Charging While Flying Setup
Long commercial shoots demand creative power solutions. DJI controllers support operation during charging, but performance trade-offs exist.
Power Bank Flight Configuration
- Secure power bank to controller with Velcro straps
- Use 90-degree cable to prevent snags
- Activate low-power mode on phone (reduce heat)
- Monitor controller temp every 15 minutes
Performance Impact Assessment
- Response delay: +15-20ms with power bank
- Signal range: Reduced 5-10% due to cable interference
- Heat buildup: 15°F warmer in direct sunlight
- Solution: Remove power bank for critical shots
Expert Note: For cinematic shots requiring precise stick inputs, charge between takes rather than during flight. This maintains optimal control responsiveness when it matters most.
Common Charging Mistakes to Avoid
Even experienced pilots make these battery-killing errors. Each mistake shortens overall battery lifespan and creates unreliable performance.
Top 3 Controller Killers
- Fast-charge adapters: Deliver 9V/12V instead of 5V—fries circuits
- Car chargers without regulation: Voltage spikes destroy batteries
- Leaving plugged in overnight: Overcharges cells, reduces capacity 20%
Cable Management Disasters
- Yanking cables out: Damages port solder joints
- Tight wraps: Breaks internal wires over time
- Moisture exposure: Corrodes charging pins
Prevention Checklist
- [ ] Always use 5V/1-2A sources
- [ ] Disconnect when LEDs turn solid
- [ ] Store cables loosely coiled
- [ ] Keep ports covered when not charging
The most common mistake I see is using the drone’s USB-C cable directly with the Mavic Air controller—this won’t work without the adapter. Always verify your connection sequence matches your specific model.
Travel Charging Solutions
Airport layovers and remote locations demand portable, reliable charging setups. Build a kit that works worldwide without adapters or voltage concerns.
Universal Travel Kit
- Anker PowerCore 20,000mAh (TSA-approved, 6+ charges)
- Micro-USB cable (3ft braided, tangle-free)
- USB-C to micro-USB adapter (backup for Mavic Air)
- Dual-port wall charger (5V/2A per port)
International Power Strategy
- Voltage compatibility: All USB sources auto-adjust worldwide
- Plug adapters: USB chargers work in any country
- Backup plan: Hotel USB ports, airport charging stations
Pro Setup: Pre-charge power bank at home, use it to charge controller during travel days. Never depend on finding outlets in the field. This ensures you’re always ready to fly upon arrival at your destination.
Battery Lifespan Maximization
Your controller’s sealed battery lasts 300-500 cycles before noticeable degradation. Smart charging habits can push this to 600+ cycles, adding years of reliable service.
Optimal Charging Schedule
- Never below 20%: Deep discharges damage lithium cells
- Never above 90%: Reduces stress, extends lifespan
- Weekly calibration: Full 0-100% cycle monthly
Storage Best Practices
- 50% charge for storage: Reduces cell stress during downtime
- Cool, dry location: Heat kills batteries faster than use
- Monthly top-off: Prevents deep discharge during long storage
Warning Sign: If charge time drops below 1 hour from empty, battery degradation is accelerating. Plan replacement within 6 months. Proper care extends your controller’s usable life significantly.
Emergency Power Recovery
Dead controller in the field? These last-resort methods can squeeze enough power for that crucial final shot.
5-Minute Quick Charge
- Use highest-rated adapter available (2A minimum)
- Power controller off completely
- Charge exactly 5 minutes (gains 10-15%)
- Disconnect immediately for flight
Solar Charging Reality Check
- Small panels: 6-8 hours for full charge (impractical)
- Large panels: 2-3 hours but requires 20W+ output
- Weather dependency: Clouds stop charging instantly
Emergency charging should be exactly that—emergency only. Regular use of quick-charge methods will degrade your battery faster than proper charging cycles.
Your controller is now your reliable flying companion, not your flight limitation. Remember: 5V/1A sources prevent damage, micro-USB remains king despite USB-C confusion, and those LED lights tell you everything you need to know. Charge smart, fly longer, and never miss another perfect shot because of a dead controller.


