You’ve scouted the perfect location, drone charged and ready—only to see ominous blue zones covering your flight area on the DJI Fly map. Your motors won’t arm, and that frustrating “Authorization Zone” warning blocks your takeoff. Before January 2025, this meant jumping through DJI’s unlock hoops. Now, the rules have fundamentally changed, but your legal responsibility has never been greater. This guide cuts through the confusion to show exactly how to legally fly your DJI drone in authorization zones under the new system, including critical FAA requirements and field-tested troubleshooting.
Here’s what’s different: DJI’s January 13, 2025 update removed automatic geofencing across all models. Blue and red zones now show as Enhanced Warning Zones—not hard locks. You can take off without DJI’s permission, but flying without proper FAA authorization remains illegal. This isn’t a loophole; it’s a shift of full compliance responsibility to you as the pilot. Skip the FAA steps, and you risk fines up to $32,666 per violation. In this guide, you’ll learn the exact pre-flight checklist, how to navigate both new and legacy systems, and pro field techniques to avoid getting grounded.
New 2025 Authorization Zone Rules That Change Everything

DJI’s firmware update fundamentally redefined how authorization zones operate. The most critical shift? No more automatic takeoff blocks. What were once mandatory unlock zones now display warnings instead of preventing flight. But this convenience comes with serious legal implications you can’t ignore.
What Changed in 2025 (And Why It Matters)
- Blue zones require zero DJI unlock—just acknowledge the Enhanced Warning Zone prompt in-app
- Red restricted zones operate identically to blue zones under the new system
- Your FAA authorization is now 100% your responsibility—DJI no longer verifies compliance
- Firmware version 01.13.2025 or newer is mandatory to access these changes
Critical reality check: If your DJI Fly app still shows red zones or forces unlock prompts, you’re running outdated firmware. Update immediately via DJI Assistant 2 (desktop) before attempting any flight. Under the new rules, you’ll see a yellow warning banner—not a motor lock—but proceeding without FAA approval is still illegal. Remember: DJI’s system now only warns, not stops you. The legal risk shifts entirely to your shoulders.
Pre-Flight Authorization Requirements You Can’t Skip
No amount of DJI unlock tricks replaces mandatory FAA authorization for controlled airspace. This isn’t optional—it’s federal law enforced by the FAA. Attempting to bypass this step risks severe penalties, including permanent loss of your Part 107 license.
FAA Authorization Methods Ranked by Speed
- LAANC (Low Altitude Authorization and Notification Capability): Your fastest option for standard zones. Submit via FAA DroneZone and get approval in under 5 minutes for 90% of requests. Valid for 1 hour to 12 hours.
- COA (Certificate of Waiver or Authorization): Required for complex operations near airports or restricted facilities. Submit 90+ days early via FAA DroneZone; approval takes 2-6 weeks.
- Part 107 Waiver: Needed for operations beyond standard rules (e.g., night flights in controlled airspace). Process takes 90+ days.
Pro timing tip: Submit LAANC requests between 2-5 AM local time for near-instant approvals. During daytime hours, processing can take up to 30 minutes due to system load. Always complete this step before leaving home—never rely on spotty field connectivity.
Quick Authorization Check: The 2-Minute Verification Process
- Open FAA DroneZone on your phone or laptop
- Select “LAANC” for standard zones (Class B/C/D airspace)
- Enter precise flight coordinates, altitude (max 400 ft AGL), and duration
- Submit—approval appears instantly with reference number
Critical reminder: DJI’s system will never confirm your FAA approval status. When you see the Enhanced Warning Zone prompt, you’re declaring “I have authorization.” Have your LAANC approval screenshot ready on your phone—local law enforcement can demand proof on-site.
Legacy Unlock Process for Older Firmware (Pre-2025)
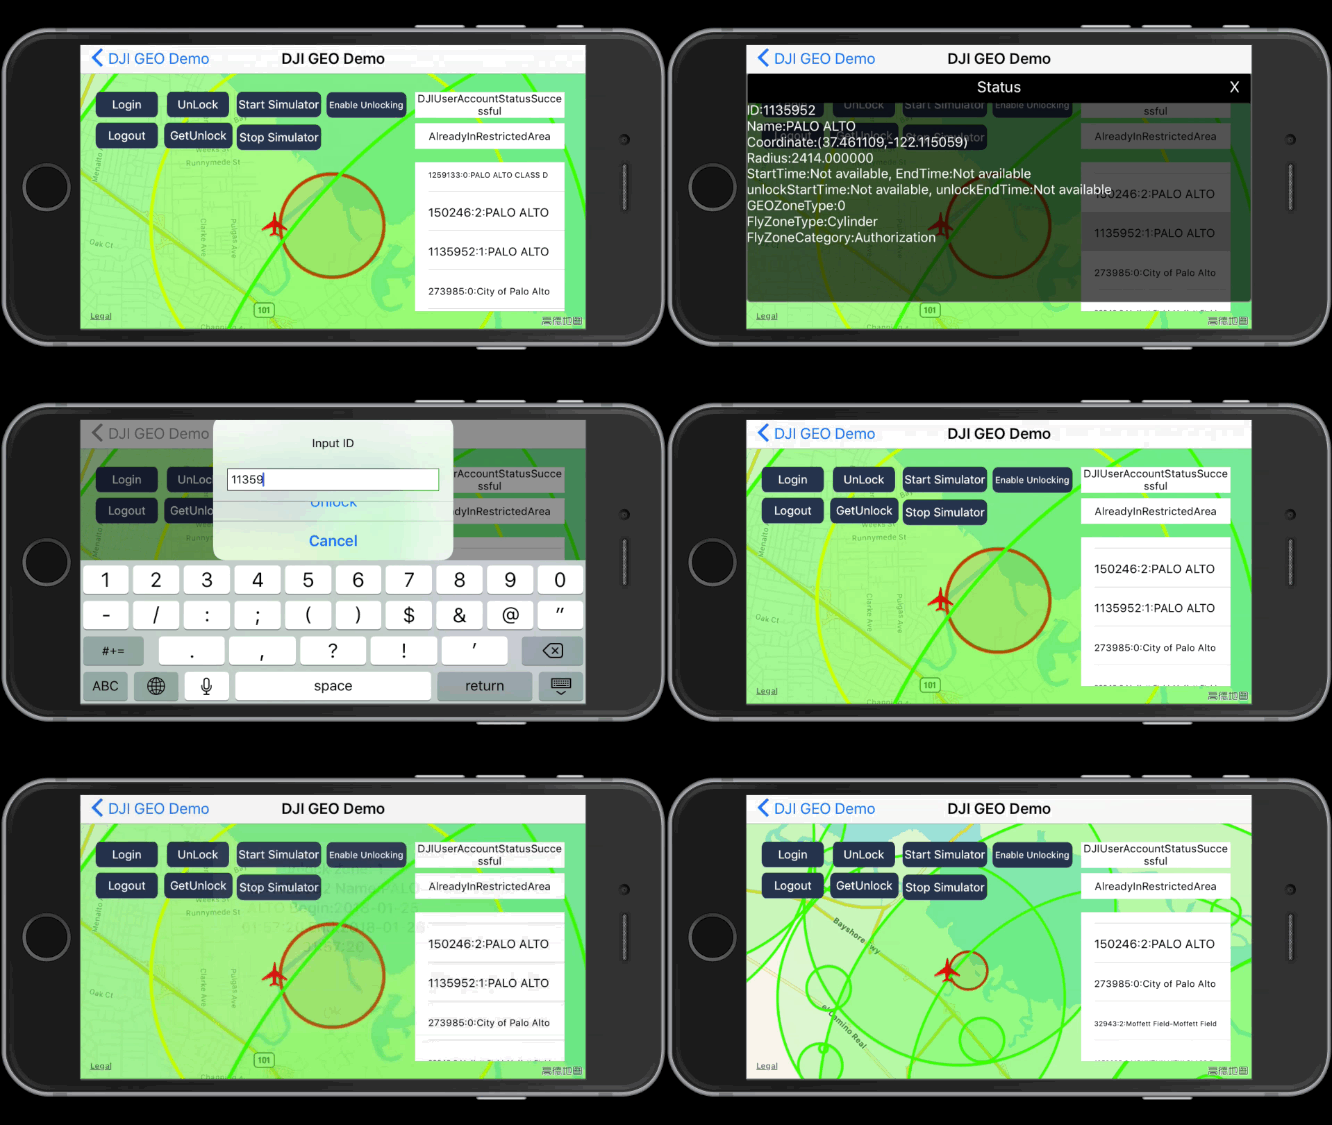
If you’re using firmware older than January 2025 (common with international models or neglected updates), you’ll still encounter DJI’s legacy unlock system. These steps remain essential for older Mavic 2/Air 2S units or when flying in regions with delayed updates.
Live Unlock for Blue Zones: Field-Ready Steps
When the “Cannot Take Off – Authorization Zone” warning appears:
1. Connect to internet using your phone hotspot (4G/5G required)
2. Tap the unlock prompt—scroll down to find the hidden “OK” button if needed
3. Enter your mobile number for SMS verification (non-VOIP numbers only)
4. Input the 6-digit code received via text message
5. Check all compliance boxes acknowledging legal responsibility
6. Tap “Unlock”—motors should arm within 10 seconds
Troubleshooting loop failures: If checkboxes keep reappearing after checking:
– Force-close the DJI Fly app completely
– Power cycle both aircraft and remote controller
– Reconnect to hotspot and retry—90% of failures resolve this way
Custom Unlock for Restricted Areas: Desktop Setup Guide
Portal Setup Essentials:
– Use fly-safe.dji.com on desktop only (mobile browser fails)
– Log in with the exact DJI account linked to your flight app
– For government/commercial use: Upload agency letterhead to qualify for 90-day certificates (vs. 3 days for personal accounts)
Device Registration Must-Dos:
– Find your Flight Controller SN via DJI Fly > About > Flight Controller SN
– Crucial: DJI serials use zero “0” not letter “O”—entering “O” causes 95% of certificate errors
– Add pilot emails under Pilot Management for team operations
Creating Your Unlock Request:
1. Draw your exact flight area using polygon tool (3-5 points)
2. Set altitude in meters first—toggle to feet only after drawing
3. Attach FAA authorization proof (LAANC PDF or COA letter)
4. Submit—approval typically arrives in 45 minutes
After approval: Import the certificate via DJI Fly > Menu > NFZ Unlocking > Import. Toggle it ON only during your flight—leaving it active elsewhere causes app conflicts.
Field Workflow Checklist: From Home to Takeoff

Pre-Flight (Office/Home)
- Update all firmware components (aircraft, controller, battery, app)—this is non-negotiable
- Sync Geo Zone Data: DJI Fly > Profile > Settings > Safety > Update
- Cross-check maps: Verify zone status on both DJI Fly Safe and FAA UAS Facility Map
- Apply for FAA authorization 24+ hours before flight for complex zones
Day of Flight
- Power cycle all equipment before arriving at location
- Confirm Enhanced Warning Zone message appears (not red zone or unlock prompt)
- Double-check FAA authorization status on DroneZone
- If using legacy firmware: Import custom certificates before leaving Wi-Fi
Troubleshooting Common Issues
“Unlock successful” but won’t take off:
– Scroll down on map screen—90% have hidden “Accept” button below visible area
– Delete expired certificates: Swipe left on old unlocks in NFZ menu
No SMS verification code:
– Switch to credit card verification if offered in app
– Use primary mobile number (not Google Voice/VOIP)
Certificate won’t load:
– Re-enter Flight Controller SN—verify all “0”s not “O”s
– Ensure portal account matches flight app login
Zero field connectivity:
– Pre-request Custom Unlock with offline certificate
– Keep phone hotspot ready as backup
Pro Tips for Authorization Zone Flights
Boundary buffer strategy: Stay 50+ feet inside zone edges. GPS drift near boundaries triggers false warnings—measure your buffer using DJI Fly’s distance tool before takeoff.
Documentation protocol: Keep three proof layers on your phone:
1. LAANC approval screenshot
2. FAA DroneZone account page showing active authorization
3. DJI custom unlock certificate (if applicable)
Emergency landing protocol: If GPS signal drops near zone boundaries:
– Immediately switch to ATTI mode (no GPS reliance)
– Manually land within 60 seconds—never use RTH in authorization zones
Commercial advantage: Enterprise accounts get 90-day certificates vs. 3 days for personal accounts. Submit government letterhead during portal setup to qualify.
Time-saving hack: Use DJI Fly’s “Save Location” feature for frequent zones—reduces pre-flight checks from 10 minutes to 60 seconds.
Bottom line: DJI’s 2025 update removed technical barriers but amplified your legal responsibility. You can now fly in authorization zones without DJI’s permission—but never without FAA authorization. Always complete LAANC/COA before heading to the field, keep documentation accessible, and remember: those yellow warnings are your last legal checkpoint. The moment you acknowledge that prompt, you’re declaring compliance. Fly smart, fly legal, and never let convenience override your pilot-in-command responsibility. For complex operations, bookmark the FAA DroneZone portal and DJI’s Fly Safe map—your license depends on it.

