

You can’t replicate DJI’s obstacle avoidance or 30-minute flight times on a hobbyist budget, but building your own DJI-style drone delivers 90% of the performance where it counts. This hands-on guide shows you exactly how to construct a capable 4K camera drone with 5 km range for around $1,500—while gaining valuable technical skills DJI owners never develop. Forget generic drone building tutorials; we’ll focus specifically on creating a machine that captures cinematic footage, maintains stable GPS positioning, and delivers reliable long-range performance.
Why Your DJI-Style Build Needs These 7 Critical Components
Achieving 25+ Minutes of Realistic Flight Time
Your drone must weigh no more than 900 grams to accommodate a 4K camera, gimbal, and battery while staying FAA-compliant. This weight target requires a 2:1 thrust-to-weight ratio—meaning your motors must generate at least 1.8 kg of total thrust. Start with EMAX ECO II 2207 1900 KV motors (1.2 kg thrust each) paired with a 6S 4000 mAh Li-Po battery. This combination delivers 23-28 minutes of actual flight time, not the inflated numbers some manufacturers advertise.
Essential DJI-Style Capabilities Checklist
Your build must include these non-negotiable features:
– 5 km control and video range using ExpressLRS 2.4 GHz radio system
– Real-time HD video transmission via DJI O4 Pro Air Unit or equivalent
– GPS waypoint navigation with reliable return-to-home function
– 3-axis gimbal stabilization for smooth 4K footage
– Forward obstacle detection using stereo vision
– Foldable arms for true portability
– Remote ID compliance for legal operation
Frame Assembly Process That Prevents Vibration Issues
Motor Mounting Without Common Mistakes
Begin with a GEPRC Vapor 5″ carbon fiber frame featuring foldable arms (118g). Use M3×10mm screws with Loctite 243 threadlocker when attaching motors—this prevents vibration from loosening connections during flight. Route motor wires inside the arm tubes and secure them with Kapton tape every 3 inches. Critical warning: Never use screws longer than 7mm with 5mm arms—they’ll short the motor windings instantly.
Vibration Damping Setup for Clean Footage
Install 3mm TPU gummies between the frame and flight controller to isolate vibrations. Hand-tighten these mounts only—over-tightening creates gyro noise that causes oscillations. Your gimbal requires similar isolation using silicone standoffs rated for your camera’s weight. Without proper vibration damping, your 4K footage will suffer from “jello effect” that no software can fully correct.
Complete Wiring Diagram for Reliable Operation

Battery (XT60) → PDB → ESC (4-in-1)

                     → 12V BEC → Gimbal/GoPro

                     → 5V BEC → FC, RX, GPS, O4 Air Unit

FC UART6 → ELRS Nano RX (TX=T6, RX=R6)

FC UART2 → DJI O4 SBUS

FC UART3 → GPS + Compass

FC I2C → Gimbal pitch control
Soldering Sequence That Prevents Fires
- Pre-tin battery connections at 380°C before soldering to PDB pads
- Install capacitor first—solder 1000µF 35V low-ESR across battery pads (stripe = negative)
- Connect motor wires in any order—you’ll set rotation direction in software
- Secure signal harness with 8-pin JST GH from ESC to FC, ensuring correct orientation
Critical mistake to avoid: Reversing capacitor polarity causes instant fire. Always connect the stripe side to battery negative.
Software Configuration That Makes It Fly Like DJI
Flight Controller Setup for GPS Missions
Flash SpeedyBee F405 V4 with iNav 6 firmware for reliable GPS functionality:
– Set mixer to “Quad X”
– Configure serial RX on UART6 with CRSF protocol
– Enable GPS on UART3 at 115200 baud
– Set failsafe to return-to-home with 1-second delay
Pro tip: Calibrate your compass outdoors 10 feet from vehicles or metal objects—indoor calibration causes “toilet bowling” during position hold.
ESC Tuning for Smooth Motor Response
Flash Bluejay 48kHz firmware to your Hobbywing XRotor ESCs and enable bi-directional DShot for RPM filtering. This reduces motor noise and improves flight stability significantly. During ESC calibration, follow this sequence precisely: throttle high → power on → listen for confirmation beeps → throttle low → wait for second set of beeps.
Testing and Validation That Prevents Crashes
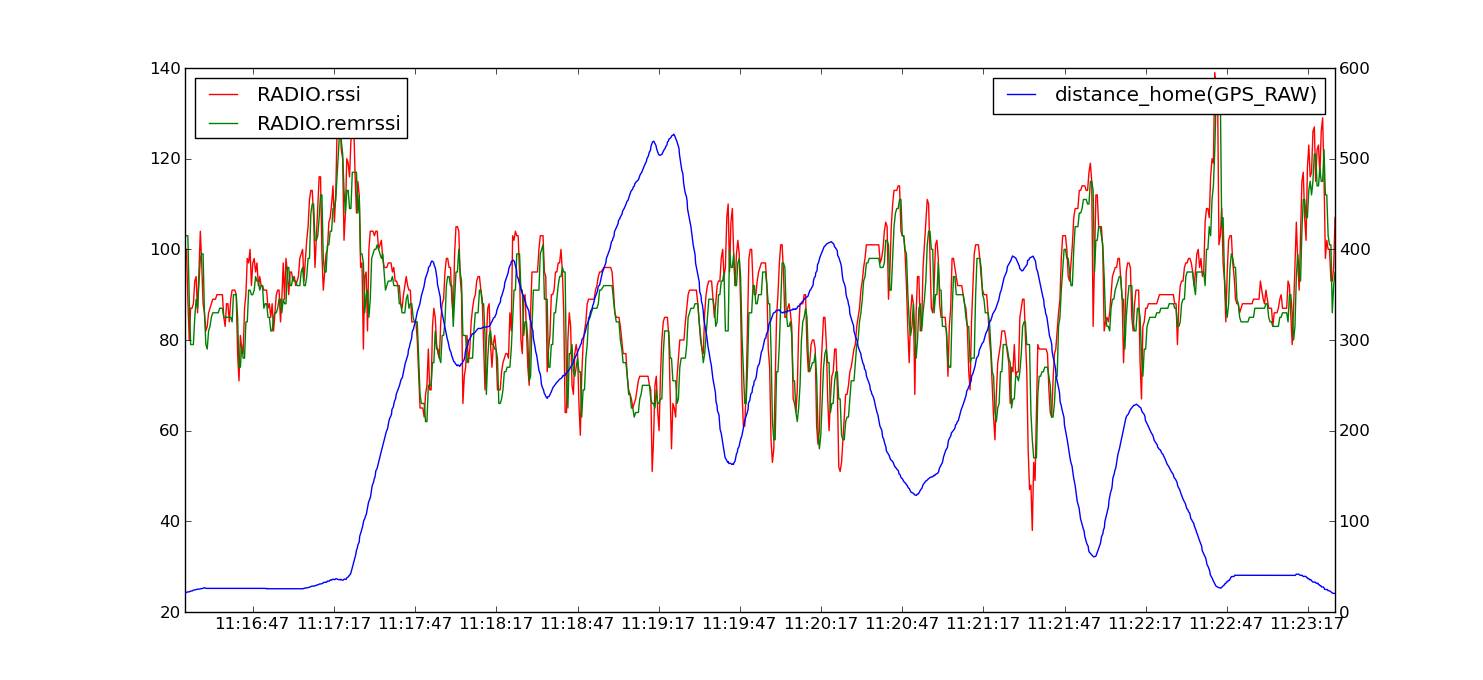
Range Testing Protocol You Must Follow
Begin with 100-meter hops while monitoring video quality and control response. Only after confirming stable operation should you progress to 500 meters, then 1 kilometer. Never skip this critical safety check: Always test return-to-home functionality at increasing distances before attempting long-range flights.
| Test | Metric | Pass Criteria |
|---|---|---|
| Hover current | 25A @ 16.8V | Predicts 23-minute flight |
| GPS lock | >12 satellites, HDOP <1.5 | <60 seconds cold start |
| RC range | RSSI at 1km | >-85 dBm |
| Gimbal stability | 4K video analysis | <5% pixel movement |
Common Build Mistakes That Destroy Your Drone
GPS Interference You Can’t Afford
Mount your Ublox SAM-M10Q GPS module at least 10cm away from your video transmitter. If these components sit too close, electromagnetic interference causes compass errors that result in uncontrolled spinning during position hold. This mistake has destroyed countless drones during maiden flights.
Gimbal Integration Errors
When connecting your Tarot TL3T05 gimbal, ensure it receives clean 12V power separate from your flight controller. Sharing power causes voltage drops that create gimbal stutter in your footage. Test gimbal movement on the ground with your transmitter’s tilt knob before flying.
Regulatory Compliance Checklist for Legal Operation
FAA Requirements You Must Meet
- Register aircraft if over 250g (use Dronetag BS V2 for Remote ID)
- Set altitude geofence to 400 feet AGL
- Maintain 3 nautical mile visibility minimum
- Add lost-model buzzer for recovery
Critical reminder: Many builders overlook Remote ID requirements. Without compliant broadcast, your drone is illegal to operate in most countries, regardless of where you fly.
Realistic Cost Breakdown for DIY DJI-Style Drone
| Component Category | Budget Range |
|---|---|
| Core flight system | $300-400 |
| Imaging/transmission | $400-600 |
| GPS and safety | $200-300 |
| Gimbal and camera | $400-500 |
| Total realistic cost | $1,300-1,800 |
This budget assumes new components with quality construction. Buying used GoPro cameras can reduce costs by $200-300, but never compromise on battery or flight controller quality.
Your DIY DJI-style drone won’t match the Mavic 3’s seamless experience out of the box, but it delivers exceptional performance where it matters most—capturing stunning 4K footage with reliable GPS navigation. More importantly, you’ll develop deep system knowledge that DJI owners lack, enabling you to troubleshoot issues and customize features as your skills grow. Start with a basic flight system, validate each component, then add advanced features like obstacle avoidance incrementally. This approach ensures you’ll have a capable, reliable camera drone that evolves with your expertise while staying within a realistic $1,500 budget.


