
Hearing the roar of a miniature engine powering your custom-built RC car delivers an unmatched thrill that electric models simply can’t replicate. Gas-powered RC vehicles offer authentic engine sounds, extended run times, and the deep satisfaction of mastering real internal combustion mechanics. If your current electric model leaves you craving more power and mechanical involvement, building your own gas-powered RC car transforms your hobby experience. This guide delivers everything you need to construct a high-performance gas RC car that outperforms store-bought alternatives while providing the pride of ownership that only comes from building something with your own hands.
Unlike off-the-shelf models, a custom-built gas RC car lets you optimize every component for your specific driving style and terrain. Whether you’re conquering backyard trails or racing on prepared tracks, a properly assembled gas-powered machine delivers consistent performance that withstands repeated use. The process demands mechanical aptitude and patience, but the end result—a vehicle that responds precisely to your inputs with the distinctive rumble of a miniature engine—is worth every minute invested.
Essential Components for Gas RC Car Construction
Skipping quality components during initial assembly leads to frustrating failures and wasted time. Your gas-powered RC car requires several critical systems working in perfect harmony, with each component affecting overall performance and reliability.
Engine and Exhaust System Selection
Your .18 or .21 cubic inch two-stroke nitro engine forms the heart of your gas RC car, delivering the power that separates these models from electric alternatives. These specialized RC engines run on nitromethane-based fuel, producing impressive power-to-weight ratios that propel your vehicle with authentic engine response. Brands like OS Engines and Novarossi offer reliable performance for beginners, while LRP provides excellent value for intermediate builders.
The exhaust system significantly impacts your engine’s power delivery. A properly tuned header and expansion chamber extract maximum performance while reducing noise levels to acceptable ranges. For your first build, start with a standard muffler system to ensure drivetrain reliability before upgrading to a performance exhaust. The header must maintain at least 10-15mm clearance from chassis components to prevent heat damage during operation.
Chassis and Suspension Configuration
Your chassis selection dramatically affects handling characteristics and durability. Aluminum plate chassis provide exceptional rigidity and easy modification capabilities, making them ideal for beginners who will inevitably need to adjust components during the learning process. Composite tub designs offer superior impact absorption for off-road applications but require more precise assembly techniques.
Suspension geometry determines how your vehicle handles different surfaces. Independent suspension with adjustable oil-filled shocks allows fine-tuning for specific conditions—stiffer settings for smooth tracks, softer for rough terrain. Pre-built suspension kits from manufacturers like Associated include all necessary pivot points and shock hardware, simplifying assembly while ensuring proper geometry from the start.
Fuel System and Engine Integration

The fuel system delivers nitro mixture to your engine with precision that directly affects performance and reliability. Proper assembly prevents common issues like fuel leaks, vapor lock, and inconsistent engine operation.
Fuel Tank Installation and Line Routing
Install your 100ml fuel tank with vibration-dampening material to prevent cracks from engine resonance. The internal clunk filter must move freely to ensure consistent fuel pickup during aggressive maneuvers. Route fuel lines using silicone material specifically designed for nitro applications—standard rubber lines deteriorate rapidly when exposed to nitromethane fuel.
Position fuel lines away from hot engine components and moving parts, securing them with zip ties at 2-inch intervals. The carburetor requires a high-flow air filter to prevent debris ingestion while maintaining adequate airflow. During initial setup, verify all connections are tight but not over-torqued, as nitro fuel leaks create serious fire hazards during operation.
Electronics and Radio System Setup
Modern gas RC cars require robust electronics that withstand engine vibration and heat while delivering precise control. Standard electric RC components often fail prematurely in gas-powered applications.
Radio System Requirements for Gas Power
Select a minimum 3-channel radio system to control steering, throttle, and an additional function like a shift servo. Digital servos with metal gears withstand the high stress of gas-powered operation, while budget plastic-gear servos typically fail within weeks of regular use. Waterproof receiver boxes with foam gaskets provide adequate protection for most conditions, though extreme off-road builds might require sealed enclosures.
Power your receiver and servos with a 6V NiMH pack for reliable performance, though many experienced builders now prefer lightweight LiPo batteries for improved response time. Install an easily accessible on/off switch near the battery compartment for quick access during pit stops and emergencies. Before engine installation, verify all control functions respond correctly and without binding.
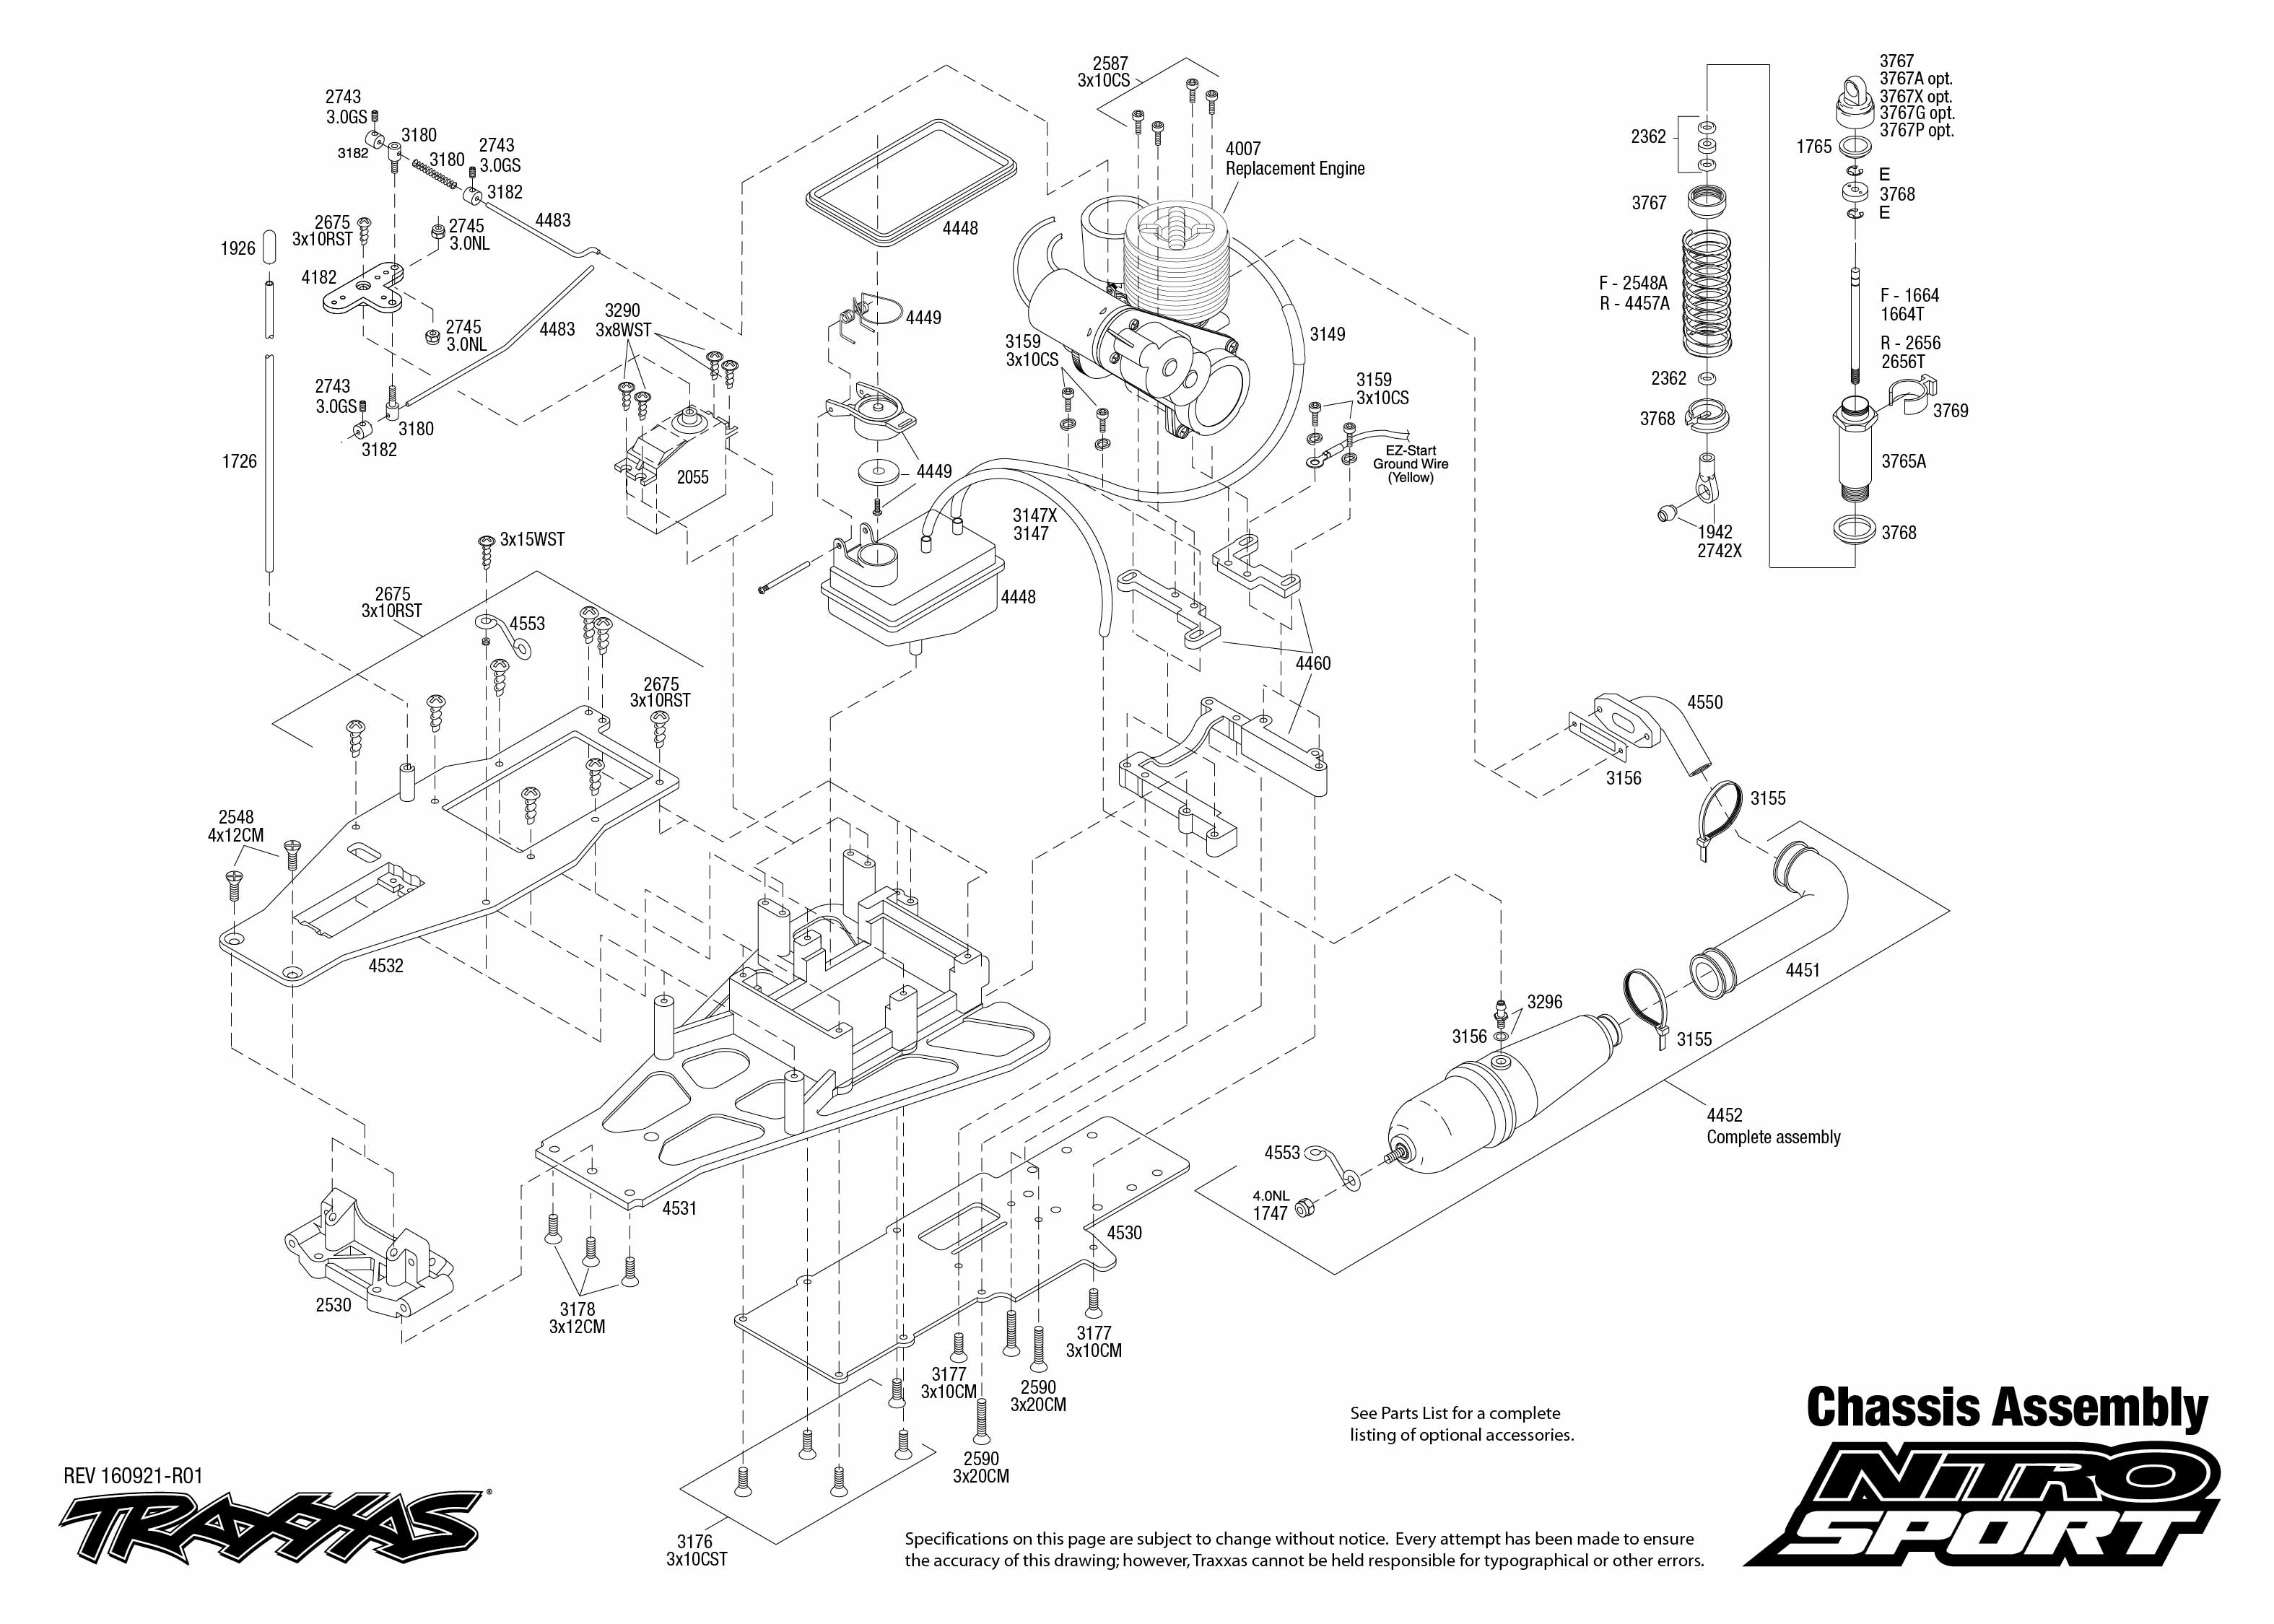
Drivetrain and Engine Assembly Process
Following a systematic assembly approach prevents costly mistakes that lead to premature component failure. Proper drivetrain alignment ensures smooth power delivery from engine to wheels.
Drivetrain Installation and Alignment
Begin assembly with the drivetrain, as this system requires precise alignment before engine installation. Install differential gears with specialty RC grease, adjusting preload until gears rotate freely without excessive play. Verify transmission gear meshing using business cards as makeshift feeler gauges—proper clearance prevents premature wear while eliminating power-robbing slack.
Inspect drive shafts and universal joints for smooth operation before final assembly. Binding or rough spots indicate alignment issues requiring correction. For most recreational builds, select a final drive ratio between 8:1 and 9:1, balancing acceleration with top speed. Higher ratios (like 10:1) provide better climbing ability for off-road use but reduce top speed.
Engine Mounting and Clutch Setup
Engine mounting requires precise alignment with the drivetrain input shaft. Most chassis include adjustable engine mounts allowing fine-tuning—install the engine with the clutch bell aligned to the centerline of the drive train, then secure all mounting bolts with thread-locking compound. The clutch system engages at 4,000-6,000 RPM, allowing smooth launch without stalling.
Adjust clutch tension according to manufacturer specifications, balancing engagement speed against harshness. Too-tight clutch tension causes wheel hop during acceleration, while too-loose tension leads to excessive slippage and premature clutch shoe wear. Verify proper clutch operation by rotating the engine by hand—engagement should occur smoothly without binding.
Initial Start-Up and Tuning Procedure
First start-up requires careful preparation to avoid damaging your new engine. Following proper break-in procedures affects long-term performance and reliability more than any other factor.
Pre-Start Engine Preparation
Fill your fuel tank with fresh nitro fuel containing 25% nitromethane and 12% oil content—the oil lubricates internal components while nitromethane stabilizes combustion. Never use automotive fuel or old, contaminated nitro mixture. Check all connections one final time, ensuring the air filter is installed and radio controls respond correctly.
Apply a small amount of fuel to the carburetor opening and rotate the engine by hand several times, verifying smooth compression and proper clutch engagement. Set the throttle to one-quarter open and prime the engine by blocking the exhaust while rotating until fuel appears in the carburetor throat.
Starting and Break-In Process
Use a glow starter to heat the glow plug filament for compression ignition. Pull the starter cord firmly but smoothly—jerky pulls can damage the pull starter mechanism. During break-in, run approximately 3 tanks of fuel at partial throttle, gradually increasing to full throttle over subsequent tanks. This allows piston rings and bearing surfaces to seat properly without excessive wear.
Monitor engine temperature during break-in—ideally staying between 220-240°F. Running too rich (more fuel) provides cooler operation but reduces power, while running too lean (less fuel) increases power but risks overheating. Find the compromise point where the engine pulls strongly through the mid-range without overheating at full throttle.
After-Run Maintenance for Longevity
Proper maintenance extends engine life and maintains peak performance throughout ownership. Neglecting after-run procedures causes internal corrosion that ruins engines during storage.
Essential Post-Run Procedures
Never store your nitro engine with fuel inside. Run the tank dry, then spray after-run oil through the carburetor while rotating the engine. This protective coating prevents internal corrosion during storage. Clean air filters regularly with filter oil and inspect fuel lines for cracks or degradation—replace any questionable components immediately.
Check clutch shoes after every 3-5 tanks of fuel, replacing them when the engagement point rises above 7,000 RPM. Inspect glow plugs periodically, replacing when the filament appears burnt or brittle. Keep the engine exterior clean of fuel residue and debris, which can ignite during operation.
Building your own gas-powered RC car delivers unmatched satisfaction that transforms your hobby experience. The roar of your custom-built engine, the extended run times, and the mechanical involvement create a connection with your vehicle that electric models can’t match. Start with quality components, follow proper assembly techniques, and respect the break-in process to create a machine that delivers reliable performance for years. Joining a local RC club provides invaluable guidance from experienced builders who can help you avoid common pitfalls. The pride of hearing your engine fire to life—and knowing you built every component—makes the effort truly worthwhile.


