
Nothing beats the thrill of launching your RC car into the air, but store-bought jumps often limit your creativity and drain your budget. Learning how to make a jump for rc car gives you complete control over size, angle, and performance to match your specific vehicle and space. Whether you’re setting up a backyard track or preparing for competition, building your own ramp saves money while delivering exactly the airtime you want.
This guide reveals exactly how to make a jump for rc car that launches your vehicle consistently and safely. You’ll discover which materials work best for your needs, precise dimension calculations for different vehicle sizes, and professional construction techniques that prevent common mistakes. By the end, you’ll have everything you need to build ramps that perform like the pros use.
Determine Your RC Jump Ramp Design Type
Your chosen design affects every aspect of construction and performance. Selecting the right ramp style for your skill level and vehicle prevents frustration and crashes.
Kick ramps feature a smooth curved transition that launches vehicles predictably at various speeds. These work best for beginners because the gradual curve reduces impact stress on your RC car’s suspension. The curved design allows you to gain speed gradually before the launch point, creating consistent airtime without requiring perfect throttle control.
Tabletop jumps create maximum airtime with a flat launch area followed by a gap before the landing ramp. These require precise speed control and are better suited for experienced drivers with durable vehicles. Tabletop jumps showcase your jumping technique but punish mistakes harshly with hard landings.
Wedge jumps use simple triangular construction with a straight launch edge for consistent, predictable launches. Their straightforward design makes wedge jumps perfect for beginners learning proper jump technique. The uncomplicated build requires minimal tools and skills while delivering reliable performance every time.
Choose the Best Materials for Your RC Jump

The material you select determines your ramp’s durability, weight, portability, and cost—each option has distinct advantages for specific situations.
Plywood Offers Maximum Durability
Standard ½-inch or ¾-inch exterior-grade plywood provides excellent strength and smooth surfaces for permanent installations. The natural rigidity prevents flexing during launches, while the smooth finish lets vehicles slide cleanly without catching. Plywood accepts paint or sealant easily for weather protection and can be modified as your skills improve.
You’ll need basic carpentry tools: a circular saw for straight cuts, drill with screwdriver bits, and sandpaper for finishing edges. Though requiring more initial effort, wood construction produces the most durable jumps that last for years with proper maintenance.
Foam Creates Instant Portable Ramps
Construction foam insulation boards (typically 2-inch thick) can be shaped with just a utility knife, requiring no power tools. The lightweight result transports easily and provides natural shock absorption for landings. Foam works exceptionally well for temporary setups or when testing different designs before committing to permanent construction.
Stack multiple foam boards to achieve your desired dimensions, then carve precise curves by hand. Reinforce the riding surface with duct tape or contact paper for durability. While foam eventually compresses with repeated use, its quick construction makes it ideal for beginners testing the jumping waters.
Gather Essential Tools Before Starting
Having the right tools prevents interruptions and ensures professional results. Basic carpentry tools handle most ramp construction needs.
A quality tape measure and square guarantee accurate cuts that directly affect how well your ramp performs. Mark all measurements clearly and double-check before cutting—measure twice, cut once is essential for good ramps. A circular saw handles straight cuts in plywood while a jigsaw helps with curved sections for kick ramps.
Sandpaper in multiple grits (80, 120, and 220) smooths rough edges and prepares surfaces. Safety gear including glasses, gloves, and dust masks protects you during construction. Construction adhesive supplements screws for joints that won’t loosen with repeated use.
Calculate Perfect Dimensions for Your Vehicle
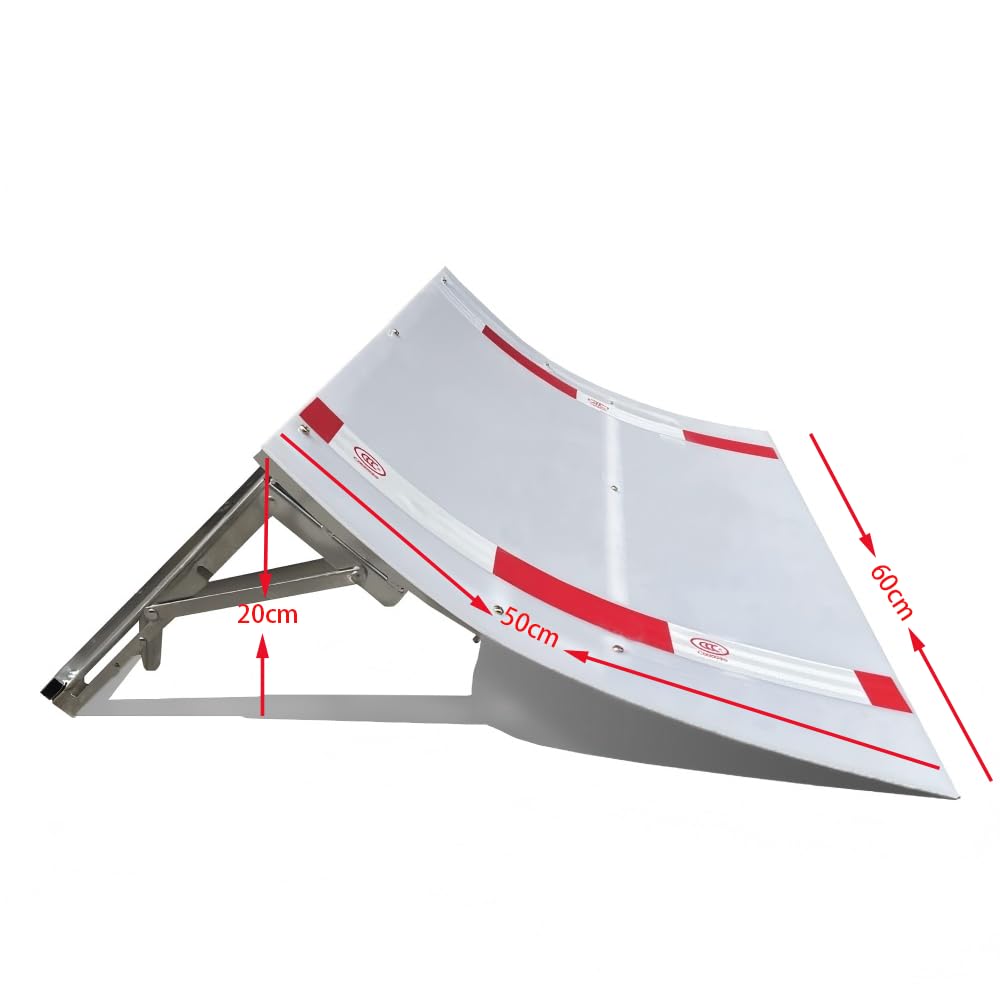
Proper sizing ensures your jump performs correctly with your specific RC car and desired airtime. Several factors influence optimal dimensions.
Ramp length determines launch angle and speed requirements. For most 1:10 scale vehicles, use 12 to 24-inch ramp sections. Divide ramp height by length to calculate the angle—gentler angles work at lower speeds but require more space.
Launch lip height controls trajectory and airtime. Start with a lip height matching your vehicle’s suspension travel—typically 2 to 4 inches for 1:10 scale buggies and trucks. Higher lips launch vehicles further but require more speed and increase landing impact.
Gap width for tabletop jumps should be 12 to 24 inches for most applications. Wider gaps look impressive but destroy unwary vehicles, so adjust based on your vehicle’s power-to-weight ratio.
Build a Basic Wooden Kick Ramp in 6 Steps
Follow these steps to construct a durable kick ramp suitable for most 1:10 scale RC vehicles using simple materials and tools.
-
Cut side panels from ¾-inch plywood using your measured dimensions. For a standard kick ramp, each panel might measure 18 inches wide at the base and 8 inches tall at the highest point, with a curved transition between these points. Draw the curve freehand, then cut carefully with a jigsaw.
-
Attach cross-braces to maintain spacing and provide structural rigidity. Three or four braces spaced evenly along the ramp length work well. Predrill screw holes to prevent splitting, then secure with exterior-grade screws.
-
Install the riding surface by positioning ½-inch plywood on top of the side panels. Check alignment before securing with screws spaced 4 to 6 inches apart.
-
Add the launch lip as a separate piece extending slightly beyond the ramp surface. This lip takes the most impact, so consider using thicker material or adding reinforcement underneath.
-
Sand all edges thoroughly, beginning with 80-grit to remove major imperfections, progressing to 120-grit for smoothing, and finishing with 220-grit for a polished surface.
-
Apply weatherproof sealant to all surfaces, including edges and undersides. Allow complete drying (24-48 hours) before use.
Create a Portable Foam Ramp in Under 30 Minutes
Foam ramps offer the fastest construction time for immediate jumping action.
Stack two foam insulation boards and cut them simultaneously into a right-triangle shape (4 inches high and 16 inches long creates a gentle 15-degree launch angle). Cut a third board into a curve shape that bridges the gap between the flat base and the raised launch lip.
Sand all edges to remove rough spots and create smooth transitions between pieces. Pay particular attention to where pieces join—the transition should feel seamless. Reinforce the riding surface with duct tape or contact paper for durability.
Test the ramp with your vehicle at low speed before attempting full-speed jumps. Watch for any flexing or sliding that might indicate weak spots.
Master Proper Jumping Technique
Building a great ramp means nothing without proper technique. Follow these steps for consistent, controlled jumps.
Approach the ramp at 60-80% of your vehicle’s maximum speed—too slow won’t clear the gap, while too fast causes overshooting. Maintain straight alignment with the ramp throughout your approach; any angle at launch translates to unpredictable rotation.
Release the throttle just before the ramp lip to allow suspension to extend naturally. Control your vehicle mid-air using small steering inputs and slight throttle application to maintain rotational momentum. Land with all four wheels simultaneously when possible to distribute impact evenly.
Avoid These 3 Critical Jump Mistakes
Learning from others’ mistakes saves your RC car from unnecessary damage.
Building too steep creates jumps that are difficult to clear consistently. Start with gentler angles (15-25 degrees) and increase gradually as your skills develop. Steep ramps look impressive but punish minor errors harshly.
Neglecting launch lip preparation leads to catching tires on the edge. The lip must be smooth, slightly rounded, and perfectly aligned with the ramp surface. Any chip or misalignment at this critical point causes crashes.
Insufficient structural support results in ramp flex during use. A ramp that shifts even slightly under your vehicle’s weight will never produce consistent jumps. Add extra braces and screws rather than risking a wobbly ramp.
Customize Jumps for Your Specific RC Vehicle
Different vehicle classes require different jump characteristics. Adjust your ramp design to match your specific RC car.
Smaller scale vehicles (1:18 and 1:16) need proportionally smaller jumps with gentler angles. Buggies with long suspension travel handle steeper jumps better than low-slung touring cars. High-power vehicles may need speed bumps before the launch lip to help modulate approach speed.
Building your own RC car jumps gives you complete control over every dimension to create exactly what your vehicle demands. Start with a basic design, test thoroughly, and refine based on your jumping sessions. Within weeks, you’ll have a custom setup that performs perfectly for your specific RC car and the satisfaction of knowing you built it yourself.


