
Your DJI Mavic Mini starts wobbling mid-flight or produces that unnerving grinding noise during takeoff—immediate propeller replacement is critical. Damaged blades compromise flight stability and can cause catastrophic crashes, turning your $400 investment into expensive debris. This guide delivers precise, step-by-step instructions for replacing how to replace DJI Mavic Mini propellers safely, verified against DJI’s official specifications. You’ll learn to identify rotation-specific blades, avoid common installation mistakes that cause mid-air failures, and validate your work before risking your first flight.
Immediate Signs Your Mavic Mini Propellers Need Replacement
Visible damage isn’t the only warning sign—subtle issues often precede in-flight failures. Cracks along blade edges compromise structural integrity, while bent tips create dangerous lift imbalances. Check for loose mounting screws during pre-flight inspections; even slight play causes harmonic vibrations that damage motors. Flight instability during hover tests is a critical red flag—your drone should maintain position without drifting or shuddering.
Pro tip: Hairline fractures invisible to the naked eye expand rapidly under centrifugal force. If you’ve had any contact with obstacles (trees, walls, etc.), replace propellers immediately regardless of visible damage. Never fly with mismatched blades—this creates rotational imbalance that strains motors.
Critical Safety Steps Before Starting Replacement
Power down completely and remove the battery—this prevents accidental motor activation that could sever fingers during installation. Work on a clean, flat surface away from drafts that might blow small parts away. Fold the drone arms inward to avoid stressing hinges while handling. Ensure bright, direct lighting to see tiny rotation markings; overhead room lights often create shadows that obscure critical details.
Warning: Skipping battery removal risks severe injury. DJI motors generate enough torque to amputate fingertips if activated during propeller handling. Always verify the drone is fully powered off by checking for LED indicators before touching motors.
Gather Genuine DJI Mavic Mini Replacement Parts
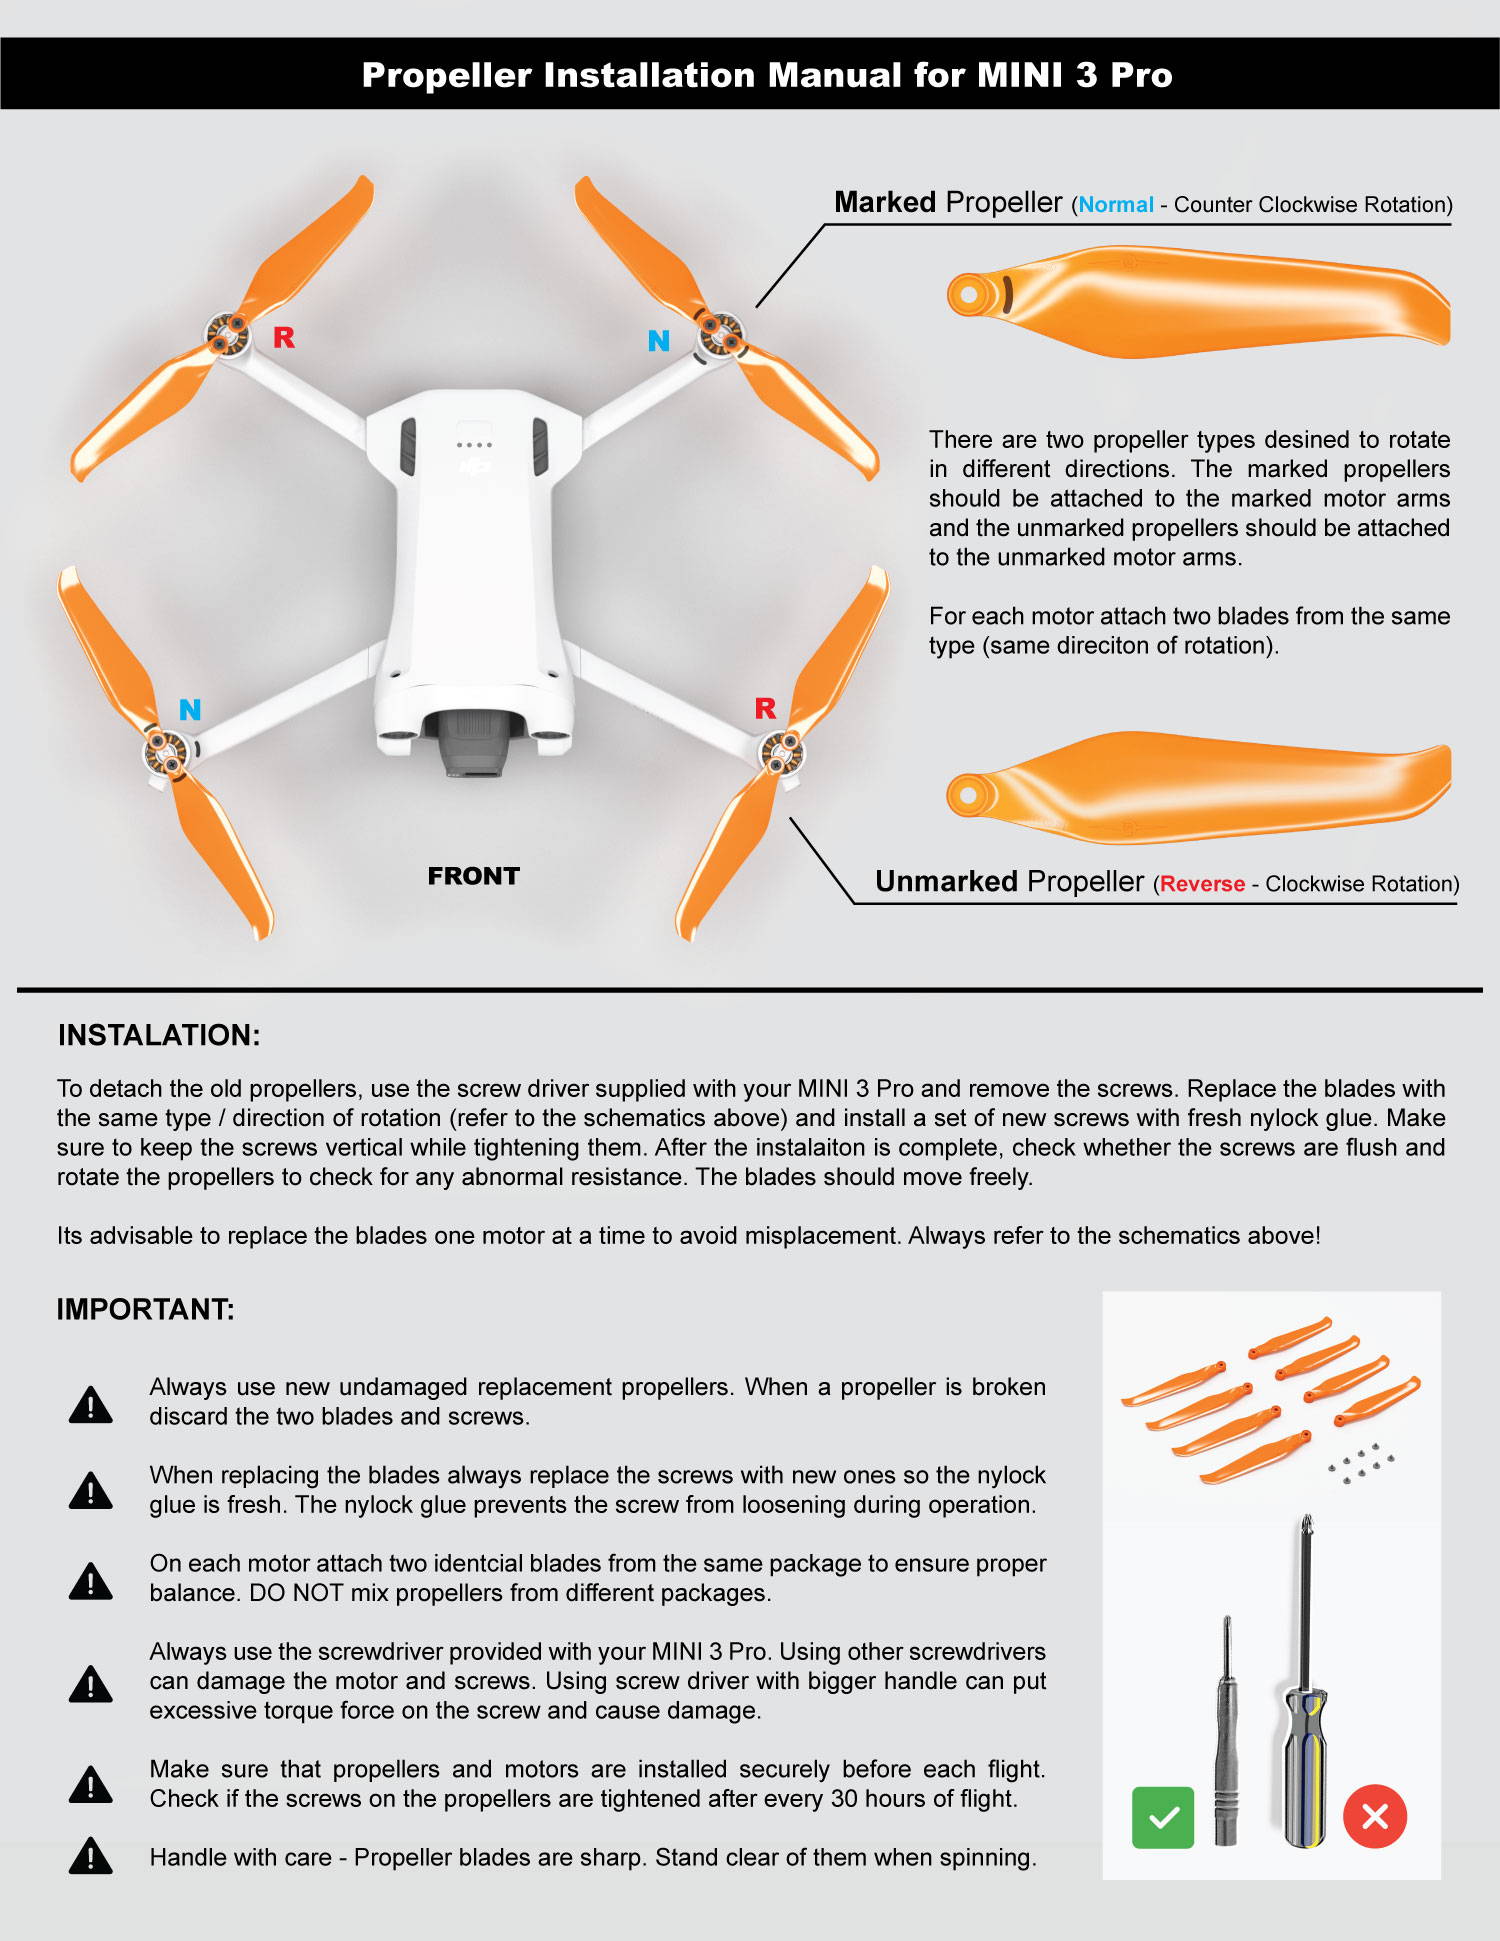
Only use certified DJI propellers—third-party blades often lack precision balancing, causing vibrations that void your warranty and damage flight controllers. Your kit requires four propellers (two CW and two CCW), but keep the spare set from your original box for emergencies. Never reuse old screws; their threadlocker degrades, leading to mid-flight detachment. Store extras in labeled compartments: CW propellers (blue/red with single silver stripe) in one section, CCW (green/yellow with dual stripes) in another.
Critical distinction: Genuine DJI propellers have micro-etched “A” (CW) or “B” (CCW) markings near the hub. Counterfeits skip these, causing irreversible installation errors. If your replacement set lacks these identifiers, contact DJI support immediately.
Decode Propeller Rotation Markings Instantly
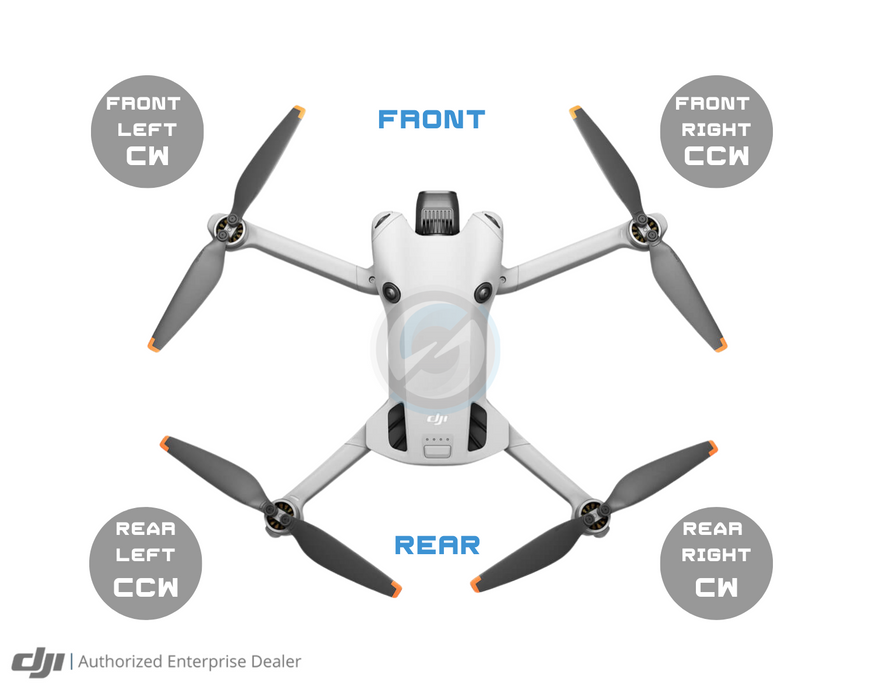
Clockwise (CW) propellers feature blue/red coloring and one continuous silver stripe on the blade tip. They mount on motors with no physical mark on the aircraft arm. Counter-clockwise (CCW) propellers display green/yellow hues and a wide/narrow silver stripe pair plus a raised dot near the screw hole. These align with motors showing a concave circular mark beside the mount.
Match Propellers to Motors in 10 Seconds
- Color check: CW blades = blue/red; CCW = green/yellow
- Stripe verification: Single stripe = CW; dual stripes = CCW
- Arm inspection: Unmarked arm = CW motor; indented mark = CCW motor
Common mistake: Installing a CCW propeller on a CW motor causes immediate backward thrust. Double-check by holding blades beside motors—their colors must match perfectly. If confused, refer to the markings on your old propellers before disposal.
Remove Damaged Propellers Without Motor Damage
Screw-Mounted Propeller Removal
- Stabilize the motor by pinching its housing between thumb and forefinger
- Insert JIS #000 screwdriver fully into the screw cross-recess
- Rotate counter-clockwise with firm, steady pressure—do not force
- Lift propeller straight off once screws are removed
- Discard old screws immediately—reusing them risks thread stripping
Press-Fit Propeller Removal
- Grip the blade base firmly near the hub (not the fragile tips)
- Twist counter-clockwise while applying downward pressure
- Feel for disengagement—it releases with a distinct “pop”
- Never pull straight off—this damages the shaft’s splines
- Rotate direction check: If resistance exceeds gentle pressure, you’re twisting the wrong way
Warning: Forcing removal cracks motor housings. If stuck, apply isopropyl alcohol to dissolve old threadlocker, then wait 2 minutes before retrying.
Install New Propellers: Avoid Flight-Critical Errors

Screw-Mounted Installation
- Align new propeller using color/marking verification (Section 4)
- Hand-start new screws to prevent cross-threading—never force
- Hold motor housing steady while tightening clockwise
- Stop at initial resistance—over-tightening strips aluminum threads
- Final snug check: Screws should sit flush but not sink into plastic
Press-Fit Installation
- Press blade straight down onto the shaft—no lateral angle
- Twist clockwise until a solid “click” confirms engagement
- Verify flush seating—no gaps between hub and motor
- Tug test: Propellers shouldn’t budge when pulled sideways
- Rotation check: Blades must spin freely without catching
Critical: Mismatched rotation causes instant crashes. Triple-check each propeller’s “A”/”B” marking against motor positions before proceeding.
Verify Installation Before First Flight
Visual Inspection Checklist
- All propellers show matching color pairs (blue/red opposite, green/yellow opposite)
- No gaps between hub and motor mount when viewed from the side
- Screws sit perfectly flush (screw-mounted versions only)
- Rotation direction arrows point correctly when arms are extended
Ground Function Test
- Hand-spin each propeller—smooth rotation indicates proper seating
- Invert the drone—propellers shouldn’t fall off under gravity
- Power on with battery—listen for grinding or clicking during startup
- Observe spin-up—all blades should accelerate uniformly without wobble
Red flag: Any vibration during spin-up means immediate reinstallation. Do not attempt flight—this stresses motors and IMU sensors.
Conduct Safe Post-Replacement Test Flights
Never skip these steps: Your first flight after propeller replacement requires extreme caution. Begin in a wide-open area with no obstacles. Power on the drone and let it complete its full calibration sequence. Initiate takeoff at 50% throttle and hover at 3 feet for 60 seconds. Watch for three critical issues:
- Lateral drift—indicates unbalanced lift from mismatched blades
- Vibrations—visible as camera shake or motor whine
- Erratic altitude changes—suggests propeller detachment
If any issue occurs, land immediately and recheck all installations. Only after stable hovering should you attempt controlled movements.
Weekly Propeller Maintenance Routine
Before every flight: Inspect blades under bright light for micro-cracks along stress points (near hub and tips). Run a fingernail along edges—roughness signals fatigue. Check screw tightness on screw-mounted models; a slight wiggle means immediate re-tightening.
After crashes: Replace all propellers regardless of visible damage. Internal stress fractures are undetectable but cause mid-flight failures. Keep a log of flight hours per set—DJI recommends replacement after 50 flights or any impact.
Replace Propellers in Pairs for Flight Stability
Always swap both blades on the same motor simultaneously. Replacing just one creates uneven wear that throws off rotational balance. For example: if the front-left CW propeller is damaged, replace both front-left blades (CW and CCW). This maintains identical aerodynamic profiles across the axis.
Pro tip: Rotate propeller positions monthly (e.g., move front blades to rear) to ensure even wear. Mark each blade with tiny dots to track usage—this extends overall set lifespan by 30%.
Store Spares to Prevent Deformation
Never toss spares loose in your bag—pressure from other gear warps blades. Keep replacements in their original molded packaging with individual compartments. Store horizontally in a climate-controlled space; extreme heat softens plastic, causing permanent curvature. Organize screws in magnetic trays labeled “CW” and “CCW” to avoid mix-ups during field repairs.
Critical storage rule: Propellers left bent for over 48 hours develop “memory” deformation. If spares get slightly curved, place them under a heavy book for 24 hours to restore flatness—but inspect thoroughly before use.
Final verification: After your first successful test flight, land immediately and re-tighten all screws (if applicable). The thermal expansion during flight often creates slight loosening. Your DJI Mavic Mini now operates with restored stability and safety—ready for smooth aerial captures. Remember: propeller health is non-negotiable in drone safety. Carry two complete replacement sets on every outing, and inspect blades for 30 seconds before each flight. This simple discipline prevents 90% of avoidable crashes, protecting both your investment and public safety.


