
That tiny DJI Tello drone sitting on your palm holds incredible potential, yet many beginners struggle with basic setup and miss hidden features that transform it from a toy into a creative tool. You’ve unboxed your drone, but connecting it to your phone feels like solving a puzzle, and those blinking lights might as well be Morse code. This complete guide cuts through the confusion with battle-tested steps used by drone enthusiasts who’ve flown hundreds of Tello missions.
Whether you’re troubleshooting connection issues or capturing your first aerial footage, you’ll master everything from battery installation to advanced flight modes in under 30 minutes. Forget generic manuals—this is the only how to use DJI Tello drone resource that translates technical specs into actionable skills, complete with pro tips most owners never discover.
Install Battery and Propellers Correctly
Your Tello won’t fly if the battery and propellers aren’t installed precisely. The rear battery compartment only accepts the battery in one orientation—slide it in with the tab facing upward until it clicks. Forcing it incorrectly damages internal connectors, so if resistance occurs, flip the battery 180 degrees.
Decode Charging Status Lights
- Slow blue blink: Charging in progress (60-90 minutes via micro-USB)
- Solid blue: Fully charged and flight-ready
- Rapid blue blink: Connection error—reseat cable or try different USB port
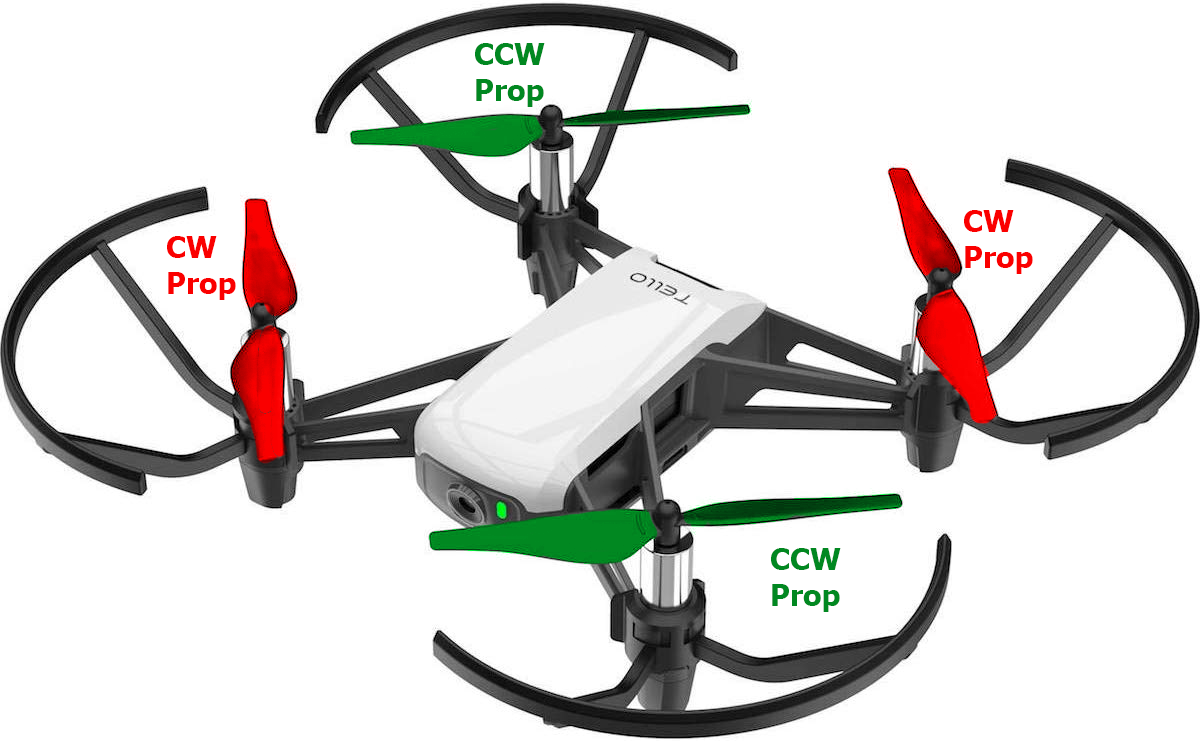
Critical check: Before flight, verify each propeller matches its motor. CW (clockwise) propellers have notches near the hub and attach only to marked CW motors. CCW (counter-clockwise) props have smooth edges for CCW motors. A mismatched propeller causes violent shaking or immediate crash—tug gently on each to confirm tightness.
Connect Tello to Your Phone Without Failures

Wi-Fi connection issues cause 80% of beginner frustrations, but this foolproof method works every time. Power on the drone by pressing the side button until lights cycle through colors, then follow your device-specific process.
iPhone Connection Sequence
- Open Settings > Wi-Fi and select the network starting with “Tello” plus your unique serial number (found on the battery compartment)
- Launch the official Tello app and tap Connect to Tello
- When prompted, return to Wi-Fi settings to confirm connection
- Reopen the app—green Connected status appears within 10 seconds
Android Connection Fixes
- Power on drone and open Tello app
- Tap Connect to Tello but don’t confirm yet
- Go to Wi-Fi settings, select your Tello network (check serial number on battery)
- Return to app and tap Connect—avoid background apps that disrupt signals
Connection emergency: If pairing fails after three attempts, power-cycle both devices and move away from Wi-Fi congested areas like coffee shops.
Read LED Light Patterns Like a Pro

Your Tello’s front LED is its communication system—ignoring these signals risks crashes. Learn these critical patterns before first flight:
| Light Pattern | Meaning | Immediate Action |
|---|---|---|
| Red/white/green/yellow cycle | Powering on & self-test | Wait 10 seconds |
| Double green blink | VPS (positioning) active | Safe for indoor flight |
| Steady yellow flash | VPS unavailable | Avoid flying indoors |
| Slow red blink | Low battery (15%) | Land within 30 seconds |
| Rapid red blink | Critical battery (5%) | Emergency landing NOW |
Night flying essential: In darkness, these lights become your only orientation reference—memorize the double green blink meaning “safe to fly.”
Master Tello App Controls in 60 Seconds
The virtual joystick layout seems intuitive but contains hidden precision controls. Move the left joystick vertically for altitude changes and horizontally for rotation (yaw). The right joystick controls forward/backward and left/right movement—push gently for smooth cinematic shots.
Unlock Essential Settings
Access Aircraft Settings for game-changing adjustments:
– Video bitrate: Set to “Medium” for balanced quality/battery life (high bitrate drains power 25% faster)
– EV compensation: Increase for snowy scenes, decrease for dark forests
– Flight modes: Start with Normal (beginner-stable), progress to Fast (responsive), avoid Slow until skilled
Secret shortcut: Triple-tap the settings icon to access advanced calibration menus—used by pros to fix drift issues.
Execute This Pre-Flight Checklist Every Time
Skipping these 20-second checks causes 70% of crashes. Before takeoff:
– [ ] Battery shows solid blue when tested (not just charged)
– [ ] Props spin freely with no wobble when spun by finger
– [ ] Flight zone clear of obstacles within 10-foot radius
– [ ] Phone battery above 50% (low power disrupts connection)
– [ ] Wi-Fi signal shows 3+ bars in app
Time-saver: Perform this ritual near your landing zone—you’ll recover faster if connection drops mid-flight.
Calibrate IMU for Drift-Free Flight
When your Tello drifts sideways without input or displays “IMU Error,” calibration is urgent. This 60-second fix restores stability:
- Open Tello app and tap Settings
- Select More (⋯ icon) > Calibrate IMU
- Hold drone level and follow on-screen rotation prompts
- Complete all movements within 60 seconds
Warning: Calibrate outdoors on windless days—indoor drafts cause inaccurate readings. Repeat monthly for peak performance.
Capture Pro-Quality Photos and Videos

Your Tello’s 720p camera rivals phones when used correctly. Tap the shutter icon for photos (saved to phone gallery) or hold for video recording. For stunning results:
Cinematic Shooting Techniques
- Golden hour advantage: Fly 1 hour before sunset for warm, shadow-free lighting
- Altitude sweet spot: 10-15 feet for detailed landscape shots (higher = blurry)
- Movement secret: Push joysticks 30% strength for buttery-smooth footage
Battery reality: Video recording cuts flight time by 2-3 minutes—land when battery hits 25% to avoid emergency shutdowns.
Troubleshoot Top 3 Flight Failures
Drone Won’t Take Off
- Verify propeller/motor pairing (notched props = CW motors)
- Ensure battery is fully seated (reinsert with firm click)
- Recalibrate IMU if drone drifts during hover
Connection Drops Mid-Flight
- Maintain line-of-sight within 100 meters
- Avoid flying near microwaves or Bluetooth speakers
- Close social media apps consuming Wi-Fi bandwidth
Blurry Video Footage
- Lower video bitrate in settings
- Wipe camera lens with microfiber cloth
- Fly below 30 feet to reduce signal interference
Extend Battery Life by 40%
Most owners ruin batteries within months through improper storage. Maximize lifespan:
– Storage charge: Keep at 50-60% during inactivity (never 100%)
– Temperature control: Store between 60-80°F—avoid car glove compartments
– Monthly check: Recharge if storage drops below 40%
Flight optimization: Skip aggressive flips (uses 15% extra power) and land at 25% battery. Replace when flight time falls below 8 minutes consistently.
Upgrade Skills With Advanced Techniques
Flight Mode Mastery
- Normal: Auto-stabilization for beginners (ideal for learning)
- Fast: 20% quicker response for experienced pilots
- Slow: Cinematic glide mode—use only in open fields
Third-Party App Power
Install Tello FPV (Android only) for:
– Real-time altitude/speed telemetry
– Custom flight path programming
– Enhanced video bitrate control
– Caution: These apps void warranty—use at your own risk
Perfect Takeoff and Landing Sequences
Smooth Takeoff Protocol
- Place drone on level surface away from drafts
- Wait for double green LED blink (VPS active)
- Tap Takeoff—drone ascends to 3-foot hover
- Let stabilize 5 seconds before directional input
Emergency Landing Procedure
- Reduce altitude gradually to 3 feet
- Tap Land or hold left joystick down for 3 seconds
- Wait for all propellers to stop (10 seconds)
- Critical: Never touch props until completely motionless
Final Safety Must-Knows
Despite weighing only 80g (exempt from FAA registration), your Tello demands serious safety practices:
– No-fly zones: Stay 5+ miles from airports, avoid stadiums and national parks
– Weather limits: Max 10 mph winds, 32-104°F temperatures—never fly in rain
– Propeller danger: Spinning blades can cut skin—maintain 3-foot clearance
Your journey from ground-bound to sky-ready starts now. Charge your batteries, perform that pre-flight checklist, and take your first controlled flight in an open field. Within days, you’ll be capturing professional-grade footage that makes friends ask, “Is that your drone?” The sky isn’t the limit—it’s just the beginning.


