
Nothing halts nitro RC enjoyment faster than a malfunctioning pull start system. When you’re ready to race but your pull start won’t engage, you’re left stranded with a silent engine. This comprehensive RC car pull start repair guide delivers proven solutions for common failures like broken springs, stripped gears, and frayed cords. You’ll learn precise diagnostic techniques and step-by-step repair procedures that restore reliable starting without requiring expensive replacements. By the end of this guide, you’ll confidently troubleshoot any pull start issue and implement fixes that keep your nitro RC car running track-ready.
The pull start mechanism serves as your nitro RC car’s ignition system, converting your physical pull into the rapid engine rotation needed for combustion. Inside the housing, a spring-loaded spool stores energy as you pull the handle, then releases it to spin the starter gear against your engine’s flywheel. When components wear or fail—whether from normal use, improper technique, or environmental factors—the entire starting process collapses. Most pull start problems stem from just four key components: the cord, the recoil spring, the starter gear, and the housing assembly. This guide addresses each failure point with specific repair methods, helping you diagnose accurately and fix effectively without unnecessary part replacements.
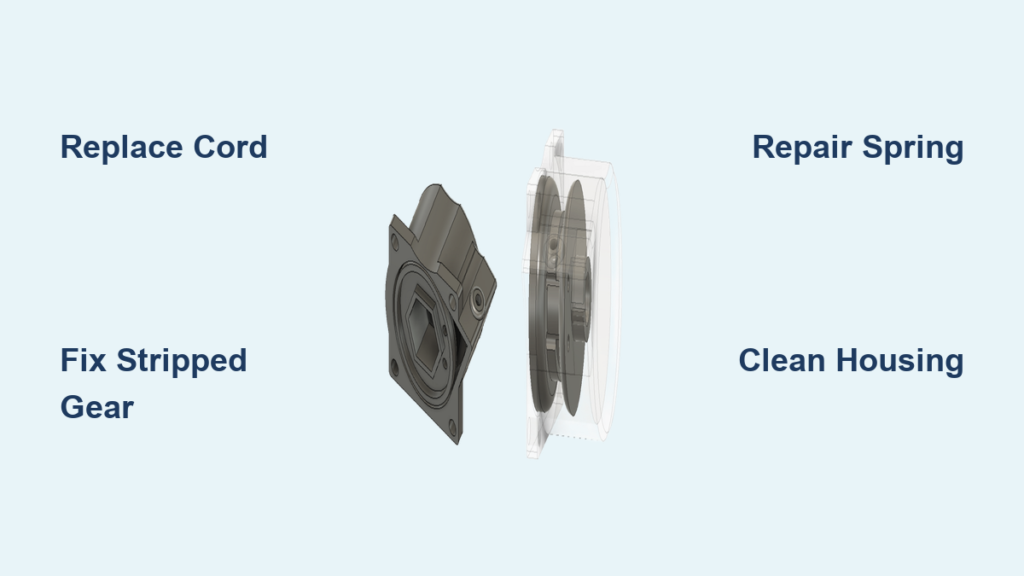
Identify Specific Pull Start Failures
Accurate diagnosis prevents wasted time and money on unnecessary repairs. Before disassembling anything, determine exactly which component has failed through systematic observation and testing. Most pull start issues fall into distinct categories with recognizable symptoms that point directly to the problematic part.
Analyze Pull Resistance and Sounds
Your pull start’s resistance profile and auditory feedback provide immediate diagnostic clues. A properly functioning system delivers consistent, smooth resistance throughout the pull stroke followed by a sharp release. If you encounter grinding or clicking noises during operation, damaged gear teeth or a failing one-way bearing is likely the culprit. A pull start with no resistance indicates a broken or disconnected recoil spring, while excessive resistance often signals debris inside the housing or a spring that’s become over-tensioned. Pay attention to how the handle retracts—jerky or uneven return suggests spring binding or housing damage that requires immediate attention before further use.
Perform Targeted Visual Examination
Remove the housing cover to inspect internal components without full disassembly. Look for visible cord fraying where it attaches to the handle or passes through housing guides. Examine the starter gear teeth for wear patterns, chips, or complete stripping that would prevent proper engagement with the flywheel. Check the recoil spring for rust, corrosion, or physical breaks that compromise its tension. Note any debris accumulation inside the housing, particularly around the spool mechanism where dirt accelerates wear. Document your findings with photos before proceeding—this visual record helps during reassembly and provides reference if problems persist after repair.
Replace Damaged Pull Start Cord
The pull start cord endures tremendous stress with each use, making it one of the most frequently replaced components. Fraying, stretching, or complete breakage typically occurs at stress points near the handle attachment or housing guides. Replacing a worn cord takes less than 30 minutes and often resolves seemingly complex starting issues.
Select Correct Cord Specifications
Choose replacement cord matching your RC model’s requirements precisely. Most nitro vehicles use 2.5-3.5mm diameter braided nylon with sufficient tensile strength to withstand repeated high-force pulls. Measure your old cord’s diameter before purchasing replacement—using undersized cord leads to premature failure, while oversized cord won’t feed properly through housing channels. Quality matters significantly; invest in UV-resistant cord from reputable RC suppliers rather than generic hardware store alternatives that degrade quickly under sun exposure. Some performance models benefit from Kevlar-reinforced cords that resist stretching and provide more consistent pull characteristics over time.
Install New Cord Properly
After removing the old cord, thread your replacement following the exact path documented during disassembly. Secure the handle end using the manufacturer’s specified method—typically a double knot with adhesive or a specialized crimp connector. Wind the spring by slowly pulling the cord outward approximately 15-20 times to achieve proper tension. The correct tension allows full handle extension with smooth resistance that doesn’t bind or feel excessively heavy. Test the mechanism by allowing slow retraction—properly installed cord should retract fully without catching or sticking in the housing guides. Apply a light silicone lubricant to cord contact points to reduce friction and extend service life.
Fix Stripped Starter Gear Problems
The starter gear transfers pull start energy to your engine’s flywheel, making it vulnerable to tooth damage from debris, improper engagement, or metal fatigue. Stripped gears cause slipping, grinding, or complete failure to turn the engine, requiring prompt attention to prevent flywheel damage.
Determine Gear Damage Extent
Examine gear teeth under bright light to assess damage severity. Minor wear showing rounded tooth edges may be serviceable with gear rotation if your design allows it. Significant damage with chipped, cracked, or missing teeth requires immediate replacement. Check for foreign material embedded between teeth that accelerates wear on both the starter gear and flywheel. Test the one-way bearing function by rotating the gear in both directions—it should lock when spun clockwise (as viewed from the pull start side) but rotate freely counterclockwise. Any play or wobble in the gear shaft indicates bearing wear that must be addressed simultaneously with gear replacement.
Install Correct Replacement Gear
Remove retaining hardware securing the damaged gear, taking care not to lose small washers or spacers. Clean the shaft thoroughly before sliding on the replacement gear, ensuring proper alignment with any keyways or splines. Apply light machine oil to the shaft before installation to reduce initial friction. Torque retaining hardware to manufacturer specifications—typically 3-5 inch-pounds for most 1/8 and 1/10 scale models. Test gear rotation manually before reassembly to confirm smooth operation in both directions. If your model uses a press-fit gear, use a proper gear puller and installer to avoid damaging shafts or housings during replacement.
Resolve Recoil Spring Failures

The recoil spring provides the power for your pull start system, storing energy during the pull stroke and releasing it to spin the engine. Spring failures manifest as weak pulls, complete loss of resistance, or uneven tension that prevents reliable starting.
Diagnose Spring Condition Accurately
A spring that’s lost tension produces weak resistance that won’t spin the engine fast enough for ignition. Complete spring breakage results in zero resistance—the handle pulls out freely without engaging the mechanism. Springs that have unwound from their anchor points cause inconsistent resistance and potential binding during operation. Corroded springs not only lose tension but can damage housing components as they unwind unevenly. Test spring integrity by slowly pulling the handle while observing the spool mechanism—healthy springs wind evenly onto the spool without catching or skipping.
Replace Spring Safely
Discharge spring tension completely before attempting removal. Carefully unwind the outer spring end from its housing anchor point while controlling the spool rotation. Note the spring’s winding direction and anchor positions before removal—recoil springs must be installed with correct orientation to function properly. Install the new spring by securing the inner end to the spool first, then carefully winding the outer end to its housing anchor point. Reattach the cord and handle, then tension the spring by slowly pulling the cord 15-20 times. Test the mechanism with controlled pulls to verify smooth operation before final reassembly.
Implement Preventive Maintenance
Regular maintenance prevents 80% of common pull start failures. Dirt accumulation, fuel residue, and lubricant degradation inside the housing accelerate wear on all components. A simple monthly maintenance routine dramatically extends pull start lifespan.
Clean Housing Thoroughly
Disassemble the pull start mechanism on a clean work surface, photographing component positions before removal. Clean metal parts with isopropyl alcohol and a soft brush to remove fuel residue without damaging components. Remove all old lubricant from gear teeth and spring coils where it attracts debris. Inspect housing channels for burrs that could damage new cord during operation. Dry all components completely before reassembly—trapped moisture causes rapid corrosion in RC mechanisms. Replace worn gaskets or seals during reassembly to prevent future contamination.
Apply Correct Lubrication
Use manufacturer-recommended lubricants specifically designed for RC pull start systems. Apply light machine oil to spring coils and gear shafts—avoid heavy greases that attract dirt. Lubricate gear teeth sparingly with silicone-based assembly lube to reduce wear without attracting debris. Never over-lubricate, as excess oil becomes sticky and traps dirt that accelerates component wear. Test all moving parts for smooth operation before final reassembly, adjusting lubrication amounts based on component movement.
Determine Repair vs. Replacement
Knowing when to repair versus replace saves time and money. Simple component failures often justify repair, while multiple damaged parts or housing cracks typically warrant complete assembly replacement.
Evaluate Cost-Benefit Factors
Compare the total cost of individual replacement parts against a complete new assembly. If your housing is cracked or multiple internal components show wear, replacement often costs less than piecemeal repairs. Consider your time investment—some repairs take longer than installing a new assembly. For older or discontinued models, repairing may be your only option if complete assemblies are unavailable. Performance-oriented racers often upgrade to reinforced assemblies rather than repairing stock components to enhance reliability during competition.
Follow Diagnostic Decision Process
Use this simple flow to determine the best course: If only the cord is damaged, replace it. If the spring shows fatigue but housing is intact, replace the spring. If starter gear damage is isolated, replace just the gear. If multiple components show significant wear or housing is damaged, replace the entire assembly. For rare models with limited parts availability, repair what you can and use the old assembly as a parts source for future failures.
Regular pull start maintenance prevents most starting problems before they occur. By implementing proper usage techniques, following a consistent cleaning schedule, and addressing minor issues promptly, you’ll enjoy reliable starting performance for countless runs. When repairs are necessary, approach them methodically with quality parts that match your RC car’s specifications—this attention to detail ensures your pull start system delivers consistent performance whenever you’re ready to race.


