
Your RC car suspension setup determines whether you’re sliding through corners or dominating the track with precision handling. The intricate relationship between shocks, springs, and geometry components creates the foundation for all performance—without proper tuning, even the most expensive RC vehicle handles like a brick. Competitive racers and serious hobbyists know that mastering suspension setup transforms unpredictable handling into consistent lap times, regardless of whether you’re racing on carpet, asphalt, or rough off-road terrain. This guide reveals the exact adjustments that deliver measurable improvements to your vehicle’s behavior, with specific techniques for optimizing each component based on real track conditions rather than guesswork.
The suspension system in your RC vehicle serves as the critical interface between chassis and track surface. Unlike full-scale vehicles where suspension addresses passenger comfort, RC car suspension setup focuses entirely on maintaining optimal tire contact under racing stresses. Every bump, jump, and cornering force challenges your suspension’s ability to keep tires planted—making proper setup the difference between competitive lap times and frustrating sliding. Modern RC vehicles offer extensive adjustment options precisely because track conditions, driving styles, and performance requirements vary dramatically—one setup that dominates on high-traction carpet may fail completely on loose dirt, and the reverse is equally true.
Throughout this guide, you’ll discover how each suspension component contributes to handling, which adjustments produce specific effects, and how to develop a systematic approach to setup work that delivers consistent results. By the end, you’ll possess the knowledge to transform your RC vehicle’s handling characteristics to match your specific needs and preferences.
Fix Shock Oil Viscosity for Instant Handling Changes
The oil inside your shocks represents one of the most impactful adjustments available to RC racers. Changing shock oil viscosity delivers immediate, noticeable effects on how your vehicle responds to track conditions, making this the first adjustment to master when tuning your RC car suspension setup.
Select the Right Oil Weight for Your Track
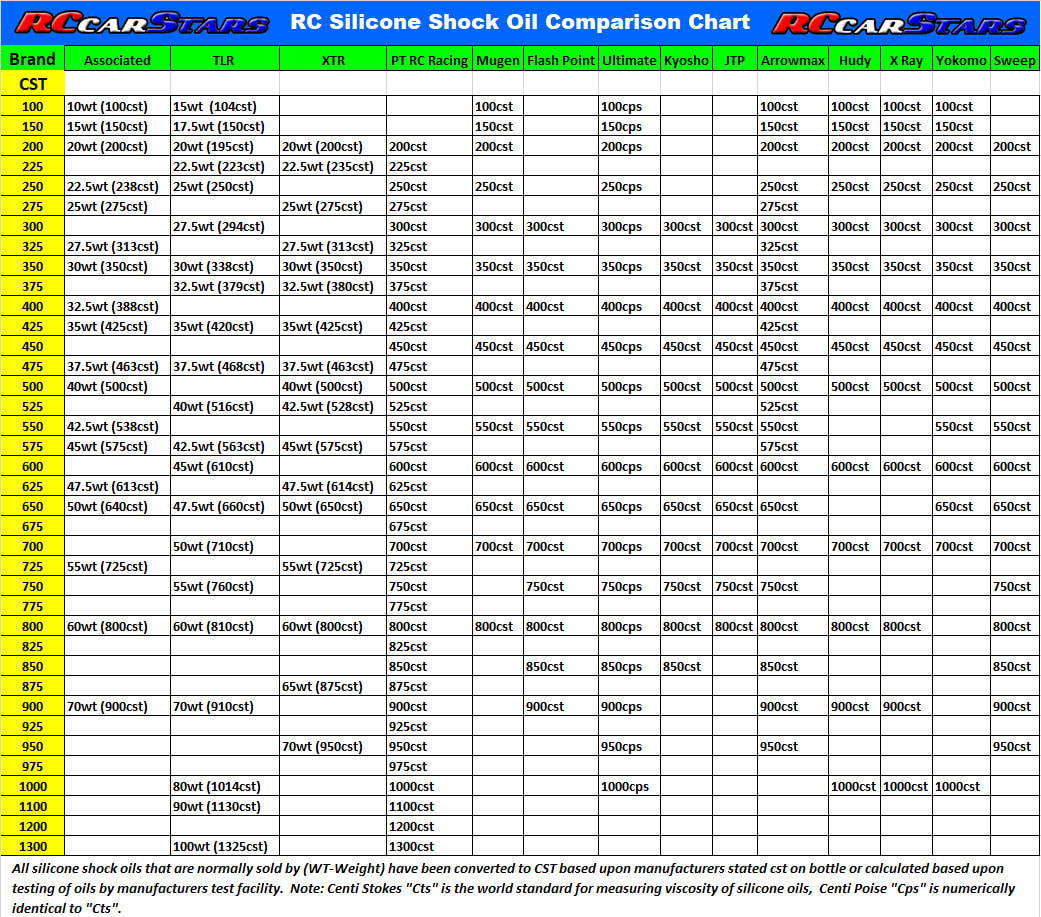
Thicker oil (higher viscosity rating) provides firmer damping, reducing suspension compression and maintaining higher ride height during cornering. This configuration typically improves stability and reduces body roll, making it ideal for high-grip tracks like prepared carpet or smooth asphalt. Competitive racers often select heavier oils in the 400-500cP range for maximum handling precision on these surfaces. However, thicker oil may compromise traction on bumpy surfaces or when landing jumps, as the firmer suspension fails to absorb smaller imperfections.
Pro Tip: Start with manufacturer-recommended oil weights as your baseline, then adjust thinner for rougher surfaces or thicker for smoother tracks. The difference between 350cP and 400cP oil can transform an unstable car into a cornering machine on high-traction surfaces.
Match Piston Designs to Your Driving Style
Shock piston hole configuration significantly affects damping characteristics across different speed ranges. Two-hole pistons generally provide balanced damping between compression and rebound, offering predictable behavior that works well as a starting point. Racers competing on high-traction surfaces often prefer six-hole pistons combined with heavier oil to prevent excessive body roll during aggressive cornering. The additional holes create more restrictive flow at higher piston speeds, actually increasing damping force when needed most.
Four-hole pistons occupy a middle ground, providing damping characteristics between the compliance of two-hole designs and the firmness of six-hole options. Many racers find four-hole pistons offer versatility across varying conditions, particularly when track traction levels fluctuate throughout a race day.
Set Perfect Ride Height for Your Track Conditions

Ride height—the static distance between your chassis and ground—affects weight distribution, suspension travel availability, and overall handling balance. Setting ride height correctly establishes the foundation upon which all other suspension adjustments build, making this one of the first parameters to address when beginning setup work.
Balance Front and Rear Heights for Optimal Handling
Front and rear ride height can be set independently, allowing for weight distribution adjustments that fundamentally alter handling characteristics. A higher front end relative to rear typically increases rear grip and can reduce understeer tendencies, as the rear suspension works with more travel available. This configuration suits drivers who prefer initial turn-in responsiveness but want to reduce mid-corner understeer that limits exit speed.
Conversely, a higher rear end may increase front grip and reduce oversteer tendencies, beneficial for drivers who struggle with rear traction during cornering. The key lies in recognizing your driving style and track preferences, then adjusting front-to-rear ride height to complement rather than fight your natural tendencies.
Control Droop for Consistent Cornering Behavior
Droop settings limit downward suspension travel beyond the static ride height position, ensuring consistent handling regardless of how long corners or straight sections allow the chassis to settle. Without droop limits, suspension can extend beyond intended positions during long corners, changing ride height mid-corner and altering handling characteristics unpredictably.
Setting droop requires extending the suspension to its fully extended position, then adjusting the limiting screw to allow a specified amount of downward travel. Most vehicles have recommended droop settings from manufacturers, though track conditions and driver preferences often necessitate adjustments from these baselines. Higher droop (more extension available) increases ride height variation and can improve traction on some surfaces, while lower droop maintains more consistent handling.
Adjust Camber for Maximum Cornering Grip
Camber angle describes the tilt of the wheel when viewed from the front of the vehicle—negative camber, where the tops of wheels tilt inward, typically improves cornering grip by keeping the tire contact patch more perpendicular to the track surface during lateral loading forces.
Measure and Set Camber at Ride Height
Camber adjustment typically occurs through suspension arm mounting positions or dedicated camber adjustment blocks. Most competitive RC vehicles allow independent adjustment of front and rear camber, with typical racing specifications ranging from slightly negative to significantly negative camber angles depending on application and track surface. On high-grip carpet or prepared surfaces, more negative camber in the two to four degree range often improves cornering performance.
Critical Mistake to Avoid: Setting camber with the vehicle off the ground produces inaccurate measurements. Always measure camber at ride height to ensure the setting reflects actual operating conditions, as suspension movement changes camber angles throughout travel.
Adapt Camber to Surface Conditions
On loose surfaces or clay tracks, less negative or even slightly positive camber may provide better overall traction by reducing the tendency for tires to dig into loose material. The degree of negative camber directly affects how much grip the tire generates through corners, with more negative camber generally increasing grip up to a point before diminishing returns or tire wear becomes problematic.
Optimize Toe Settings for Steering Precision
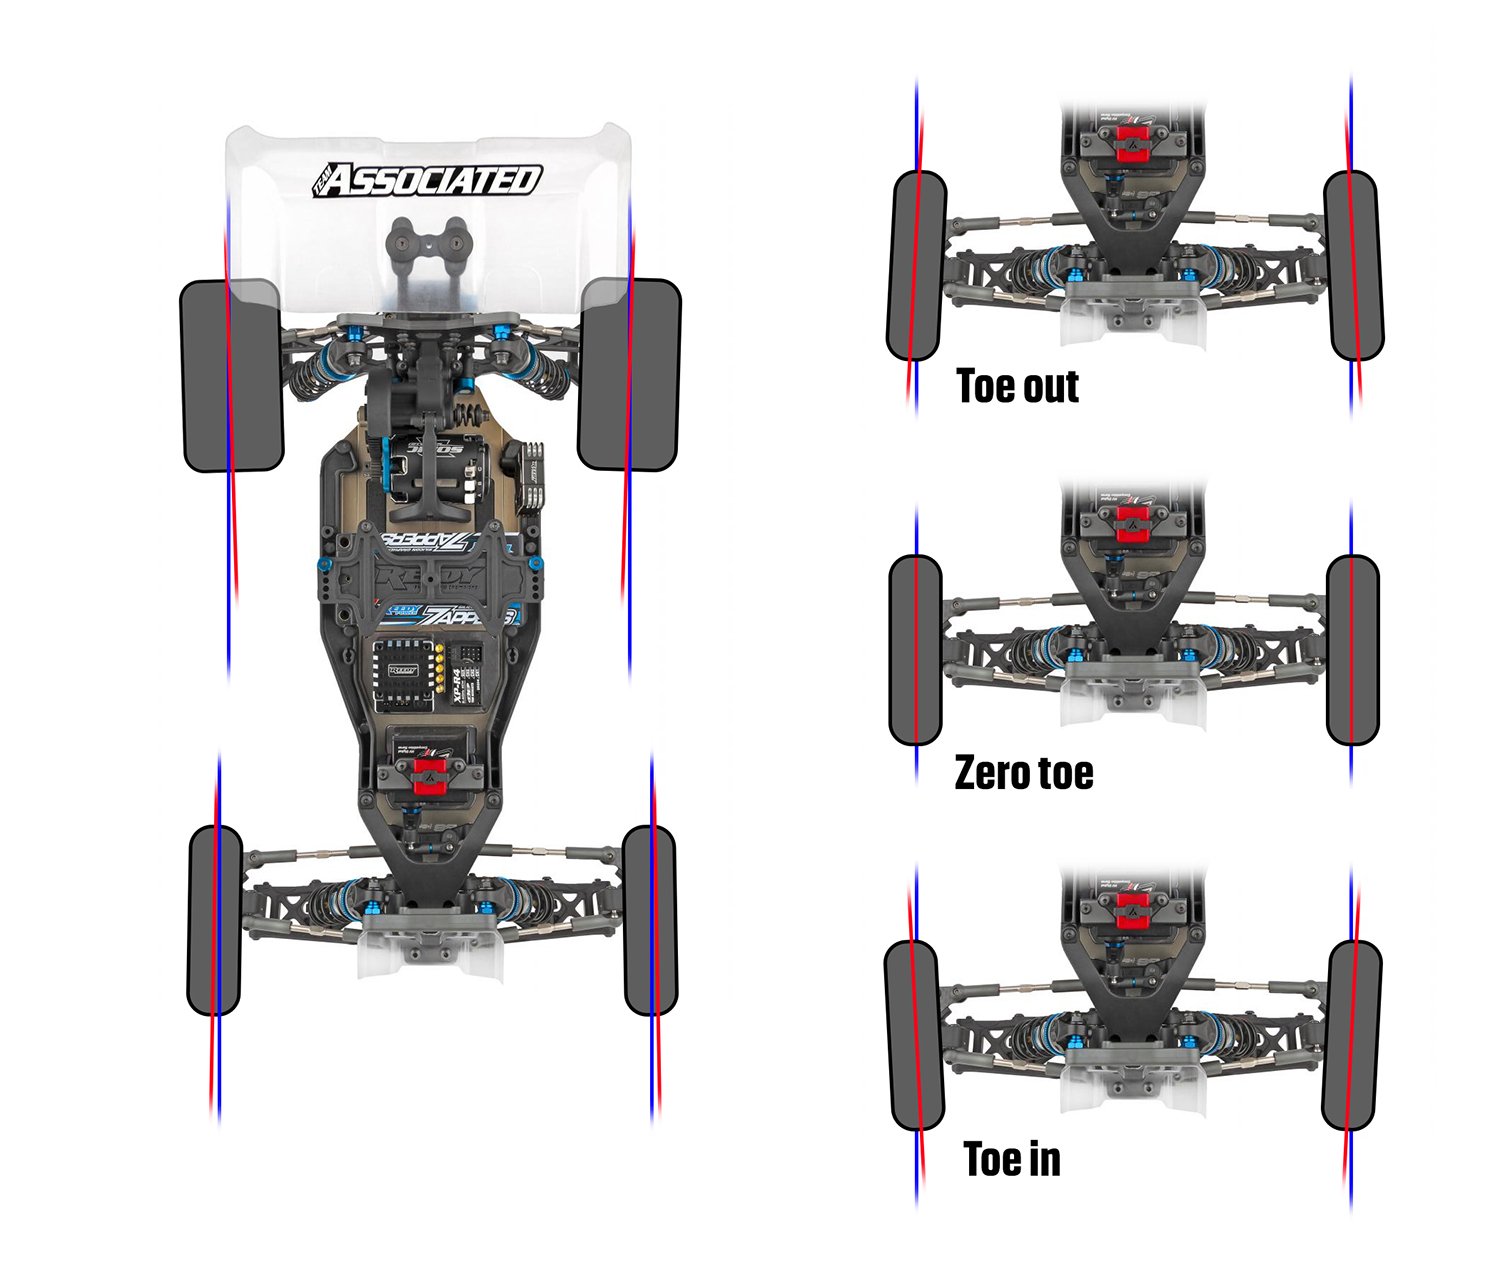
Toe angle determines whether the fronts of the wheels point inward (toe-in) or outward (toe-out) relative to the vehicle’s centerline. This adjustment directly affects steering response and straight-line stability, making it essential for fine-tuning your RC car suspension setup.
Front Toe Configuration for Turn-In Response
Front toe-out, typically ranging from one to three degrees, improves turn-in response and initial steering feel, while front toe-in enhances straight-line stability at the cost of initial turn sharpness. Drivers preferring more aggressive turn-in can increase toe-out, while those struggling with nervous steering on straights may reduce toe-out or even experiment with slight toe-in.
Rear Toe Settings for Stability and Rotation
Rear toe-in remains the standard configuration for most RC racing applications, typically ranging from two to four degrees depending on vehicle type and track conditions. Rear toe-in increases straight-line stability, reduces traction rolling during acceleration, and provides a more predictable handling baseline for developing drivers. Technical tracks where rotation ability takes priority may benefit from reduced rear toe-in or even slight toe-out, though this configuration requires experienced drivers to manage the increased rotation tendency.
Tweak Caster Angles for Better Stability
Caster angle, the tilt of the steering axis when viewed from the side, influences straight-line stability and self-centering behavior of the steering system. RC cars typically feature caster angles between twenty-five and forty-five degrees depending on design and intended application.
Lower Caster for Technical Tracks
Lower caster angles reduce steering effort and can improve initial turn-in response, making them suitable for technical tracks where quick steering inputs matter more than high-speed stability. This configuration benefits drivers who prioritize agility through tight sections but may sacrifice some high-speed stability.
Higher Caster for Speed Stability
Higher caster angles improve straight-line stability and provide more consistent camber gain through the steering range, valuable on high-speed tracks where maintaining direction takes priority over aggressive cornering. The self-centering effect of higher caster also reduces steering fatigue during long races, as the wheels naturally seek center rather than requiring constant driver input to maintain straight-line direction.
Tune Off-Road Suspension for Rough Terrain
Off-road RC applications present unique challenges that demand specialized suspension approaches. The varied terrain, vertical obstacles, and high-impact nature of off-road driving require suspension setups optimized for travel, compliance, and durability rather than the precision focus of on-road racing.
Maximize Shock Travel for Jump Landings
Off-road vehicles require significantly more suspension travel than their on-road counterparts to handle jumps, rough terrain, and vertical obstacles effectively. Shock length directly determines maximum suspension travel, with longer shocks providing greater wheel movement but requiring appropriate mounting points and clearance considerations.
Shock positioning on off-road vehicles often uses the full range of mounting positions available on shock towers and suspension arms. Moving shocks to outer positions on towers increases leverage, effectively softening the suspension without changing springs, while inner positions increase firmness.
Select Springs for Variable Terrain
Off-road spring selection must accommodate the dramatic variation in terrain encountered during operation. Progressive rate springs address this dual requirement effectively, providing compliance for small bumps while increasing resistance as travel increases to prevent bottoming on larger impacts. This progressive nature makes them particularly valuable for off-road applications where terrain variety demands both compliance and bottoming resistance.
Maintain Your Suspension for Long-Term Performance
Regular maintenance ensures your suspension performs consistently over time and protects your investment in quality components. The demanding conditions of RC operation accelerate wear in suspension parts, making regular inspection and maintenance essential for sustained performance.
Establish a Shock Maintenance Routine
After each race meeting or significant driving session, inspect shocks for oil leaks, examine seals for wear, and check for visible damage to shock bodies or shafts. Oil changes should occur at regular intervals, with frequency depending on usage intensity and operating conditions. Dusty or muddy environments require more frequent maintenance than clean indoor carpet facilities.
When rebuilding shocks, matching oil quantities between shocks on the same axle maintains balanced handling, as even small differences in oil level produce noticeable handling imbalances. Taking time during rebuilds to inspect all components—shock bodies for scoring or damage, piston heads for wear or clogging, springs for fatigue or damage—identifies parts needing replacement before they fail completely.
Inspect Pivot Points and Springs
Springs should be inspected regularly for signs of fatigue, settlement, or physical damage. While quality springs maintain their rate for extended periods, repeated compression cycles eventually affect spring characteristics. Checking springs for signs of physical damage, measuring spring length to verify they haven’t settled, and replacing springs showing any degradation maintains consistent suspension performance.
Hinge pins, bushings, and other suspension pivot points require periodic inspection and lubrication to maintain smooth operation. Worn bushings or pins introduce slop into suspension movement, compromising handling precision and potentially causing inconsistent behavior that gets attributed to setup problems when worn components are actually the cause.
Mastering your RC car suspension setup transforms your vehicle from a limitation into a competitive advantage. By systematically adjusting shock oil viscosity, spring rates, ride height, camber, toe, and caster while maintaining components properly, you’ll develop the intuitive understanding needed to adapt quickly to changing track conditions. Start with manufacturer baseline settings, document everything you change, and evaluate results methodically—this systematic approach, combined with regular maintenance, delivers consistent handling that lets you focus on driving rather than fighting your setup. Your chassis and tires can only perform as well as your suspension allows—give them the opportunity to excel through proper setup, and your RC vehicle will reward you with handling that makes every drive more rewarding.


